
The Bunnings Workshop community can help with your home improvement projects.
- Bunnings Workshop
- >
- Discussion
- >
- Garage and Shed
- >
- Re: D.I.Y. shed workbench makeover
D.I.Y. shed workbench makeover
- Subscribe to RSS Feed
- Mark Topic as New
- Mark Topic as Read
- Float this Topic for Current User
- Bookmark
- Subscribe
- Mute
- Printer Friendly Page
Share
- Mark as New
- Bookmark
- Subscribe
- Mute
- Subscribe to RSS Feed
- Highlight
- Report Inappropriate Content
D.I.Y. shed workbench makeover
An easy-to-build workbench with a massive amount of workspace, pegboard storage, top shelf storage and room underneath for items / storage.

THE SCENARIO
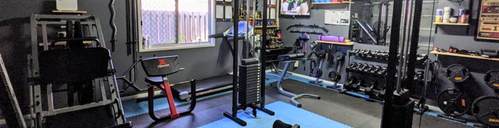
My wife is the DIY person of the house, easily more tools savy than me, however she is also 6 months pregnant and her shed is an absolute mess in my eyes (Note: It's one of those situations where it's organised in her way so finding items was easy for her). I wanted to build her something that had some heart in it, looked nice and was practical. I never took a picture of the shed before, but here is how it was laid out:
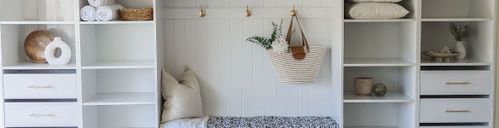
The above layout was chaotic, things were stored everywhere, it didn't function and you couldn't do anything in there, things poked out (like the lawnmower) and it was just bad, cue my new design:

As you can see, things are much nicer.
THE LOCATION
The Bench will be inside our shed, an Absco Space Saver Single Door Garden Shed.
THE PROJECT
I Researched a ton of designs and eventually came up with the following:

The idea was to have it tall enough to be a good workbench, with the top shelf being low enough to accomodate the sloaping of the Absco shed so that you could easily store bulky items + reach and grab them. There would be a large pegboard along the back of the workbench for the majority of storage, while two smaller pegboards would cover the front top shelf supports. The height of the bench ensured we would be able to store items such as the scarifier and mower under it with ease. Late in the process, my dad suggested we place a third support on the frame in the middle to make it more stable and support the pegboard better.
THE TOOLS
I used the following tools:
- Ryobi One+ 18V Cordless Brad Nail Gun
- Ryobi 18V ONE+ HP Brushless Circular Saw
- Ryobi 18V ONE+ Drill Driver
THE MATERIALS
I purchased the following Materials:
- 6x Pine Structural MGP12 Blue H2 70x35MM 3.6m (I/N: 8031371) @ $20.30 each
- 1x Masonite Pegboard 1830 x 1220mm (I/N: 0244199) @$68.30
- 1x Plywood Non Structural C+/C 2440x1220x12mm (I/N: 0340355) @ $39.00
- 1x Pine Moulding FJ Splayed 42x11mm 5.4M Clear (I/N: 0020825) @ $8.10
- 1x Pine DAR FJ Clear 31x11mm 5.4m (I/N: 0020814) @$6.69 (Used as braces in various places)
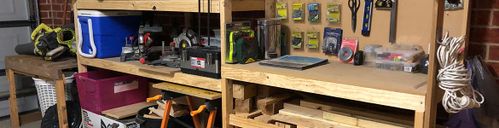
THE BUILD
Due to the nature of the small shed, the project was built in stages before moving it into the shed and installing. I first spray painted the pegboard. Using the 70x35mm Pine I created the Left & Right supports first, these were secured to the sheds floor & walls for extra support. The Third support beam was then added before the two horizontal pine pieces were installed to complete the basic frame. We then cut the Plywood to create the main bench and secured it into place. Finally, the top shelf including the front support and back pegboard support was created, installed and secured, ensuring everything is level. We then cut the Plywood again to create the top shelf bench. The Bench was finished off using the Pine Moulding to give it a nice finish. The Pegboard was then cut to size and installed, with the leftover material created into a backboard (mounted using the Pine DAR) which houses some of our long garden items.

PAINTING
Even though it's in a small Shed, I wanted the Bench and Work area to look like an inviting place to work, so I opted into the following:
- The Pegboard was spray painted using Rust-Oleum 2x Ultra Cover Flat Grey Primer (I only needed 1 can).
- The Frame was painted using Dulux 1L Design Theatre Black Paint.
- The Bench & Top Shelf had 2 coats of 1L Cabot's Cedar Satain Stain & Varnish applied to it.

The Contrast of all 3 colours played out so nice, I was especially happy with how the Black Moulding created this nice black line in between itself and the Varnish.

I wasn't really too fussed on being clean at this stage, in the end this is a shed, and most of it will be covered with items. Once the Varnish Dried I did go back and fix up a lot of the Varnish that had gone onto the pegboard.


Filling & Finishing Touches
Once this was finished, it was up to my wife to fill this as she pleased.

We ended up having two spare LED Cabinet Lights with Twilight Sensor that we picked up from ALDI last year, these are no longer available to my knowledge. These lights are bright enough to illuminate the shed in the dark, and turn on as soon as we enter.

We also installed two large Pinnacle Large PVC Coated J Hooks to hang our 2 Saw Horses up, who never had a home prior to this.

The Final piece of the puzzle was some storage shelves for our smaller items such as screws and wrenches, we were originally going to build these under the unit but opted to just purchase the Craftright 24" 6 Drawer Rolling Cabinet And Chest to finish it all up. We are super happy with the project, it's something I take a lot of pride having completed and look forward to the additions we make to it in the future.

- Mark as New
- Bookmark
- Subscribe
- Mute
- Subscribe to RSS Feed
- Highlight
- Report Inappropriate Content
Re: D.I.Y. shed workbench makeover
Welcome to the Bunnings Workshop community @Ritar. It's brilliant to have you join us, and many thanks for your question about this wonderful project.
Let me mention @Remarka6le, so they are alerted to your kind comment, and hopefully, they can let you know where they go the tool stand.
We look forward to hearing all about the projects and plans around your house and garden. Please reach out anytime you need assistance or have something to share.
Mitchell
- Mark as New
- Bookmark
- Subscribe
- Mute
- Subscribe to RSS Feed
- Highlight
- Report Inappropriate Content
Re: D.I.Y. shed workbench makeover
Hey @Ritar,
Thank you! She's in there at least an hour every day 😅.
My wife got that from an Aldi special buy, they come around every Spring / Summer. They're called the Gardenline Corner Tool Holder and they cost like, $25? They're an awesome add to any shed.
- « Previous
-
- 1
- 2
- Next »
Why join the Bunnings Workshop community?
Workshop is a friendly place to learn, get ideas and find inspiration for your home improvement projects
You might also like

We would love to help with your project.
Join the Bunnings Workshop community today to ask questions and get advice.