
The Bunnings Workshop community can help with your home improvement projects.
- Bunnings Workshop
- >
- Discussion
- >
- Bathroom and Laundry
- >
- How to correctly grout after adhesive fo...
How to correctly grout after adhesive for wall tiling?
- Subscribe to RSS Feed
- Mark Topic as New
- Mark Topic as Read
- Float this Topic for Current User
- Bookmark
- Subscribe
- Mute
- Printer Friendly Page
Share
- Mark as New
- Bookmark
- Subscribe
- Mute
- Subscribe to RSS Feed
- Highlight
- Report Inappropriate Content
How to correctly grout after adhesive for wall tiling?
Hey team.
We’re finally here, the final stages of our laundry renovation.
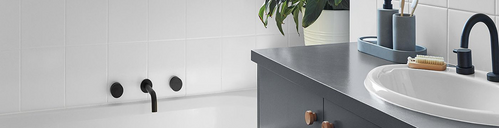
I ended up getting some tilers to come in and lay down these arabesque wall tiles for us (porcelain) because they were tricky to do myself and the walls were not plumb, so this presented challenges in doing it.
I’m glad I did, however I need to grout now. They laid the tiles 24 hours ago and I’m wanting to lay down a white grout to match the glossy tiles.
My concern is, based on googling, how much trouble having some adhesive between the tiles will be? I’ve cleared out as much as possible as it was drying, without causing movement of the tiles but I’m concerned that if I grout over this dark adhesive with white grout, it may show through or not take properly. There’s no adhesive that is raised above the tiles but there is some that is stuck to the sides etc as you can see in the photos.
Am I just over thinking it and this will be fine to just grout or do I need to take a Stanley knife to every single bit of adhesive that’s between these tiles.
For reference the grout I’m going to use is dunlop ready to go ultra white grout.


- Mark as New
- Bookmark
- Subscribe
- Mute
- Subscribe to RSS Feed
- Highlight
- Report Inappropriate Content
Re: How to correctly grout after adhesive for wall tiling
Hello @dchur
Your assessment is correct, the glue that has risen into the grout line must be removed or at least levelled down. This will allow the grout to go deep into the gap, the issue with grouting now means that if the grout is too shallow it will not anchor properly to the side of the tile, and when it cures it will be very weak and fail.
I suggest inspecting all the grout lines and modifying those areas that have excessive adhesive. You can then be confident that when you start grouting it will go in deeply and not fall out.
Please note that due to the current weather system passing through, I suggest giving the tile adhesive a few more days to cure to make sure that there is no more moisture under the tiles. Grouting too early can lead to grout or tile failure as the moisture has nowhere to escape and it compromises the tile adhesive.
If you have any other questions we can help with, please let us know.
Eric
- Mark as New
- Bookmark
- Subscribe
- Mute
- Subscribe to RSS Feed
- Highlight
- Report Inappropriate Content
Re: How to correctly grout after adhesive for wall tiling
Thanks for the reply Eric!
Bummer. Ive spent the last two hours removing most of the grout that I think is problematic. I assume I don't need to remove absolutely all of it but enough so there's at least a few mm of depth to fill in.
Is there a limit to how long we Can wait to grout? To play it safe I'm thinking to give it 3 days total to dry before grouting especially because it's a white grout and the adhesive was dark as you can see. I guess I just don't want any chance of the adhesive leeching through
- Mark as New
- Bookmark
- Subscribe
- Mute
- Subscribe to RSS Feed
- Highlight
- Report Inappropriate Content
Re: How to correctly grout after adhesive for wall tiling
Hi @dchur,
Thank you for your question. Not to worry, this is a normal step when it comes to tiling.
Ideally, you have a couple of millimetres of depth for grout between each tile. The trick is to ensure you compress the grout into the gap by running your float, such as the QEP Home Pro Grout Float, at an angle across the grout lines before sponging it al down to tidy up.
There is no limit to how long you can wait to grout, so giving it a couple of days to fully cure would be beneficial to ensure good adhesion.
Let us know if you have any further questions and keep us updated with the progress, it would be great to see the finished product.
Jacob
Why join the Bunnings Workshop community?
Workshop is a friendly place to learn, get ideas and find inspiration for your home improvement projects
We would love to help with your project.
Join the Bunnings Workshop community today to ask questions and get advice.