The Bunnings Workshop community can help with your home improvement projects.
- Bunnings Workshop
- >
- Featured Projects
- >
- Board and batten feature walls
Board and batten feature walls
Share
- Subscribe to RSS Feed
- Mark as New
- Mark as Read
- Bookmark
- Subscribe
- Printer Friendly Page
- Report Inappropriate Content
MDF panels, moulding and fresh paint used to create feature walls in a home entryway.

The project
We have recently moved into our home which was built in the early 1950s and found there is much work to be done. We decided to start with a fun project to get us motivated and what better way than to add some features and paint. The entire project took us roughly three weekends to complete, as this extends the entire length from our front door to our dining/living area.
Tools and materials
- Paint: Porters 2L French Green eggshell finish
- 9mm MDF Panel Standard 2440 x 1220mm (to cut for boards)
- Trim: Tasmanian Oak Moulding Scotia
- Powerfit 32mm C1 series electro galvanised nails
- UNi-PRO Gap filler
- 240 grit sandpaper
- UNi-PRO paint roller
- Monarch paint brush
- Painter's tape.
Tools used in the project:
Steps
Step 1
First and foremost, prepare the wall by filling any holes or sanding back trouble spots and then clean the area. This will ensure no dirt or grime is left on the walls and will leave a smooth finish.
Step 2 - Time to measure
Decide the height and spacing of the battens. A common height for the battens is around two thirds of the wall height, but you can adjust it to your preference.
Use a measuring tape, level, and pencil to mark the desired height of the battens on the wall. Ensure that the marks are level. We used a handy calculator to help with getting exact spacing. There are tons of sites online, but we used Slat Gap.
Step 3 - Make the cuts
Cut the MDF to the length and width for your desired look. We decided to have our battens 100mm wide and a total height of 1330mm. We wanted to make sure that it didn't interfere with the light switches.
The length of each board was roughly 1060mm, however, there were some adjustments to be made due to our uneven walls. The top horizontal batten was measured to fit the length of the wall. This occasionally meant using more than one board.
On the right hand side of the entrance door, we decided to add in coat hooks and a shelf, so we extended the height to a total of 1910mm. We used a circular saw for the longer cuts and mitre saw for the short. Don't forget your PPE (safety goggles and ear plugs) for this step.
Husband's helping hands to measure twice before cutting.
 (297 × 210mm) (Instagram Story).png")
Using a mitre saw to cut the lengths.

Step 4 - Install horizontal battens
Attach the horizontal battens to the wall. We used a nail gun but you can use a hammer and nails, although this increases the size of your gaps to fill later. Ensure they are level and aligned with the marked height of the battens. You can use a stud finder to nail them into the wall studs for added stability.
Double checking the level.

Step 5 - Install vertical battens
Align your vertical battens against the pre-spaced marks on your wall. We made sure to double check the spacing along the way. Secure the battens to the wall using a nail gun or hammer and nails.
Spacing of the battens.

Secured vertical battens.

Step 6 - Install trim
Cut and measure your trim to fit along the top of your horizontal batten. Use a nail gun or liquid nails to attach.
Using a nail gun to secure trim to wall.

Step 7 - Make it smooth
Fill any nail holes or gaps between the boards with gap filler. Allow it to dry and then sand the patched areas until smooth. Give your boards and trim a light sand to prep for painting. We used 240 grit.
Step 8 - Paint away
Use painters tape on any wall surface you don't want to get paint on. Using the detail brush, do the inside corners first and then the roller brush to create a smooth finish.
Tip: I wish that we painted the trim before attaching and then touching up after nailing it. This would have prevented us from needing to tape up the wall and needing to cover and recover paint bleed from the tape.
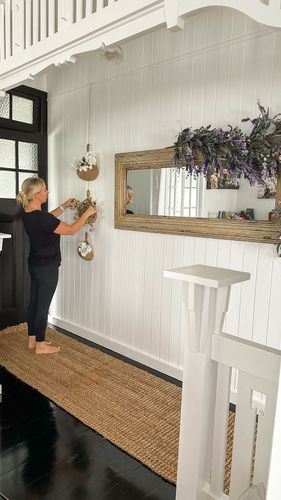
Step 9 - Enjoy your hard work
This was a really fun project that we absolutely loved. The next step is to replace the shelf with one that doesn't stick out so much, add a bench seat, and then onto relocating the electrical box and replacing with a nice side light window.
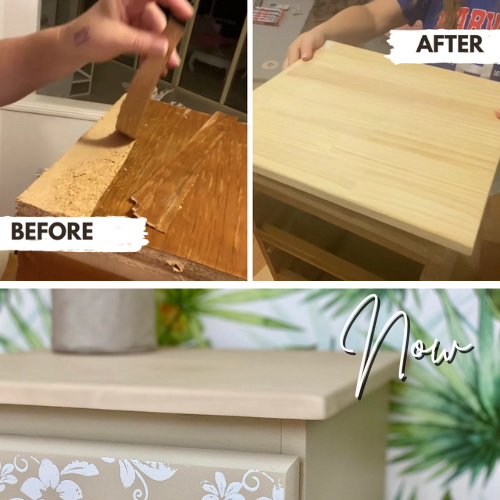
Before and after


More inspiration for your wainscoting project
Community member kileycarbin used wallpaper and bright paint on her entryway wainscoting feature wall.

Workshop member Rufaro transformed a plain room with a wainscoting feature wall.

Check out our 5 feature walls with wainscoting for more great ideas from our clever and creative community members.
- Mark as Read
- Mark as New
- Bookmark
- Highlight
- Report Inappropriate Content
Looks amazing ! Great work and very well executed 👍🏾
- Mark as Read
- Mark as New
- Bookmark
- Highlight
- Report Inappropriate Content
Hi @Tinker_Bell, I have just come across this post, and it is timely, as I am about to do this in my daughters room!
Your step by step is SO helpful, thank you! You have done a wonderful job!
Can I ask, did you use gap filler/caulk etc for around the edges of the boards and the walls, or just for the joins of the boards? I hope this make sense!!!
Thanks once again for the detailed steps!
- Mark as Read
- Mark as New
- Bookmark
- Highlight
- Report Inappropriate Content
Evening @Tinker_Bell
Oh thats a WIN! I was just staring at the blank alcove with my head off thinking about stuff and then I scrolled... and reveresed and scrolled again!
Absolutly love it!, Right down to the door (how did you fill the lines or ??) and the new light you have! The foyer as it deserves to be calle now really suits the space.
Dave
- Mark as Read
- Mark as New
- Bookmark
- Highlight
- Report Inappropriate Content
Hi @Kelli-H,
Hopefully @Tinker_Bell can get back to you, but I suspect you might need to use caulking sparingly around the edges of the boards and wall if gaps are present. If you can achieve a nice fitment, caulking might not be required as the paint will cover tiny gaps. If the boards are not flush against the wall, caulking will hide those issues.
Here's a helpful guide: How to apply silicone sealant.
Please let us know if you have any questions.
Mitchell
- Mark as Read
- Mark as New
- Bookmark
- Highlight
- Report Inappropriate Content
- Mark as Read
- Mark as New
- Bookmark
- Highlight
- Report Inappropriate Content
Hi @Kelli-H,
@MitchellMc is on the money as usual! We really only used it when there was gapping. I am excited to see how your daughter's room turns out, please tag me when the post is up.
@Dave-1 the door came with the house (lucky I know) and the light I got second hand. We love our entrance and we have yet to make our bench seat but it will come.
And thank you @diy_hausdesigns 😊
Tinker_Bell
Why join the Bunnings Workshop community?
Workshop is a friendly place to learn, get ideas and find inspiration for your home improvement projects