The Bunnings Workshop community can help with your home improvement projects.
- Bunnings Workshop
- >
- Featured Projects
- >
- Luxury D.I.Y. bathroom renovation with b...
Luxury D.I.Y. bathroom renovation with bathtub
Share
- Subscribe to RSS Feed
- Mark as New
- Mark as Read
- Bookmark
- Subscribe
- Printer Friendly Page
- Report Inappropriate Content
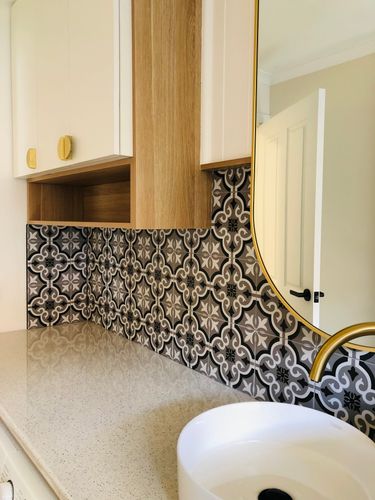
This stunning bathroom makeover features brass shower hardware, frameless shower screens and stylish tiling.
- The project
- Demolition
- Installation
- Tiling
- Finishing touches
- Before and after
- How to plan a bathroom renovation
- More bathroom renovation ideas

The project
Our main bathroom was small and dated and had all the original features from when the house was built. We set out to design a bathroom from scratch as part of our full house renovation.
From working out how to fit a bathtub, shower and vanity into a small space to selecting all the products and finishes to create a light, bright and clean look, we completed almost every aspect of the bathroom renovation ourselves over a couple months. The only trade we employed was a plumber, who roughed in the new plumbing. What was once a dated, pink bathroom is now a light and bright space.

Demolition
We started by demolishing the whole bathroom: removing the tiles and linoleum flooring, removing the plasterboard walls, dismantling the old vanity and sink, removing the glass shower screen divider and removing the old corner spa bath.

Once the corner spa bath was removed we had to cut the slab for new plumbing wastes for both the new bathtub and the floor waste for the bathroom.

Plumbing slab work.

We gutted the bathroom, opening up the walls for new plumbing to be run, and cut the slab to create a new waste location for the shower (where the old vanity had been).

Cutting the slab for new shower waste plumbing.

Cutting our the slab further for the bathroom floor waste.
Installation
Once all the floor plumbing was done, we installed a tile-over shower tray, as well as an aluminium angle in the doorway. We then screeded the whole bathroom floor, ensuring that the screed bed fell towards the floor waste.
The materials we used included:
- Bellessi Tile Over Shower Tray from Bunnings
- Metal Mate Aluminium Angle for doorway trim from Bunnings
- Assorted PVC plumbing fittings from Bunnings
- Sand and cement for screed from Bunnings
- Davco tile adhesive (used under screed bedding) from Bunnings.

Screeding.

Screed completed and new shower tile tray installed.

Test fitting the bathtub in the tight space.
We installed additional studs in the wall for the shower-screen mounting locations and studs for the Mondella 365 x 320 x 90mm Shower Niche. We then called a plumber in to run new lines within the wall cavity and on the floor for the new bathroom layout.

Additional studs.

New plumbing layout, including floor connection for bathtub spout.
We then lined the walls with James Hardie Villaboard from Bunnings.

We test fitted the vanity for the height of the sink as well as width clearance between the bathtub spout and shower screen.

We used Gyprock Ultra-Top Topping Compound and mesh tape on the joints. Then we filled the screw holes and tape joints. We followed a Bunnings video tutorial and continued it all the way around the room on all the Villaboard-lined walls.

We used Gripset Betta Easy Seal Bond Breaker on the wall joints and shower base joints and around the plumbing outlets.
We applied a primer to the whole room and applied Gripset Betta Under Tile Waterproofing Membrane.

Applying Bond Breaker to the wall junctions.

Waterproofing around plumbing.

Waterproofing in progress.

Tiling
Tiling was a tricky process but we learned a lot from our previous ensuite bathroom renovation. It also helped that we used the same tiles for both bathrooms. This time around we knew how to perfectly cut each tile without breaking and wasting too many. The White Gloss wall tiles were easy to cut with a DTA 1000mm tile cutter from Bunnings. The large-format floor tiles, though, proved difficult and did not cut perfectly. For those we used a diamond blade and angle grinder to make each individual cut.
Once the tiling was done, we grouted all the tiled walls.
Tiling details:
- White matte Kit-Kat mosaic tiles from Facebook Marketplace
- Duratile 300mm x 600mm White Gloss wall tiles from Bunnings
- Bellazza 600mm x 600mm Crema Porcelain floor tiles from Bunnings
- Tile-levelling clips and tile spacers from Bunnings
- Davco white grout from Bunnings
- Dunlop grey floor grout from Bunnings.

Floor tiles and tile-levelling clip system from Bunnings.

Gyprock Aquachek lined on to the left wall.

The long process of tiling the back wall with Kit-Kat-style mosaic tiles.

We used gold L-shape angle tile trim to box in the niche. It was much easier to install a trim piece than to cut a mitred edge on the tiles.

Tiled right-hand side shower and wall with tiled niche.
Finishing touches
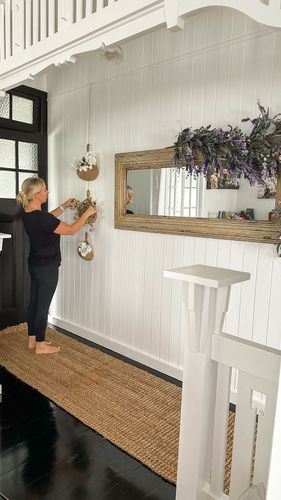
We lined the un-tiled wall to the left with Gyprock Aquachek and made it a wainscot feature wall to add some character to the room instead of having all four walls with floor-to-ceiling tile. We didn't want the bathroom to feel boxed in and it also allowed us to add a traditional element to an otherwise modern bathroom.
We installed new cornices around the bathroom, new window architraves, door architraves and bathroom door (all the same moulding that was used for the rest of the house).
Materials (all from Bunnings):
- Plasterboard: Gyprock Aquachek
- Joint and Hole Filler: Gyprock Ultra-Top Topping Compound
- Undercoat primer: British Paints 4-in-1
- Wall paint: Dulux Vivid White Low Sheen
- Ceiling paint: Dulux White Ceiling +PLUS Kitchen and Bathroom
- Caulking: Selleys No More Gaps Bathroom and Kitchen Gap Filler.


We were now on the home stretch! We installed all the tapware, frameless shower screens, bathtub, vanity, mirror and other bathroom accessories over a weekend and had everything siliconed and ready to use the following week. We opted for all brass fittings and finishes so that all the metal finishes looked cohesive in the space.
Bathroom details:
- Frameless shower screen: Frameless Direct
- Brass shower hardware: Frameless Direct
- Vanity and vanity top: IKEA
- Round sink: Bunnings
- Sink mixer tap: Reece
- Mirror: IKEA
- Freestanding bath: Reece
- Floor-mounted bath spout: Reece
- Macrame plant hanger: Denn Lane
- Sheer roller blind: DIY Blinds
- Wainscot panelling: Bunnings
- Wainscot panelling paint: Dulux from Bunnings
- Ceiling paint: Dulux from Bunnings
- Window and door architrave moulding: Bunnings
- Exhaust fan: Arlec from Bunnings
- Towel Rail: InStyle Bathware
- Floor waste grates: Reece
- Shower seal strip: Bunnings
- Shower floor channel: Bunnings.

Frameless shower screen and shower floor grate installed.

Bathtub and custom sheer roller blind installed.

Macrame plant hanger and towel rail installed.

Mirror installed with wall sconces on either side.
Before and after


How to plan a bathroom renovation
No matter what type of bathroom you have, it all starts with planning and research to discover how you can make best use of what is often the smallest room in the house. Check out How to plan a bathroom renovation by experienced Bunnings Workshop member Adam Woodhams for advice on how to redesign your space.

More bathroom renovation ideas
For more inspiration check out our Top 10 most popular bathroom projects, and let us know if you need a hand with your project. We're here to help.
- Mark as Read
- Mark as New
- Bookmark
- Highlight
- Report Inappropriate Content
Wow that is impressive 😁 y'all should be extremely proud of yourselves!!!
- Mark as Read
- Mark as New
- Bookmark
- Highlight
- Report Inappropriate Content
What an incredible outcome! So much hard work but the stunning results speak for themselves. Also, you would have saved yourselves so many thousands of dollars whilst achieving a well-deserved sense of pride for the quality of work. Sensational renovating.
- Mark as Read
- Mark as New
- Bookmark
- Highlight
- Report Inappropriate Content
So beautiful and fresh. Great inspiration for our own reno on our small bathroom. Can you please let me know the size of your bathroom. Mant thanks VIcki
- Mark as Read
- Mark as New
- Bookmark
- Highlight
- Report Inappropriate Content
Welcome to the Bunnings Workshop community @Vicki64M. It's sensational to have you join us, and great to see you've received inspiration from this stunning project.
Let me mention @homeinmelbourne, so they are alerted to your question on the size of the bathroom.
This is one of my all-time favourite bathroom transformations, and I don't think you could go wrong with borrowing some ideas from it.
Please keep us updated on your project and consider starting a discussion about it to ask any questions or document the process. We all love a good bathroom transformation.
Mitchell
- Mark as Read
- Mark as New
- Bookmark
- Highlight
- Report Inappropriate Content
Hi @Vicki64M @MitchellMc ,
Thank you for your kind words. The bathroom is quite small - only 2 x 3 metres. 🙂
- Mark as Read
- Mark as New
- Bookmark
- Highlight
- Report Inappropriate Content
Beautiful. I love it.
- Mark as Read
- Mark as New
- Bookmark
- Highlight
- Report Inappropriate Content
Hello @mga,
I totally agree. This is a fantastic renovation indeed. Let me tag @homeinmelbourne so they're alerted to your kind comments.
Are you looking to do something similar in your home? Let us know if you need any help. We'd be happy to assist.
Akanksha
- Mark as Read
- Mark as New
- Bookmark
- Highlight
- Report Inappropriate Content
- Mark as Read
- Mark as New
- Bookmark
- Highlight
- Report Inappropriate Content
Love love, thank you for such detail and photos, I always wondered how to cut the concrete floor and how to hide the shower base. The wainscoting is super cute feature. 3 different tiles works beautifully too. Any idea how much you spent?
Why join the Bunnings Workshop community?
Workshop is a friendly place to learn, get ideas and find inspiration for your home improvement projects