
The Bunnings Workshop community can help with your home improvement projects.
- Bunnings Workshop
- >
- Discussion
- >
- Living and Bedroom
- >
- Re: DIY arched cabinet
DIY arched cabinet
- Subscribe to RSS Feed
- Mark Topic as New
- Mark Topic as Read
- Float this Topic for Current User
- Bookmark
- Subscribe
- Mute
- Printer Friendly Page
Share
- Mark as New
- Bookmark
- Subscribe
- Mute
- Subscribe to RSS Feed
- Highlight
- Report Inappropriate Content
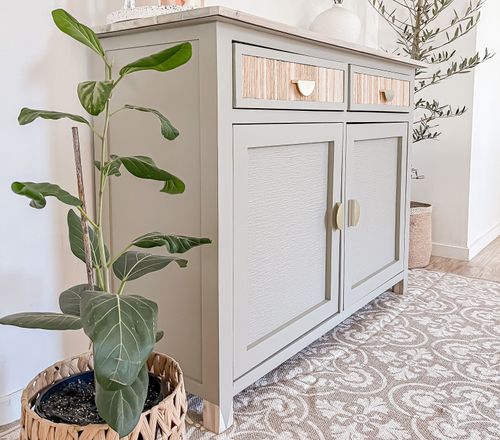
DIY arched cabinet

Using only a bit of 12mm MDF, a pvc pipe and some corflute from bunnings, weve created the bedside table of our dreams. Arched cabinets are expensive and I really wanted to make a custom one to suit all the little things I had while leaving the top of the table free from clutter. Total cost for the materials was about $60 for one cabinet (not including the tools)
Materials
12mm MDF
55mm pvc pipe
3mm Corflute white
Gypock (or render)
Sanding paper
White base paint (internal)
Tools
Ozito batery-operated Table saw
Steps
Step 1
- First up measure up the space you have for your bedside table and work out your overall width, height and depth.
- From there calculate the measurement of your top and L-shape cutouts
- The inside of the L shape should be about 59-60mm which includes the diameter of the pipe and the 4-5mm rebate

Step 2
- Next up, add your sides
- Use pins and MDF glue for everything

Step 3
- Add your base and back for more stability then place the pvc pipe and cut it to size
- Using your router, add 2 rebates to each edge (as per the photo below). The depth of the rebate should be about 4-5mm. 3mm for the corflute and 1-2mm to allow for the screw head. You want the screw heads to sit just below the level of the mdf board.
- We've used Pan head screws

Step 4

- Once you've done this, I would probably suggest to paint the box as it is. The mistake I made was to paint the cabinet at the very end and it was quite a challenge to paint the inside 😅
- Cut your front fascia and draw up where you want your checkouts to be. This part is a bit time consuming as you'll most likely have to try a few different designs to see what works but better to take your time before cutting them out.
- We've done the vertical and middle spacings at 35mm each. The top spacing is at 55mm and the bottom one is only at 12mm so it ends up flush with the base
Step 5
- Once you've finalised your front fascia, you can then work out the size of the fixed shelves and your vertical division.
-The vertical division should sit centre to the middle spacing and the fixed shelves should end up flush with the top of the spacings so there are no steps
- Another suggestion would be to assemble the vertical division and fixed shelves as one piece and paint it first before adding it into the box.
- Then pin and flue from the outside
- Using a flush router bit, cut off all the excess around the back and the front, add a bit of gyprock to the joins and sand everything off.


Step 6

We really wanted to have a textured finish, so we've used a 100mm foam roller to paint, it came up a treat!
Step 7
And here you go, the finished product below 😊
For more DIY projects and ideas, you're also welcome to follow us on tiktok or instagram... we're always making something 😋
If you'd like to watch a video of it, click here.
Any questions feel free to ask and if anyone attempts this DIY, please tag us 💛

- Mark as New
- Bookmark
- Subscribe
- Mute
- Subscribe to RSS Feed
- Highlight
- Report Inappropriate Content
Re: DIY ARCHED CABINET
Hello @ourcountrycoast
Welcome to the Bunnings Workshop community. It's fantastic to have you join us and thank you for sharing your arched cabinet project.
What a clever and ingenious way to create the rounded corners of your cabinet. Before reading the article, I thought you had used metal sheeting for the rounded corners. But then I saw that you had used corflute which I thought was even better. It's easy to cut and form into shape, plus its plastic material makes it impervious to moisture.
Definitely a win-win all around, the organic uneven opening for the shelves really give it so much character. At first glance you would think that it was made out of solid rock instead of MDF.
Again, thank you so much for sharing such an awesome project.
Eric
- Mark as New
- Bookmark
- Subscribe
- Mute
- Subscribe to RSS Feed
- Highlight
- Report Inappropriate Content
Re: DIY ARCHED CABINET
Thank you so much for this Eric, I really appreciate your feedback on this 😊
- Mark as New
- Bookmark
- Subscribe
- Mute
- Subscribe to RSS Feed
- Highlight
- Report Inappropriate Content
Re: DIY arched cabinet
Hi @ourcountrycoast,
What a gorgeous arched cabinet you have made! Thank you for sharing how you made it with the community and also sharing your tips along the way. Your project looks like so much fun, did it take you long to complete from start to finish?
Katie
- Mark as New
- Bookmark
- Subscribe
- Mute
- Subscribe to RSS Feed
- Highlight
- Report Inappropriate Content
Re: DIY arched cabinet
Hi Katie, thank you so much, happy to share it 😊 it took me a day to make it then I painted it the next day once the gyprock was completely dry ☺️
- Mark as New
- Bookmark
- Subscribe
- Mute
- Subscribe to RSS Feed
- Highlight
- Report Inappropriate Content
Re: DIY arched cabinet
I love this! 👏
- Mark as New
- Bookmark
- Subscribe
- Mute
- Subscribe to RSS Feed
- Highlight
- Report Inappropriate Content
Re: DIY arched cabinet
Welcome to the Bunnings Workshop community @DiyShel! We're delighted to have you join us and hope you're finding the site a great resource for useful advice and inspiring D.I.Y. ideas.
Glad to see you loved @ourcountrycoast's arched cabinet. It's a great D.I.Y. project. Are you looking to do something similar in your home?
Let us know if you need any assistance. We would be happy to help.
Akanksha
- Mark as New
- Bookmark
- Subscribe
- Mute
- Subscribe to RSS Feed
- Highlight
- Report Inappropriate Content
Re: DIY arched cabinet
Thank you so much ☺️ 💛
- Mark as New
- Bookmark
- Subscribe
- Mute
- Subscribe to RSS Feed
- Highlight
- Report Inappropriate Content
Re: DIY arched cabinet
Hi Yes I saw it on instagram and I love it! I'll be sharing my own project soon as well 😊
Why join the Bunnings Workshop community?
Workshop is a friendly place to learn, get ideas and find inspiration for your home improvement projects
You might also like

We would love to help with your project.
Join the Bunnings Workshop community today to ask questions and get advice.