
The Bunnings Workshop community can help with your home improvement projects.
- Bunnings Workshop
- >
- Discussion
- >
- Living and Bedroom
- >
- How to remove built in bookshelf?
How to remove built in bookshelf?
- Subscribe to RSS Feed
- Mark Topic as New
- Mark Topic as Read
- Float this Topic for Current User
- Bookmark
- Subscribe
- Mute
- Printer Friendly Page
Share
- Mark as New
- Bookmark
- Subscribe
- Mute
- Subscribe to RSS Feed
- Highlight
- Report Inappropriate Content
How to remove built in bookshelf?
Hi there
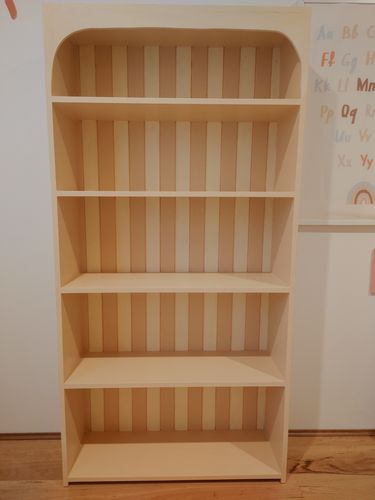
I was hoping to get some advice as to how to remove this built in bookshelf and mirror with as little damage as possible to the walls. They appear to be glued(?) to the wall and the floor; there are no visible screws or brackets. The bookshelf is made of wood. We would also be looking at removing the trim beside the mirror (the mirror is flush against the wall and there is no trim behind it).
We will be removing the carpet and levelling the floors to put in boards, so have no issues with there being a gap in the carpet or damage to the floors, but ideally we'd like for the wall behind it to remain intact to the extent possible.
Any advice, instructions or steps (or suggestions of tools to use) would be greatly appreciated!

- Mark as New
- Bookmark
- Subscribe
- Mute
- Subscribe to RSS Feed
- Highlight
- Report Inappropriate Content
Re: How to remove built in bookshelf?
Welcome to the Bunnings Workshop community @szy. It's amazing to have you join us, and many thanks for your question about removing objects from a wall.
Start by having a very close inspection of all the faces that could be attached to the wall. The screws could have been installed, and then timber putty applied to them to conceal their locations. Sometimes it will just be a small circle the size of a screw head that looks slightly different to the surrounding area. Failing being able to find the fixings or if these items have been glued to the wall it's highly unlikely that you'll be able to remove them without causing some damage. Most construction adhesives would rip a portion of the plasterboard off before letting go of it.
You could begin dismantling the shelf by cutting away the shelves, uprights, and top. A mini sledge would come in handy for knocking them out of place. Once you've removed everything proud of the wall, it might reveal how the rear section is attached. If not, you'll just need to try and lever it away with a prybar. I presume you'll be looking at replacing the plasterboard as not only will it be damaged, but any adhesive left on it would make re-painting troublesome.
For the mirror, I'd recommend you leave that up to the experts and employ a professional to do it for you. It's going to be a similar situation to the shelving, but you are now risking your own safety, as the glass could shatter in the process.
Remember your PPE, including a face mask, safety glass, and work gloves.
Let me mention a couple of our talented members @Dave-1 and @Nailbag to see if they have any thoughts.
Please let me know if you have any questions.
Mitchell
- Mark as New
- Bookmark
- Subscribe
- Mute
- Subscribe to RSS Feed
- Highlight
- Report Inappropriate Content
Re: How to remove built in bookshelf?
Afternoon @szy
Having a closer look at your photos raises a few questions first.
Is that a picture rail you have in your room either side of the mirror? And that leads me to the next question. Are you walls firbro or plaster? If they are fibro then Abspestos is something to factor in and will require professionals to remove it if you intend to break/remove it by removing the mirrors.
The square mirrored tiles with an edge could be possibly tiles stuck to a board and then the edge is used to attach it to the wall tho reading your explanation that prob is the case :/. Crossing fingers that it is if thats the case, otherwise if they have been glued directly then there will be a fair chance of damaging the wall. (professionals would be wise at this point)
If the wall is fibro then its still safe unless you damage or remove it. I have a feeling when you remove the shelves and the mirror you will find that the fibro panels will just be butted up next to each other and will require a new cover strip over the join (You may have some like that elsewhere in the room)
With the plinth mmm it really reminds me of a fireplace, do you by chance have a chimeny on the outside of your house? It could just be a timber plinth and easy enough to remove, if its brick or concrete it could be more involved. Do you know what the plinth is made of? (Plinth is the bit the bookcase is sitting on)
Dave
- Mark as New
- Bookmark
- Subscribe
- Mute
- Subscribe to RSS Feed
- Highlight
- Report Inappropriate Content
Re: How to remove built in bookshelf?
Thanks very much Dave and Mitchell!
In response to your questions:
1. Yes I believe that is a picture rail (thank you for enlightening me on that, I thought it was simply a trimming). It ends where the border of the mirror begins, so we'd be looking to remove that too (otherwise there would be a gap where the mirror used to sit).
2. I would think the walls are plaster given the house was built in 2009/10, but I'm not 100% sure - is there an easy way to tell?
3. The squared mirrored tiles appear to be stuck to a backing board, which is stuck to the wall (again, not 100% sure), but it seems like the entirety of the board is glued(?) to the wall (as opposed to being nailed in).
4. The plinth is made of timber (despite looking exactly like what you'd have on a fireplace - completely agree). We don't have a chimney.
Does this help / change what you would recommend?
Would you mind explaining this to me in terms a kid would understand (that is the level of DIY/construction knowledge I have)? "I have a feeling when you remove the shelves and the mirror you will find that the fibro panels will just be butted up next to each other and will require a new cover strip over the join (You may have some like that elsewhere in the room)".
Thanks again!
- Mark as New
- Bookmark
- Subscribe
- Mute
- Subscribe to RSS Feed
- Highlight
- Report Inappropriate Content
Re: How to remove built in bookshelf?
Afternoon @szy
I was thinking as your ceilings look high and the picture rail it was a potentially an older built house. If that was the case and there was fibro panels then the cover strips hide the joins to make it look pretty/tidy
A house built in 2009 will be plaster  Makes life easier and also easier to repair. From what you have clarified the backing board is glued to the plaster wall behind it. When the board is removed (probarly with some hard levering) you will end up with torn plaster surface or holes.
If you do it yourself then Id suggest to tape the whole of the mirror surface first as any flex will crack and break the glass, Wear leather gloves and eyeware plus long sleeves. Also a floor sheetto capture any breakages. Be prepared to replace a section of plaster or repair holes in the wall. I have had holes after removing some kitchen tiles and repaired the area with large patches, I should have gone with a whole sheet as theer would have been less sanding overall but live and learn So once you have removed the mirrors you can assess what is needed.
I am glad the plinth is timber Makes life a lot easier. Id have in my tools a smalll pry bar, an old chisel, mallet and a claw hammer plus maybe a long flat bladed screwdriver (large in size) as you may need any or all of them to remove the timber bookcase.
Oh if you can poke a thumbtack or thin nail into the wall then its plaster fibro or concrete/brick it will bend the thumbtack or small nail.
Dave
- Mark as New
- Bookmark
- Subscribe
- Mute
- Subscribe to RSS Feed
- Highlight
- Report Inappropriate Content
Re: How to remove built in bookshelf?
Hi @szy I would be following the tips outlined by @Dave-1 & @MitchellMc. My recommendation would be to not to try and save the plasterboard wall behind as this wont be possible without leaving far to much damage to attempt to repair. The mirrors will post likely be glued on and then timber frames out. As the boys have highlighted, there will be concealed screws fastening the bookshelf. A short pry-bar and mallet would be my main tools to dismantle/remove.
The cleanest result you are looking for is to one you have have remove the wall furniture and cut the plasterboard out as per the attached image to expose the internal framework. Leave about 300mm from the cornice and if possible each side of the windows. This is all DIY-able and will then allow the replacement of new plasterboard to be fixed and stopped up by a plasterer to a new finish ready for painting.
Regards, Nailbag

Why join the Bunnings Workshop community?
Workshop is a friendly place to learn, get ideas and find inspiration for your home improvement projects
You might also like
We would love to help with your project.
Join the Bunnings Workshop community today to ask questions and get advice.