
The Bunnings Workshop community can help with your home improvement projects.
- Bunnings Workshop
- >
- Discussion
- >
- Living and Bedroom
- >
- Re: Amazing Small Furniture Makeover ~ S...
Upcycled drawers with D.I.Y. chalk paint
- Subscribe to RSS Feed
- Mark Topic as New
- Mark Topic as Read
- Float this Topic for Current User
- Bookmark
- Subscribe
- Mute
- Printer Friendly Page
Share
- Mark as New
- Bookmark
- Subscribe
- Mute
- Subscribe to RSS Feed
- Highlight
- Report Inappropriate Content
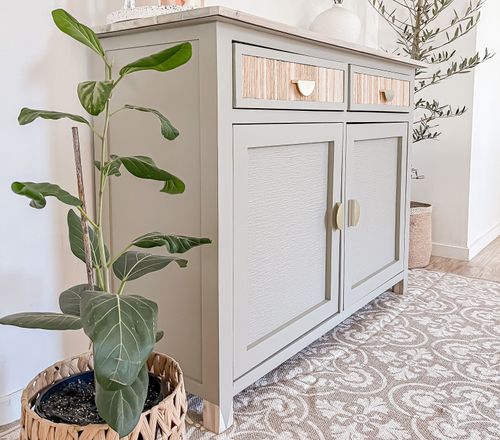
Upcycled drawers with D.I.Y. chalk paint
 My twirly drawers now have a new lease on life and a new home.
Giving new life to an old, well used and seemingly unsalvageable piece of furniture is not only rewarding, but also profitable. I bought these twirly drawers from the Facebook Marketplace for $10, but when I got them home and had a good look at them, I knew this project would be a challenge... and it certainly was. From sanding back the ink-stained top to filling, refilling the dents and scratches and making and applying my own chalk paint out of a $3.95 mistint jar of Taubmans paint then whitewashing and waxing, the result was worth it! You can watch the whole grueling but rewarding process here😁 >>
Materials
Old set of drawers
Sugarsoap Selleys 1L Wall Surface Cleaner Super Concentrate Sugar Soap - Bunnings Australia
500ml Taubmans mistint sample pot Taubmans 500ml Accent Sample Pot - Bunnings Australia
Baby talcum powder
Mont Marte Acrylic Flow Medium
Timbermate wood filler Timbermate 250g White Wood Filler - Bunnings Australia
Plastic Cement wood filler Selleys 50g Maple Plastic Wood - Bunnings Australia
Glitz Beeswax Glitz 200g Beeswax Polish - Bunnings Australia
Kmart Drawer Knobs
Kmart Wallpaper
Surface Gard Adhesive Pads Surface Gard Assorted Eva Pads - 56 Pieces - Bunnings Australia
Tools
Paintbrushes
Sander/sandpaper
Staplegun
Dishcloths
Steps
Step 1


Step 2

Step 3

Step 4


Step 5

Step 6


Step 7

Step 8


Step 9

Step 10


- Mark as New
- Bookmark
- Subscribe
- Mute
- Subscribe to RSS Feed
- Highlight
- Report Inappropriate Content
Re: Amazing Small Furniture Makeover ~ Selling Upcycles ~ DIY Chalk Paint Transformation ~ DIY Proje
Hi @daniknight4 ,
Wow, that looks fantastic! Well done!
I never knew that's how you make chalk paint! So many great tips and tricks in that post!
Can't believe the transformation
Cheers
Marty
- Mark as New
- Bookmark
- Subscribe
- Mute
- Subscribe to RSS Feed
- Highlight
- Report Inappropriate Content
Re: Amazing Small Furniture Makeover ~ Selling Upcycles ~ DIY Chalk Paint Transformation ~ DIY Proje
Thanks @Marty_greenshed
It was an experience that's for sure!😂
- Mark as New
- Bookmark
- Subscribe
- Mute
- Subscribe to RSS Feed
- Highlight
- Report Inappropriate Content
Re: Amazing Small Furniture Makeover ~ Selling Upcycles ~ DIY Chalk Paint Transformation ~ DIY Proje
Hello @daniknight4
I am sooo in love with this piece! It’s so delicate and just beautiful!
I really admire your post, not just for the level of detail, but for your honesty when up-cycling. I hope people starting out know that there are issues that do arise but not to be discouraged if they do.
Thank you so much for sharing your experience with us all and best of luck with your with D.I.Y entry
Sandy
- Mark as New
- Bookmark
- Subscribe
- Mute
- Subscribe to RSS Feed
- Highlight
- Report Inappropriate Content
Re: Amazing Small Furniture Makeover ~ Selling Upcycles ~ DIY Chalk Paint Transformation ~ DIY Proje
Thank you so much😊 @sandy_d
- Mark as New
- Bookmark
- Subscribe
- Mute
- Subscribe to RSS Feed
- Highlight
- Report Inappropriate Content
Re: Amazing Small Furniture Makeover ~ Selling Upcycles ~ DIY Chalk Paint Transformation ~ DIY Proje
What a truly lovely unit, @daniknight4! You've done a sensational job of restoring new life into an aged piece. I love the colour you created, and the dual handles were a nice touch and a huge timesaver.
Many thanks for sharing your project and the steps, tools and materials required to achieve a similar result.
Mitchell
- Mark as New
- Bookmark
- Subscribe
- Mute
- Subscribe to RSS Feed
- Highlight
- Report Inappropriate Content
Re: Amazing Small Furniture Makeover ~ Selling Upcycles ~ DIY Chalk Paint Transformation ~ DIY Proje
Thank you @MitchellMc 😊
- Mark as New
- Bookmark
- Subscribe
- Mute
- Subscribe to RSS Feed
- Highlight
- Report Inappropriate Content
Re: Upcycled drawers with D.I.Y. chalk paint
Very nicely done 👍 Love the colour 👍😁
Why join the Bunnings Workshop community?
Workshop is a friendly place to learn, get ideas and find inspiration for your home improvement projects
You might also like

We would love to help with your project.
Join the Bunnings Workshop community today to ask questions and get advice.