Melamine and timber dowels were used to create energy-efficient drying racks for a laundry.

The project
If like us you don't have the wall space to add drying racks to your laundry, check out these pullout drying racks we've made. We only had a space of 250mm to work with, but if you have a bigger space and can make the gaps between the racks a bit wider, do it.
Steps
Step 1
First thing I did for this project was pre-plan for it. We had our builder add a heating vent in a specific spot of the laundry ceiling marked on our plans. The point of these drying racks is for us to use them during winter mainly, where we wouldn't be able to use an outdoor drying rack. We would most likely use heating in the house when it's cold anyway, so I would then minimise the use of our dryer and use the racks instead.
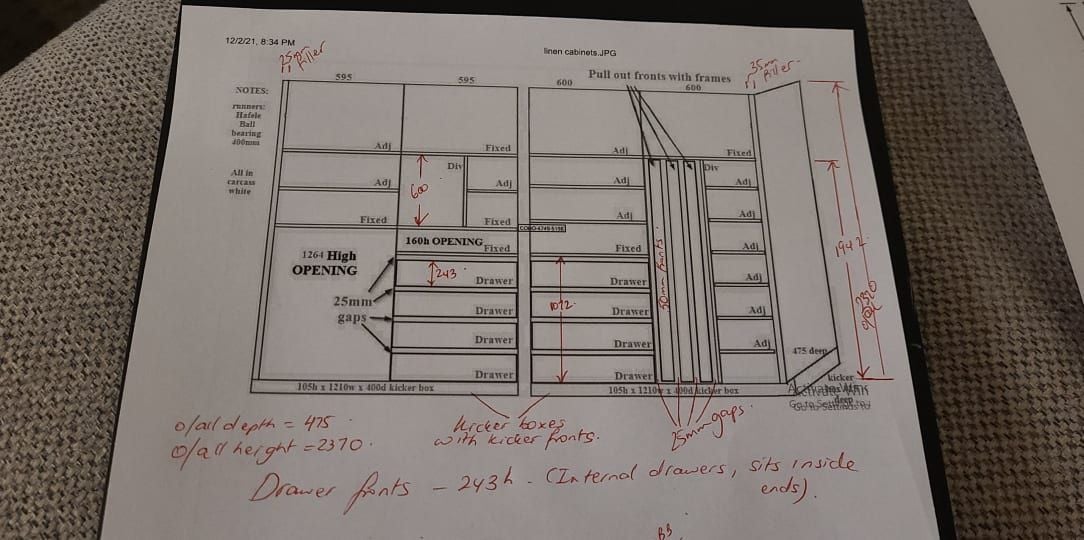
I had already done a sketch of where I wanted these racks to be so all I needed to do was to make sure the heating vent was in the right spot. Here is what I sketched up.

Step 2
What I tried to achieve was like a finger-pull look, but vertical. The fronts are edged all the way around and the frames behind the fronts are about 5mm smaller from each side - so 40mm wide.
I wanted to try and have both shelving and pullout drying racks so the space I had was very small, only 250mm. But if you have a bigger space, instead of 25mm gaps, go with 80mm or more if you can, so you can use them for thicker clothing like jumpers, jackets etc.
I also initially had the idea of drilling a series of holes from top to bottom so the dowels could be adjustable, but as I built the frames I realised that it needed support from the middle, so I ended up making them all fixed so the frames would stay square.
The hard part was to determine what my frame size needed to be so here's the sketch I used to determine my measurements

Step 3
Cut all your rails using white melamine board, then edge them all around to seal them from moisture. Before you assemble the frames together, mark where you want your dowels to be (ours were 437mm apart). Once you have worked out your heights on one rail, repeat the marks on all your front and back rails so they're all equal and consistent. Drill all your holes and then assemble the frames.
You will need to assemble them with the dowels in, it's much easier that way. Don't forget to measure both diagonals to make sure your frame is square.
Step 4
Once your frames are in, install your runners inside the cabinet. I made a space/jig to make sure my runners were screwed on straight and evenly.


Step 5
Install your frames on the runners. Cut and edge your pullout fronts. Cut a 3mm packer and another one for the gap you will have between your fronts. Screw your fronts into the frames from the inside.
Step 6
And here you go, you've got awesome space-saving pullout drying racks for not even $100!


Tools and materials
Materials used in the project:
Tools used in the project:
More inspiration for your laundry project
Bunnings Workshop member John916 created a clothes drying cupboard with vents using Kaboodle cabinetry.

Community member Nkbarfield created space-saving drying and laundry storage using an industrial-style rail and cube shelving.

Get more inspiration from our Top 10 most popular laundry projects.