Could you please advise me what the difference is between 1/3 and all fastener installations for plasterboard
Hi @emmab1986,
The difference is in the number of fixings you use to hold the plasterboard in place.
All fastener installation means you put in every fixing point shown in the manufacturer’s fixing pattern – every stud or joist gets a screw or nail at the specified spacing.
1/3 fastener installation refers to the process of installing only about one-third of the fixings, typically because you’re also using plasterboard stud adhesive. The reduced number of screws just holds the sheet until the adhesive sets, so you don’t need the full fixing pattern.
Please let me know if you have any questions.
Mitchell
Hi Mitchell,
Thanks for your clarificiation.
would you advise me if these photos show 1/3 or all fastener method?
That looks like a bit of a combination @emmab1986. I've attached the guide for CSR Gyprock below. If it was 1/3, there should be dabs of glue every 230mm along the joists, and those in your image look too far apart for that. We can also see the mechanical fixings. There appears to be slightly more fixings than what would be used with 1/3, but not enough for all fasteners.
What I can say is that even if it might not strictly comply with either method, with the amount of glue and fixings used, I'm surprised it's dropped and failed like that.
Hi @MitchellMc
Thanks for your detailed response.
What do you refer to for this one, " I'm surprised it's dropped and failed like that"? The house is from 2008-09
cheers
From your photos, it appears that the sheet has detached from the joist as there is a gap between them @emmab1986. The sheet should be hard up against the joist. It also appears there are sections where the fixings have pulled through the sheet and the glue has let go entirely.
Hi @emmab1986
This is definitely a result of not enough glue. As @MitchellMc mentioned this is supposed to be applied every 200mm or so and the sheets screwed. The glue once set is actually whats securing the sheets to the truss joist not the screws/nails. Without glue the fasteners can't hold the weight of the ceiling sheets. This is something I had to rectify a few months back myself for a customer in their garage. I needed to apply glue and then use Acro-props to press the sheets hard up and drive in additional screws.
Nailbag
Thanks @MitchellMc
We also find it strange, as the garage conditions are generally good. A slight sagging along the edge of the plasterboard ceiling was observed after a severe storm event. Could this have been caused by the storm?
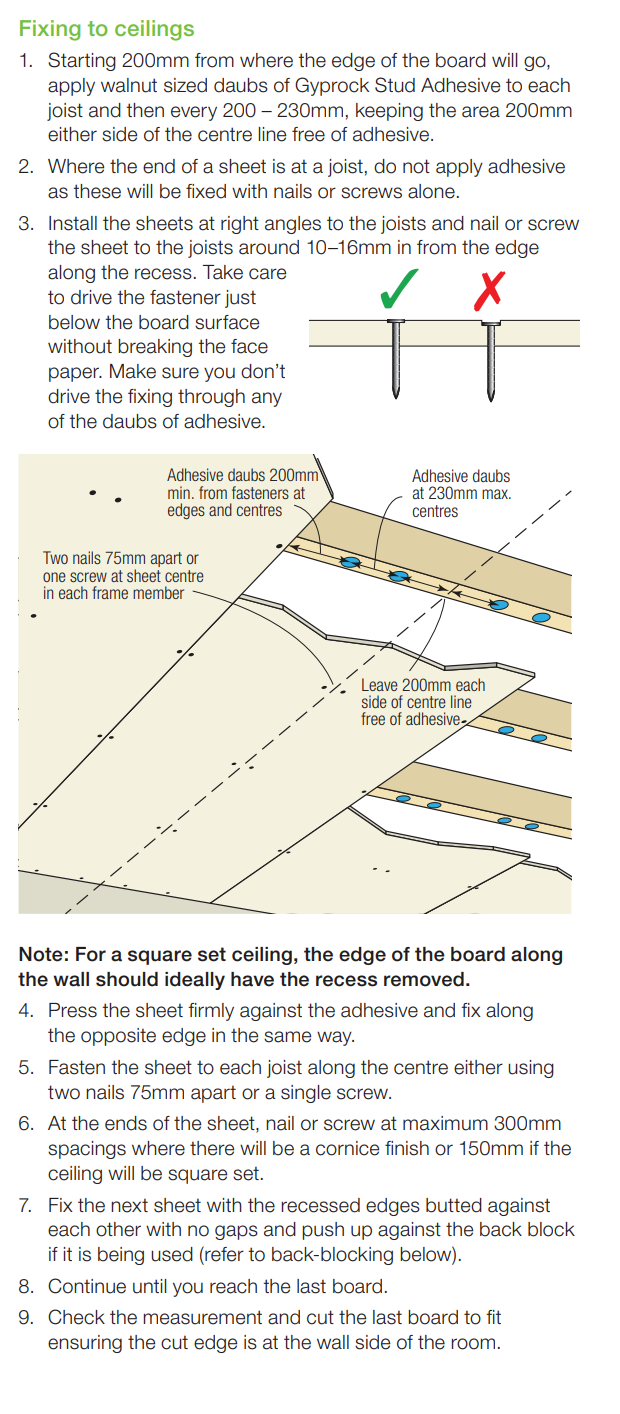
@Nailbag Thanks. According to the Gyprock Red Book (2008), two methods are allowed:
I assumed supplementary adhesive was used to enhance support, which might explain why the garage ceiling appeared to be in very good condition—until after a severe storm event.
Could the storm have caused the observed issue?
Are you working for Bunnings or for what company? How many years of warranty for your work?
It's hard to say what triggered the drop in the ceiling other than if it was significantly more noticeable after the storm, then that would be the obvious cause. Though, due to the lack of correct fastening in the first place, it's highly likely that over time the sheer weight alone might have simply resulted in a gradual drop which started this conversation by @MitchellMc . This was basically the scenario with my customers garage ceiling dropping.
These days, I'm self-employed doing property maintenance and small scale improvements either directly or via a few property management agencies. I also do a lot of work preparing properties for sale for a real estate agent mate of mine. All of which I'm slowly scaling back heading towards retirement before the body falls apart more than it already has. Nailbag
Like @Nailbag has said, it is hard to say what triggered the ceiling to fail, but the solution is to add more adhesive Stud Adhesive and screws and prop the plasterboard up with some acrow props while it sets.
Let me know if you have any further questions.
Jacob
Nailbag,
Due to budget constraints last year, we have not yet replaced the plasterboard ceiling. I would like to discuss obtaining a quote with you further.
I also have some photos of our alfresco ceiling. The leaking was quite severe, and the roof (including the sarking and flashing) has since been redone. The trades advised that the ceiling still appears to be in good condition and that cleaning and painting should be sufficient. We have not painted it yet, as we want to be sure there is no ongoing leak.
As the leakage appeared to affect the entire ceiling rather than a localised area, I would appreciate your advice on what you think may have caused the leak in our alfresco ceiling.
As the staining affected most of the alfresco ceiling rather than one area, it likely indicates water was entering over a broad section of the roof, not a single point. The most common causes are water being driven back under the roofing during heavy rain due to failed or poorly installed sarking or flashing, or gutter overflow allowing water to run back under the roof edge and spread before showing on the ceiling.
Because the roof, sarking and flashing have now been redone, the original source of water entry has likely been addressed. If the ceiling sheets are still flat, firm and dry with no sagging, softness, or further staining, then cleaning, sealing and repainting is generally an acceptable solution.
Before painting, it is important to confirm there is no ongoing moisture. This can be done by checking after heavy rain and, if possible, taking moisture readings with a moisture meter. If the ceiling remains dry and stable, a stain blocking sealer such as Zinsser Bulls Eye Primer Undercoat Sealer And Stain Blocker followed by exterior rated paint should be sufficient. If any softness, sagging or new marks appear, replacement would be the safer option.
If you are in need of assistance and you are in the Sydney area, you could use our Services Marketplace or alternatively use a service such as HiPages or Airtasker to find tradespeople to assist.
Let me know if there is anything else we can do to assist.
I would first contact a local leak detection service to establish that the roof is 100% waterproof. Based on that report you will either have recommendations on repairs to stop the leaking first and then tackling the cosmetic repairs. The LDS will also be able to give you a far more accurate condition report on the ceiling plasterboard sheets and fixing timbers behind. They will be able to determine has water-damaged they are and if cosmetic repair is feasible or require replacement.
Unfortunately even if I was local, its far to big I job that I could undertake.
Hi @Nailbag ,
Apologies — I realise I may have distracted from the original topic earlier by referring to the other ceiling.
This is regarding the garage ceiling, which dropped slightly on the southern side following a storm event. We initially considered submitting it as an insurance claim; however, the claim was rejected. The insurer (RACV) advised that the installation is non-compliant.
Could you please let me know your view on this situation?
Kind regards,
Hello @emmab1986
let me tag @Nailbag as well, to make them aware of your query. I propose asking your insurer what exact conditions they are after in order to make the installation compliant. By having more information, you can at least take steps or make plans to make it compliant.
Eric
@EricL,
Thanks! that's a very good question! I have summarised the RACV engineer report in the following
If use the 1/3 spacing or full fastener method of fixing plasterboard, RACV basically said must be compliant with Gyprock “the red book” and AS/NZ 2589-2017:
The following photos are from the installation from our builder’s trade. It has been marked by RACV.
Apologies Ive been having technical issues with the website my end. From your photos I can see the issues can be very easily resolved. I would get a decent handyman in to do the repairs required.
The idea while the sheets are slightly sagging below the trusses, is to apply daps of stud adhesive every 300mm in-between then press the sheets back up in place and screw them off from the garage side.
Get a couple of sheets of plasterboard which can then be cut in to 250mm wide strips and trimmed to length. These would layover the joins and fixed with just the stud adhesive. The idea is that your complying the repair inline with original installation guidelines so in the unlikely repeat of water damage your covered by insurance. Nailbag
@Nailbag
That sounds good. Thanks for getting me back!
Would you be able to come and have a look? You can then assess the scope of work (including how many plasterboards need to be replaced) and provide me with a quotation.
By the way, there was no leak. The insurer has advised that the sagging was due to non-compliant installation.
Sorry but besides not living in the same state, I wouldn’t accept work opportunities from the community. This is purely an opportunity to share my knowledge along with the moderators and fellow community members.
@Nailbag Thanks for sharing. I’m sure you’re one of the best trades in the industry. Unfortunately, you are not in Melbourne.