The Bunnings Workshop community can help with your home improvement projects.
- Bunnings Workshop
- >
- Discussion
- >
- Bathroom and Laundry
- >
- After some great waterproofing products ...
After some great waterproofing products for special use
- Subscribe to RSS Feed
- Mark Topic as New
- Mark Topic as Read
- Float this Topic for Current User
- Bookmark
- Subscribe
- Mute
- Printer Friendly Page
- Mark as New
- Bookmark
- Subscribe
- Mute
- Subscribe to RSS Feed
- Highlight
- Report Inappropriate Content
After some great waterproofing products for special use
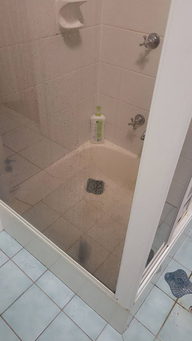
About eleven months ago, we hired a shower repair company to seal the tile floor of our shower stall with epoxy grout.
But now it is leaking again. We are contacting the company for a re-seal but not sure if they will honour the warranty.
Now we have two possible causes:
1) Leaking shower faucet behind the wall (but the plumber already "leaked test" the faucet last year, they found one and fixed the source of leak behind the wall)
2) Tiles moved and created hairline crack
If the company is not willing to reseal our shower, we are thinking to install an acrylic shower pan/base.
To us , It seems much better and simple but effective to have a piece of smooth, slick and solid pan / shower base, than replying on some sticky epoxy grout tiles to "seal all the gaps" between tiles ... is it a better choice?
Currently renting another property and the toilet has a big plastic shower base, preventing all the water from seeping through the tiles. Seems a no-brainer? and easy to install as well?
________________________________________________________________________________
If we go for shower base, it will probably take us several weeks to plan this.. (ask around to get recommendation for good local plumber or handyman, arranging onsite quote when we're home on weekend, comparing quotes, or try to learn about the feasibility of DIY)
Several weeks of planning, would mean we need something to fix the leaking problem first
We are thinking to get some thick , gluey, sticky, durable waterproofing gel to "paint on all tiles" directly, instead of regrouting.
Creating a thick layer Above the tile floor, sealing off all cracks and gap. Appearance wont be an issue since we will install a base on it in future.
Liquid waterproofing product wont be good and durable enough.
________________________________________________________________________________
Could anyone share your thought on Shower pan/base vs Tile floor,
and what product you recommend to paint directly on those tiles?
Many thanks.. for any comment. Still have a lot to learn..!
- Mark as New
- Bookmark
- Subscribe
- Mute
- Subscribe to RSS Feed
- Highlight
- Report Inappropriate Content
Re: After some great waterproofing products for special use
@Vis-á-vis , you could visit the above link for the experience we had last time
what we mean by "plan" for this time is,
if we want to remove the shower and install a new shower base, and redo all the waterproofing work (like the process you outlined🙏) ,
the time and effort to find a reliable plumber, communicate with him about our expectation, and getting quotes, and make sure I will be on the site when he does all the work,
perhaps it is easy for many people.
But its not easy for us, you could visit our older post - how we hired a plumber to install an ag drain but end up they leaving a huge mess for us..
1)They promised in the email for three times to waterproof the foundation corner of our bedroom before laying the agdrain, but they didnt
2) We placed a lot of tarps at the backyard , and also informed them by email, to dump all the clay soil from the excavation to the tarp. They also acknowledged that.
But i dont know why, they just dumped all the mud and clay soil on our new lawn......and even use compactor on the muddy clay soil above our new lawn...... its a nightmare
We have learnt a huge lesson, this is the house of my very old parents, and I wasnt been able to be there on the day when the plumber came.
And I should have been more patient when finding good plumbers for this kind of bigger job, should have gotten advice from more plumbers and should have received recommendation for good plumbers from our neigbours, Instead of trying to hire someone in a rush
We actually could have brought this issue to Fair Trade and asked for compensation or refund, as we have all the documentation of what they promised. But we are so busy fixing what they have caused.
Last weekend I went back to my parents house, and digged out all the compacted clay soil (its around 0.5 cubic meters) , and replace it with new soil and relay all the turf......
It is exhausting, as they used compactor to compact all the muddy clay On our lawn.
This time, we will get someone to install a shower base for sure as a long term solution like @EricL and you suggested, but for this type of more complicated job , it will take time for us to plan and make sure its done properly🥲
In the meanwhile, we will need to fix the leaky shower temporarily.
- Mark as New
- Bookmark
- Subscribe
- Mute
- Subscribe to RSS Feed
- Highlight
- Report Inappropriate Content
Re: After some great waterproofing products for special use
Thanks @MitchellMc , I have asked my parents who are now living there, they didnt mess with the tap and spindle washers.
Yes, the carpet is close to vanity as well.
So, how can we check if the pipes connecting to the vanity and showers are leaking?
Hydrostatic pressure testing would be accurate and easy for plumbers to identify the source? Perhaps we need to get plumbers for pipe leak detection first?
https://www.ryanoldplumbing.com.au/plumber/leak-detection/
________
Could really relate when hearing the frustrating experience of the elderly customer.
It has driven us crazy😂 we wont give up and Will solve this like the elderly customer did.
- Mark as New
- Bookmark
- Subscribe
- Mute
- Subscribe to RSS Feed
- Highlight
- Report Inappropriate Content
Re: After some great waterproofing products for special use
Hi @ivanptr,
The best advice I can give you is to enlist the services of a plumber that is prepared to assist you with resolving the issue. Not someone who wants to come for a couple of hours call out and then answer that they can't find the problem. However, they might not find the issue even after extensive work and cutting away the entire rear plaster sheets. The amount of money you'd need to invest in tracking down the leak might be better used towards the cost of the shower refit.
Mitchell
- Mark as New
- Bookmark
- Subscribe
- Mute
- Subscribe to RSS Feed
- Highlight
- Report Inappropriate Content
Re: After some great waterproofing products for special use
@MitchellMc Wholehearted thanks for the advice.
We have booked one of the local plumbers, so far the best and most caring plumber in our neighbourhood, for an inspection. He doesn't have any employees and wont be free until next weekend but he will be much better than others we came across 😐.
1) On another note, there is a post which we've found quite inspiring:
https://www.workshop.bunnings.com.au/t5/Bathroom-and-Laundry/Leaking-shower-recess-waterproof-and-re...
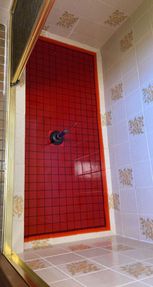
The OP did a water leak dye test for initial leak detection
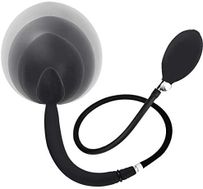
Any idea what tool could we use to plug the drain?
inflatable plug?
__________________________________
Also, this plumber from Perth used thermal imaging camera and successfully identified the leak behind the tile wall. Seriously considering to buy one :
https://youtu.be/ekspirzXq1k?t=86
- Mark as New
- Bookmark
- Subscribe
- Mute
- Subscribe to RSS Feed
- Highlight
- Report Inappropriate Content
Re: After some great waterproofing products for special use
Hello @ivanptr
Before making any purchase perhaps your new plumber friend already has this tool in his arsenal? Maybe you can borrow the tool or they can perform the test for you. As for the thermal imaging tool, I strongly suggest seeing if you can rent it from a company that does thermal imaging. It is an expensive tool and you need the experience to use it and make a diagnosis.
If you need further assistance, please let us know.
Eric
- Mark as New
- Bookmark
- Subscribe
- Mute
- Subscribe to RSS Feed
- Highlight
- Report Inappropriate Content
Re: After some great waterproofing products for special use
@EricL yes, we thought about that too, but we are just not sure how long it takes to do a thorough dye leak test, like, if its a minor leak, then preferably the water should sit overnight ? Err , im gonna ask him if we can borrow the inflatable plug and return it the next day.
And yes, we have just found one company near our suburb which supplies thermal imaging cameras for hire, (rate is $100 per day ) , much cheaper than making a purchase. Gonna rent one to try it and keep you guys updated with our experience .
- Mark as New
- Bookmark
- Subscribe
- Mute
- Subscribe to RSS Feed
- Highlight
- Report Inappropriate Content
Re: After some great waterproofing products for special use
I have a thermal imaging camera, a Flir E6, the model above the one in the video. I would say this is a minimum for high enough resolution to detect smaller leaks. However, it only gives a general area of moisture. It has significant limitations. That camera cost me $3500 and I'm feeling like I need to upgrade. You already have enough holes in your plaster to do any inspection you need. A thermal imaging camera would normally be used as a non-destructive tool before you remove plaster....a point at which you are already at.
The remedial work for your shower is the same. Regardless of whether you have a failed waterproof membrane, a leak in a pipe or breach requiring plaster coming off, a failure in your waste.....ALL will require a strip-down of the shower and remedial work as previously advised.
You are just wasting time and money that could be put toward a permanent solution.
- Mark as New
- Bookmark
- Subscribe
- Mute
- Subscribe to RSS Feed
- Highlight
- Report Inappropriate Content
Process of waterproofing foundation
Hi @MitchellMc ,@EricL and everyone,
Some good news, we did a dye test ourselves with 2cm depth of dye water sitting on the shower floor for 48 hours. No sign of leak to the bedroom at all. No damp carpet!
So the possible causes might be narrowed down to - waste pipe, or shower pipe leak, behind the wall (these will be investigated by our plumber next week) ,
Or : rainwater getting (water ingress) into the bedroom from the outside.
So Im starting a new project to waterproof the foundation side of my parents house. (outside the bedroom)
Material I already bought, as suggested by you guys 😄:
1) 30 Seconds 2L Spray And Walk Away
2) Crommelin 4l exterior grade brushable-waterproofer
Planning:
1) Use wired brush and Walk Away Spray to clean the mould off the brick wall ( tried this product on the other side before, incredible outcome!)
2) Already digged a trench - But how much vertical depth of the foundation should I waterproof ?
(I just have time to do this tonight , the photos are a bit blurry. But I will snap better pictures in daytime)
3. I dont have high pressure washer, but i have a garden hose. Now there are some silt/dirt covering the foundation, I might use a brush first, then spray water to clean it?
4. After the cleaning process, I reckon I should wait for 7 days for the foundation to dry out completely, before applying any waterproofer?
5. Backfill - is it better to backfill the trench with sand? seems the permeability of sand is much better than our soil (some are clay soil), higher permeability -> Faster evaporation?
What soil / sand can we order from landscape company and the best material to put next to the foundation?
(Before completion, I will cover the foundation side and trench with some tarps in case of bad weathers)
Did I miss anything in this initial plan? any advice greatly appreciated
Hope this project will be easy with no drama and I can post the outcome here.
Cheers,
Ivan
- Mark as New
- Bookmark
- Subscribe
- Mute
- Subscribe to RSS Feed
- Highlight
- Report Inappropriate Content
Re: Process of waterproofing foundation
Hi @ivanptr,
Typically, there will be a damp course line in your bricks, preventing moisture from being wicked up through the wall. This line usually is positioned one course above soil level. Any amount of waterproofing you can do below the soil level will help prevent water ingress. However, just applying a membrane to that outside face of the wall will only do so much. I recommend you scrub any loose dirt off the wall before applying the waterproofer. If you can borrow a pressure washer or consider purchasing a budget-friendly option, that would be your best bet. You'll need to follow the application directions on the container, and allowing the wall to dry out completely would be a great idea.
I'd suggest you paint the bricks you've already exposed and then install a slotted drain coil along the wall as a secondary measure. This will drain any water away that hits the wall instead of it just pooling at your foundations. The drain coil's trench only needs to be 100mm wide and can be backfilled with aggregate.
Please keep us updated and reach out if you have further questions.
Mitchell
- Mark as New
- Bookmark
- Subscribe
- Mute
- Subscribe to RSS Feed
- Highlight
- Report Inappropriate Content
Re: Process of waterproofing foundation
Ok @MitchellMc , I will get a high pressure washer, thanks again for the reminder
And my trench is not deep enough too
"Dig a 120mm wide trench hard up against the wall to a depth of 600mm."
Now my trench is only about 120mm deep, so im going to dig more.
And i want to connect the next ag drain to the one we have just installed. But to do this, we need to relocate the downpipe first.
Why join the Bunnings Workshop community?
Workshop is a friendly place to learn, get ideas and find inspiration for your home improvement projects
You might also like
We would love to help with your project.
Join the Bunnings Workshop community today to ask questions and get advice.


