
The Bunnings Workshop community can help with your home improvement projects.
- Bunnings Workshop
- >
- Discussion
- >
- Bathroom and Laundry
- >
- How to adjust fix a loo hush fill bottom...
How to adjust fix a loo hush fill bottom entry cistern inlet valve?
- Subscribe to RSS Feed
- Mark Topic as New
- Mark Topic as Read
- Float this Topic for Current User
- Bookmark
- Subscribe
- Mute
- Printer Friendly Page
Share
- Mark as New
- Bookmark
- Subscribe
- Mute
- Subscribe to RSS Feed
- Highlight
- Report Inappropriate Content
How to adjust fix a loo hush fill bottom entry cistern inlet valve?
2 questions here
the first is that the instructions say in BOLD type
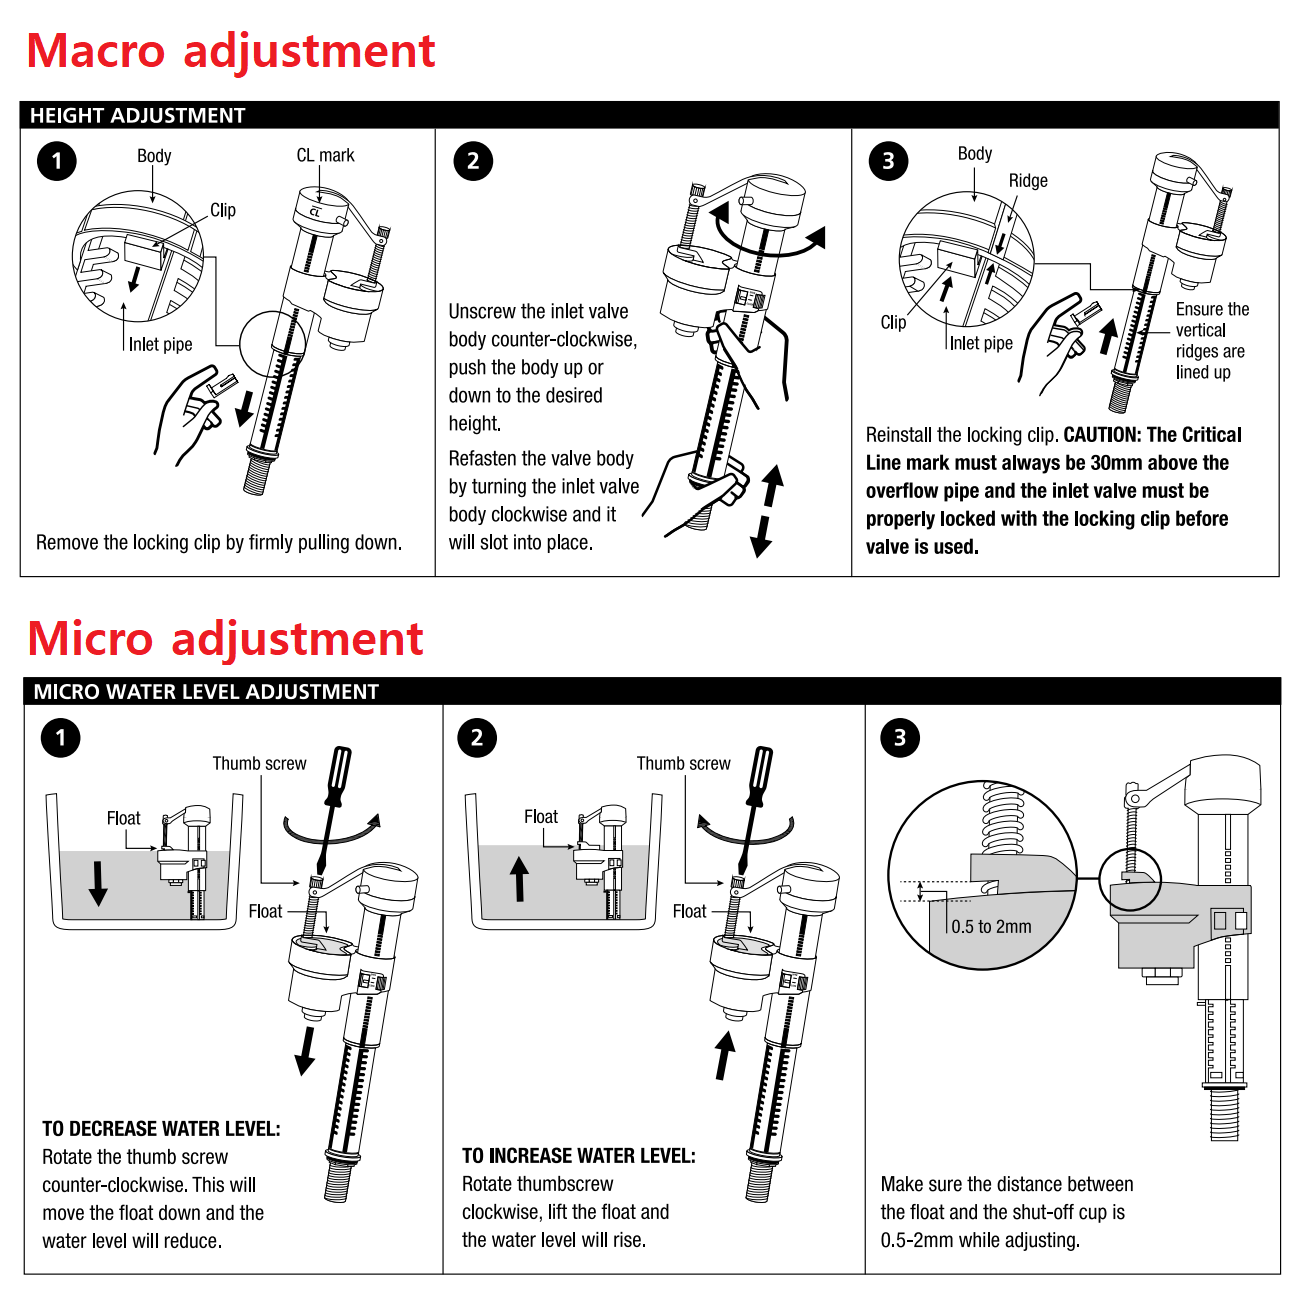
"Reinstall the locking clip. CAUTION: The Critical Line mark must always be 30mm above the overflow pipe and the inlet valve must be properly locked with the locking clip before valve is used."
Is that "at least 30mm", "exactly", or "no more than 30mm"?
The second is that there are instructions for micro level adjustment that seem to suggest there is only an adustement in the range of 0,5 to 2 mm, or am I reading it wrongly?
there are no istructions for macro adjustment.
I assume this is done by sliding open-close latch and moving the float cup up or down then turning the thumb screw to get the float back into position?
Any advice greatfully received. I have been puzzling over the instructions for days
- Labels:
-
Plumbing
-
Repairing
-
Tools and Materials
- Mark as New
- Bookmark
- Subscribe
- Mute
- Subscribe to RSS Feed
- Highlight
- Report Inappropriate Content
Re: adjust fix a loo hush fill bottom entry cistern inlet valve
Welcome to the Bunnings Workshop community @dsainsbu. It's terrific to have you join us, and many thanks for your question about inlet valves.
The critical line mark should be placed exactly 30mm above the overflow pipe. Any higher, and water will continuously flow out of the overflow.
The macro adjustment is the stem of the unit, and it gets you in the right ballpark. The micro adjustment is the thumbscrew. It has an available adjustment of between 0.5 to 2mm. Provided you set the CL mark correctly, you shouldn't need to adjust the micro at all.
Please let me know if you have any questions.
Mitchell
- Mark as New
- Bookmark
- Subscribe
- Mute
- Subscribe to RSS Feed
- Highlight
- Report Inappropriate Content
Re: How to adjust fix a loo hush fill bottom entry cistern inlet valve?
Hi @dsainsbu,
I've just received further information from FIX-A-LOO.

You need to make sure that the adjustments at 1 and 2 are coordinated. If you move the shut off cup upwards without adjusting the screw (#2) the float may not drop properly and will not fill the cistern. So, you need to adjust the screw until the float barely lifts above the shut off cup that way you know it will actuate properly.
If the float is lifted too high above the shut off cup the fill valve may turn on whilst the cistern is still flushing. This will increase the flush volume above the designed value and waste water.
Mitchell
- Mark as New
- Bookmark
- Subscribe
- Mute
- Subscribe to RSS Feed
- Highlight
- Report Inappropriate Content
Re: How to adjust fix a loo hush fill bottom entry cistern inlet valve?
Mitchell, thanks for your amazingly rapid answer.
It is goo to see the linking of adjustment points 1 & 2 which makes total sense.
My problem remains that the Critical Line is on the outer main tube.
Even with the inner tube pushed all the way in (as in the macro adjustment diagrams) the Critical Line is still 40 mm above the overflow pipe.
This does not seem to be a problem in practice, because the water height is set by the matching adjustments in the annotated diagram. And I have set it well below the overflow level.
Cheers, Dave
- Mark as New
- Bookmark
- Subscribe
- Mute
- Subscribe to RSS Feed
- Highlight
- Report Inappropriate Content
Re: How to adjust fix a loo hush fill bottom entry cistern inlet valve?
Hello @dsainsbu
My best advice is to test the cistern before you put the cover back on. Make sure that that the float stops at the correct level, and you don't get any overflow.
If you need further assistance, please let us know.
Eric
- Mark as New
- Bookmark
- Subscribe
- Mute
- Subscribe to RSS Feed
- Highlight
- Report Inappropriate Content
Re: How to adjust fix a loo hush fill bottom entry cistern inlet valve?
It works perfectly, shuts off at the appropriate water level.
With the cup and float neatly matched.
And
The exit valve washer in the base of the cistern is now replaced so no more trickle down the back of the pan, triggering the household water pump every 15 minutes!
Thank you Mitchel, Eric and Bunnings
Dave
PS I found the answer to my second question on the Critical Line
the gap to top of the overflow tube has to be AT LEAST 25 to 30 mm to comply with the plumbing standard for the prevention of back flow of cistern water into the mains.
So the fact that mine is at 40 mm is compliant.
The point of the sliding tube adjustment is more about the air gap and not macro setting of the water level
Why join the Bunnings Workshop community?
Workshop is a friendly place to learn, get ideas and find inspiration for your home improvement projects
You might also like


We would love to help with your project.
Join the Bunnings Workshop community today to ask questions and get advice.