Workshop
Ask a question

The Bunnings Workshop community can help with your home improvement projects.

How to fix leaking shower mixer tap?

teaganw
Just Starting Out

How to fix leaking shower mixer tap?

IMG_9636.jpeg

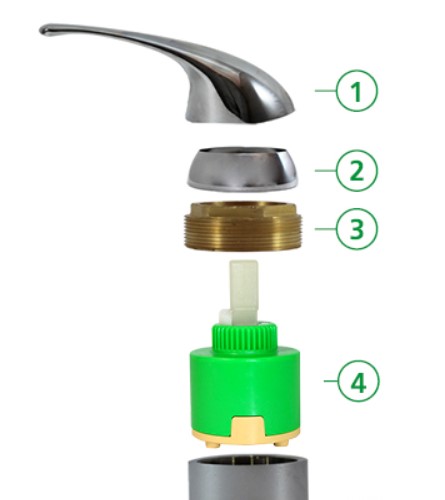
Hi! We have a leaking mixer tap in our bathroom. We are not very handy. 🫣 Wondering if it’s something we could attempt to fix or if we need someone to help us! Not sure how to get the handle off. There is just a hole in it - can’t see a screw?! Will attach photo. Thank you

EricL
Bunnings Team Member

Re: How to fix leaking shower mixer tap?

Hello @teaganw 


Welcome to the Bunnings Workshop community. It's sensational to have you join us, and thanks for sharing your question about your shower mixer.


Repairing your shower mixer can be done with a bit of preparation. You'll need a set of Allen keys and a medium sized shifter that can open up to at least 30mm. I recommend turning off your mains water outside the house before you start your repairs. Make sure to turn your tap on to depressurize your plumbing set in the house. The handle on your shower mixer is held in place with a grub screw. The access point is often located behind the hot and cold indicator which you'll need to remove first, other times there is a hole along the bottom of the handle itself.


This grub screw can be removed with an Allen key, please put it aside in a safe place as you'll need it later on. Once the grub screw is removed hold the handle firmly and pull it off. Please note that the handle might be tightly fixed in place so it will take a fair amount of force to remove it, I propose twisting and turning the handle till it comes loose. Once the handle is off, you'll find a half dome cover that acts like a shield. This is the cover shield that covers the brass locking nut. Hold the shield firmly with your hand and turn it anticlockwise to loosen it up. 


Once the cover shield is removed get your shifter and turn the large brass locking nut anticlockwise to loosen up and remove. Once the locking nut is removed grab the square plastic post of the ceramic cartridge and pull it out. I recommend bringing the ceramic cartridge to the store and comparing it to the spares in the plumbing aisle to make sure you get a similarly shaped replacement set.


My best advice is to sit the new ceramic cartridge properly inside the body of the mixer before putting the brass locking nut back into place. Simply reverse the disassembly procedure to put everything back together. Turn the water back on and test for leaks. I've placed a general image below as a reference for disassembly.


If you have any other questions we can help with, please let us know.


Eric


See something interesting? Give it the thumbs up!

Why join the Bunnings Workshop community?

Workshop is a friendly place to learn, get ideas and find inspiration for your home improvement projects