Hi,
I replaced existing shower head with dual shower head. Is there a way to tighten the spigot of the diverter to the O Ring? There are only 2.5mm hex screws. I tried to wrap tape around it but it still does not hold it tightly.
Welcome to the Bunnings Workshop community @jc089. It's terrific to have you join us, and many thanks for your question about tightening a showerhead.Is this one of our units? If so, could you please link us to it on the Bunnings webpage so we can investigate further?It appears that the two grub screws are designed to lock the unit in place at the 12 o'clock position, but that obviously isn't working for you. Does the screw when tightened hold it in position at all?
From the diagram, it appears that part number 17, with the O-rings, is designed to be attached directly to the copper pipe emerging from the wall. A system I haven't come across before, as these units typically screw directly onto the exposed threaded copper outlet. Did you have part number 17 brazed onto the copper pipe by a plumber? I'm interested in learning more about the installation so I can help with troubleshooting.Please let me know if you have any questions.Mitchell
This is from Estilo https://www.bunnings.com.au/estilo-wels-3-star-9l-min-chrome-3-function-1-2-twin-rail-shower-set_p0663827
Thanks for that @jc089. Can you tell me a bit more about part 17 and how it was attached to the wall?
Mitchell
screwed it in clockwise .
And when the unit is screwed onto part 17 and positioned at 12 o'clock @jc089, where it should be, the grub screws, when tightened fully with the Allen key, do not hold it in position at all? The grubscrews are what fix the unit in the correct position, and they should be locking it in place. If the grubscrews are not working, there could be something wrong with them, and it might be best to speak with a Plumbing Expert In-store to determine whether the unit is faulty and in need of replacement.
Surpringly, there is no holes on part 17 to hold the screws in place. I checked my existing Grohe one, it also have no holes at 12 o clock. How can the screws hold it in place? Can you check other brands to see if that's a normal set up?
The grub screws would typically insert into holes @jc089, they would tighten against the side of fitting 17. The friction of them against the fitting is what holds them there. Did you turn the Allen key sideways and use the shorter arm in the grub screw to tighten it quite hard?
As mentioned, many shower heads screw on to the threaded wall fitting without using grubscrews and the threaded tape is what allows them to sit at the required 12 o'clock position. So I'm a bit surprised that both the two grubscrews and threaded tape are not holding it in positon.Could it be that the grubscrews are actually holding it in position, but it's part 17 that is rotating and allowing it to drop down?
Hi Jc, MitchellMc seems to have this covered. These connections are similar to an Outside Hose Union Bibtap. It’s a bit of trial and error with the PTFE tape. You count the turns to the correct position and then put the tape on. Ignore the instructions about overlapping the tape 50%. Wrap about 20 turns clockwise and then use your thumb and forefinger to squeeze the tape into the thread. Or buy some Loctite 577. This seals and locks the thread in place.
Hi @jc089,
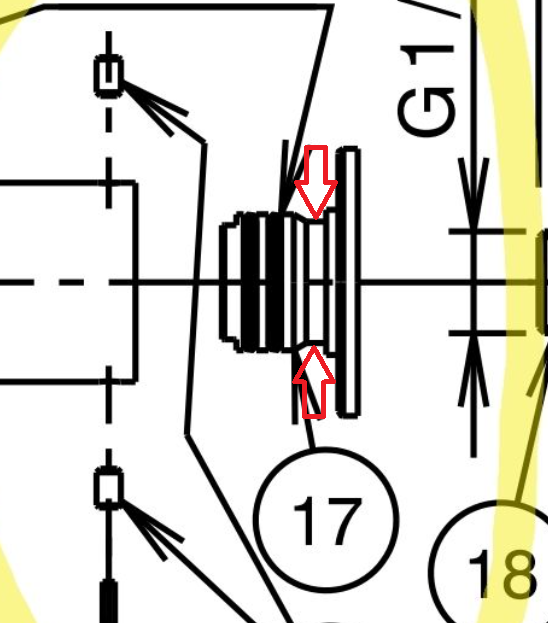
I've just had another thought. I've likely made a mistake in how I perceived this fitting to work. I looks like part 17 screws on to the existing threaded wall outlet. Then, part 12 pushes onto it. In you picture part 12 does not appear to be pushed fully against the chrome cover flange on the wall and if that's the case the grubscrews will not screw into the recessed channel on part 17. I've indicated were the grub screws should lock into in the image below.I presume you tried this initially and only resorted to the thread tape as it didn't hold in position, but the thread tape might be preventing part 12 from fully pushing on, allowing the grub screws to engage the channel.
Could you please take the thread tape off and push the fitting (part 12) firmly onto part 17. It might take some force to push it on fully. I would expect the back of part 12 to rest seamlessly against the cover flange on the wall, without that visible gap as shown in your image.