Workshop
Ask a question

The Bunnings Workshop community can help with your home improvement projects.

How to install Kaboodle Hevea benchtops?

Edgar
Growing in Experience

How to install Kaboodle Hevea benchtops?


20240422_120757.jpg

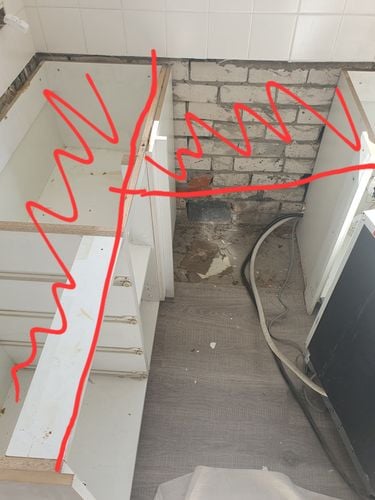
I am installing new Hevea benchtops over existing base cabinets. The installation instructions state the joiners should be used. However, will this be possible considering that the join will run along the top of the base cabinets? (See photo). Do I need to reconsider the dimensions of the different benchtops and how they connect? 

EricL
Bunnings Team Member

Re: How to installing Kaboodle Hevea benchtops?

Hello @Edgar 


Thanks for sharing your question about your benchtop. Your analysis is correct the benchtop join will be over the cabinetry preventing you from tightening the benchtop nuts. Your cabinetry layout is fine, I suggest instead shifting the benchtop join in the other direction. In this manner you'll be able to access the benchtop joiner from underneath.


I've sketched a sample image and placed it below to give you an idea of how they can be put together. I propose doing a test fit before you cut the benchtop anchor points in the benchtop.


If you have any other questions we can help with, please let us know.


Eric


See something interesting? Give it the thumbs up!
Edgar
Growing in Experience

Re: How to installing Kaboodle Hevea benchtops?

thank you for getting back to me. I had considered that, but given the layout of the remainder of the cabinetry i dont think it will work (Apologies. I should have posted the entire the layout.) It's an inverted "U" shape with the sink running across the top. The length across the top is longer than a uncut Hevea board, so doing as suggested will look a little odd. Are there other options that you can think of? 

EricL
Bunnings Team Member

Re: How to installing Kaboodle Hevea benchtops?

Hello @Edgar 


If the configuration I suggested is not ideal, the only option that comes to mind is to assemble benchtop first in its original configuration. In order for you to have access to the benchtop join, I suggest placing some very straight 90x45 timber pieces on top of the cabinetry base high side up. 


This will raise the benchtop off the cabinets which will allow you to access the benchtop joiners. Once you are happy with the assembly, slowly pull the 90x45 off the cabinets and allow the benchtop to settle down on to the cabinetry. Once the benchtop is in place double check for straightness and level and then anchor it onto the cabinetry.


If you need further assistance, please let us know.


Eric


See something interesting? Give it the thumbs up!
Edgar
Growing in Experience

Re: How to installing Kaboodle Hevea benchtops?

Wow! That was quick. Thank you for the suggestion. I think that could be a good workaround.  When I can I'll post some more photos, as I have a couple more questions.  

Thank you!

Edgar
Growing in Experience

Re: How to installing Kaboodle Hevea benchtops?

IMG-20240426-WA0005.jpg

Hello again. I cut the benches to size and I have been using the offcuts to practice with the jigsaw as I need to cut out the sink cavity from one of the boards. On practising I found the kickback was intense. Also, the board split entirely.  Are there options for how to cut out a sink hole without running the risk of the board splitting. 

JacobZ
Bunnings Team Member

Re: How to installing Kaboodle Hevea benchtops?

Hi @Edgar,


You could use a hand saw, but it would be very difficult to get a cut started and difficult to make rounded edges if you needed to. Unfortunately, the best option for cutting out a sink is a jigsaw. If you feel uncomfortable doing so, it may be best to contact a handyman for some assistance.


I have a few thoughts on what could help improve your cut with the jigsaw.


Firstly, make sure you have a good quality, fresh jigsaw blade that is designed for fine carpentry work such as these Diablo 100mm High Carbon Steel Jig Saw Blade for Fine Finish Wood Cuts. Make sure to check the compatibility with your particular jigsaw prior to purchase.


I would then check to see if there are speed options on your jigsaw. A faster speed can be more difficult to control but will not cut quite as smoothly. Have a play around to find out what feels comfortable and works for you.


Based on the photo above, another thing you can do is bring the sawhorses in, closer to where you are cutting. How they are currently, the board is supported on each end well away from your cut. This will mean the weight of the board in the middle is unsupported allowing the board to sag, this can cause the board to "pinch" the blade. Having the weight supported closer to your cut will help prevent this.


Like you've already done, have a practise run to make sure you're accustomed to the tool before committing to your final cut. Make sure the material is in a comfortable spot, at a comfortable height and set your feet steady. Being in a "boxing stance" with one foot forward and one foot back, weight distributed evenly, with a firm grip on the tool using both hands, will allow your body to absorb any of the unexpected forces that can happen when cutting with a jigsaw. Having control of your tool is all about having control of your body.


The next step I could advise is drilling larger holes to allow the blade to get up to speed well clear of the material you are cutting. Once the blade is up to speed, you can then slowly move it into the material. If you start the blade directly on the material, it will bite in and kick, and you risk snapping the board.


Finally, make sure to take your time. Jigsaws can be a bit unpredictable at times, but if you take the time to get comfortable with them, they are the best tool for this job.


Let me know if this is helpful or if you'd like some further guidance.


Jacob


Edgar
Growing in Experience

Re: How to installing Kaboodle Hevea benchtops?

I practiced on another offcut today and all your tips were very, very helpful and I successfully made a cutout in one of my offcuts. It wasn't perfect but I am much more confident I can get it done .


thank you

Why join the Bunnings Workshop community?

Workshop is a friendly place to learn, get ideas and find inspiration for your home improvement projects