Workshop
Ask a question

The Bunnings Workshop community can help with your home improvement projects.

Low-level Ekodeck over stencil concrete slab

Nat2
Building a Reputation

Low-level Ekodeck over stencil concrete slab


22AB4BEC-D034-4A4D-A43B-1AF2C01ABFF1.jpeg

DB445A51-E04B-48A3-9C4C-305D34F0CA91.jpeg

Hi There,

We are about to embark on building an outdoor deck over our existing stencil concrete patio.

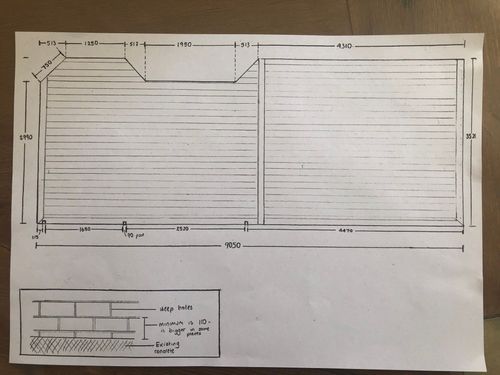
We are leaning towards using the Ekodeck product and have come up with a deck design for our given space. We want to keep it pretty simple due to having to work around a bay window. (See 1st image….. showing dimensions, placement of breaker boards and orientation of boards, and where bay windows are - hope you can read my diagram).


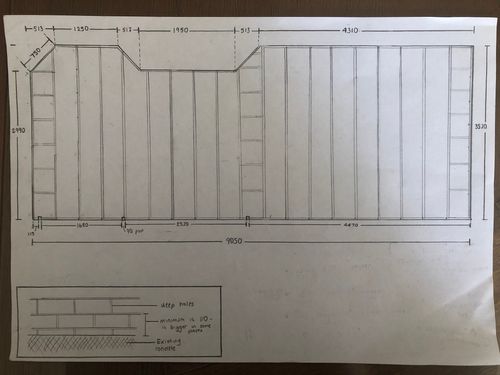
Now that the deck design is finalised I am planning the substructure and trying to prepare a list of all the materials I require for this part of the job. This next image shows the plan for the substructure - noggins are in place to support breaker /end boards).


After reading though a number of discussions on this forum I have noticed that when using a timber product for the deck that you recommend allowing as much space beneath the deck as possible for air flow etc. In particular I noted you recommended the use of 90x45 H3 Treated Pine and attaching to concrete using Dynabolts and heavy duty zinc plated angle brackets (ensuring  timber is not in direct contact with ground). 

However as we do not want our deck to sit flush with our brickwork, we were thinking of using the 70x45 instead? The concrete does not pool any water and is currently completely covered with a Vergola / pergola. I understand ekodeck have a minimum ground clearance with adequate drainage of 40mm, so I hope that using the slightly smaller timber would be ok - ie strong enough to support the deck traffic /no sponginess under foot). Do you think this would be ok?


Assuming it’s ok to use the 70x45 H3 treated pine, I was wondering about the carina heavy duty zinc plated angle brackets. Would using the 50x50x40x3.5 be strong enough (rather than the 75x75x40x3.5)?


This may be a silly question (and my husband will probably know the answer, but how many Dynabolts go into the concrete per angle bracket  - 1 or 2?


Similarly what screws do you recommend for attaching bracket to the timber joist - am I correct in assuming 2 screws per bracket? Any particular screw you can recommend?

Where the joists attach to the outer frame do I use joist hangers or can these just be screwed in from the outside into the end of each joist (with countersinking so doesn’t affect the way the fascia board sits)?


Finally should I be using Protectadeck PVC Joist system? And if so where do you recommend it is applied - where timber meets brickwork or where screws go into concrete, or both / neither?


I think that about it for now - just wanting to plan for all the materials and costs to start with. 

Kind Regards.


StevieB
Retired Team Member
Retired Team Member

Re: Low-level Ekodeck over stencil concrete slab

Welcome to the Bunnings Workshop community @Nat2 and thanks for your questions. We'd be happy to help you get started on this project.


Let me tag @Adam_W, @tom_builds and @EricL to see if they can share any thoughts to kick off this discussion.


Stevie


See something interesting? Give it the thumbs up!
EricL
Bunnings Team Member

Re: Low-level Ekodeck over stencil concrete slab

Hello @Nat2


Thank you for joining us and sharing your questions about your Low-level Ekodeck over stencil concrete slab project.


Thank you so much for sharing your decking plans with us. It's great that you've found information and inspiration from the low-level deck projects that have been shared in the community. I recommend using the Treated Pine Outdoor Timber Framing 90 x 45mm if your space allows it. It will save you from having to put too many angle brackets to support it. Using a Treated Pine Outdoor Timber Framing 70 x 45mm can be used but will require extra support. 


I suggest using the Dunnings 50 x 100 x 50 x 5mm M12 Galvanised Angle Bracket as it is made for exterior use. One Galvanized Dynabolt is enough to hold the bracket in place. I recommend Galvanized Hex Head Screws to screw the bracket into the timber. I propose using Joist Hangers as they provide greater shear force support to joists. Using Protectadeck 45mm x 25m PVC Joist is highly recommended for both applications. It sounds like a fantastic deck project, we would be keen to see any progress you make while building it.


Here is a link for ideas and inspiration: Top 10 most popular deck projects


Let me tag our experienced members @Adam_W and @tom_builds for their recommendations.


If you need more advice or information, please let us know.


Eric


See something interesting? Give it the thumbs up!
Adam_W
Workshop Legend

Re: Low-level Ekodeck over stencil concrete slab

Hi @Nat2 full-marks for forward planning!
As was mentioned by @EricL you can use the smaller spec timber, it just means adding more support. No biggie really.
For the extra supports you could even use TuffBlocks.
As was also said, one bolt is normally more than adequate in this sort of situation. Personally I prefer to use screw bolts as I've found you avoid that issue you sometimes encounter with Dynas where they start slipping. You can also put a screw bolt in very close to an edge without risk of cracking as they don't rely on expansion to lock in place.

Nat2
Building a Reputation

Re: Low-level Ekodeck over stencil concrete slab

Thanks Adam and Eric for your advice. Great tip about the screw bolts….. I will be sure to do that especially close to the concrete edges. I will finalise my materials list and get ready for starting to work on it.

ProjectPete
Kind of a Big Deal

Re: Low-level Ekodeck over stencil concrete slab

This will be an impressive deck when you're done @Nat2 - looking forward to seeing it.


When I install over concrete/brick I use 40x40x3mm aluminium frame as it gives you more room to play with the smaller dimension and you also don't need to allow the airflow you've read about as there are then no timber components in the deck. I've also used composite joists however these must be installed flat/flush on the concrete/bricks as they're not strong enough to bare weight without full support - they flex and snap.

----------
Handy and helpful
Instagram @projectpete.diy @at.home.rosehill @kayudesignco @aspirebamboo
Nat2
Building a Reputation

Re: Low-level Ekodeck over stencil concrete slab

Thanks ProjectPete. That is a good option to consider in our circumstances. I know Ekodeck make their Quickfit kits and clips to suit either timber or steel joists, so it couid be something for me to explore in terms of costs for materials and any additional tools I may need to purchase (such as pop rivet gun to attach clips or different drill bits etc).

We are in the early stages of this project, but I will definitely take photos and post updates as we progress. 

Nat2
Building a Reputation

Re: Low-level Ekodeck over stencil concrete slab

Well after many months we have finally made progress on our deck. We decided to delay starting it until after we painted our eaves, gutters and fascias and completed a few other small jobs around the yard. 


We are hoping to complete the deck this coming weekend - we only have few boards to install up against the house and the fascias to go.


With regards to the substructure we decided to use heavy duty angle brackets for the “bearers” and used a combination of blue tip screw bolts and Dynabolts to secure the brackets to the concrete. We used the screw bolts for all the brackets close to the edges of the concrete and dynas everywhere else. 

We used plastic shims to help with lifting and leveling the substructure and joist tape to help give the timber added protection and hopefully greater longevity. 

We did end up modifying our design a little (moved the breaker boards) just to make better use of the Ekodeck boards and to minimise using really small pieces around the bay window. 

As our concrete wasn’t a perfect rectangle and the levels weren’t even (concrete was slightly higher near expansion joints) there was definitely some challenging moments. And working in varying temperatures meant we had to be mindful of the expansion and contraction capacity of the Ekodeck product. 

Anyway here are some photos of where we are currently at and will post some final pictures when its complete. I have plenty of progress photos, so if anyone is interested I can post those too. The advice I got from this forum and also from Ekodeck directly has been invaluable. 

6C33541A-A572-4323-B217-408A7854B30B.jpeg

2C04E057-E08B-461C-884E-82A6249FCEB3.jpeg


EricL
Bunnings Team Member

Re: Low-level Ekodeck over stencil concrete slab

Hi @Nat2


Thank you so much for posting photo updates of your low-level deck. It looks amazing, it's given your front porch area a totally different look and is so very inviting. Would it be possible for you to post a few pictures of the deck framing before you covered it with decking panel? As this is a complex shaped deck, it will give our members a chance to see how you tackled the angled parts of the framing.


Please keep us updated with your progress, we look forward to seeing your low-level deck totally assembled and ready for use.


Again, thank you for sharing your low-level deck project.


Eric


See something interesting? Give it the thumbs up!
Nat2
Building a Reputation

Re: Low-level Ekodeck over stencil concrete slab

Thanks Eric.


The first thing we did was complete the perimeter of the substructure. We then attached the joists - for most of the joists we used joist hangers, however on some of the angled pieces we just screwed together. We also had to work around the pergola posts and downpioe. 

7ABBBD7F-80D0-4116-9843-94262944CBA7.jpeg

E84337B6-3E14-48A6-934E-36F03DB1897E.jpeg

1547ED49-A8F1-4A45-A911-BDD6E965F617.jpeg

Once the framework was complete we then started working on lifting the framework to achieve the desired level. We first placed the angle brackets in the desired location - aiming for approx 0.8m spacing (as we used the 75x45 h3) and alternating sides where we could. For example on the perimeter pieces we had to put angle backers on the inside, and sometimes where the joist was very close to or over an expansion joint in the concrete we had to Put the Angie bracket on the other side of the joist. We attached the angle brackets to the concrete (using dynas or connector screws) and then packed under the framework to get the desired lift. Once in place we attached the framework to the angle brackets. As the concrete was sloping away from the house we had to be mindful of lifting it the right amount in the right place. 
We also siliconed the packers in places just to prevent them from moving over time.

0CE1C8EB-B193-4D92-8674-D4061D697D32.jpeg

Once everything was we in place we added the joist tape. 

C998B892-E5EB-4AE1-BCFF-87BAD077A2B9.jpeg

First step in laying the deck was to do the picture framing and edge boards. We had to mark and cut around the posts snd pipes, whilst allowing for expansion and contraction of the decking. 

C4E2AEBA-29F5-4494-A0E6-FD1D5C96F89A.jpeg

2C21758B-EE5F-4D3E-9DA4-CFC61D5C681F.jpeg

72DD06AF-B9F4-42FA-8037-04D10D6D263D.jpeg

Once edging was done, we could start laying the deck in sections.

EA806968-D06E-4DF9-AED8-3DA88411D918.jpeg

9DC56D2A-08D3-47E5-8326-EF225BE50A00.jpeg

F1CFCBD4-2059-40E9-A3FF-844FDED6A910.jpeg

7E5CA095-503E-4793-93EA-F105E467D03F.jpeg

Just facias and final boards (to be ripped down and top fixed) to go.


Why join the Bunnings Workshop community?

Workshop is a friendly place to learn, get ideas and find inspiration for your home improvement projects