New to the DYI scene - I would love to learn and make something like this : https://au.pinterest.com/pin/1548181162926926/
https://au.pinterest.com/pin/12244230228473273/
I do need a saw - definitely cordless and lightweight.
What else would I need to make items such as that?
Welcome to the Bunnings Workshop community @Marie_123. We're pleased to have you join us and look forward to seeing how your D.I.Y. skills can develop over time.
I would encourage you to check out a couple of guides by experienced community member @Peggers:
Let me also tag some experienced woodworkers for their thoughts: @Alicia_Woodwork, @woodalwaysworks, @JoeAzza, @Benskimo.
Jason
Hi @Marie_123
This looks awesome and definitely worth having a go at! I would start with ensuring you have a saw - a hand saw is cheapest to start but you can’t go wrong with a proper drop saw if you’re looking to continue on your DIY journey. I started with this Ozito one from Bunnings
https://www.bunnings.com.au/ozito-1600w-210mm-8-corded-compound-mitre-saw_p0025645?store=2174&gclsrc=aw.ds&gad_source=1&gad_campaignid=11071326933&gbraid=0AAAAADtbEB8MeO-Jcb1FZO7POoJT3FvBr&gclid=CjwKCAjw24vBBhABEiwANFG7y4l856_deshAMxlwDuGefwgjJtc-XK5r-kIpAm-IXQUgw-9QpLLejxoCf18QAvD_BwE
but I’ve now moved onto an AEG. A cordless drill is also a must. Again, you can start with a Ozito one
https://www.bunnings.com.au/ozito-pxc-18v-cordless-10mm-compact-drill-driver-pxcdk-150-kit_p0049052?store=2406&gclsrc=aw.ds&gad_source=1&gad_campaignid=11071326933&gbraid=0AAAAADtbEB8MeO-Jcb1FZO7POoJT3FvBr&gclid=CjwKCAjw24vBBhABEiwANFG7y6z3SBpowWu6NForxc9LJ6OwHDIgqnaQ-j83ZLs159Nu9FIhw0uaeRoC61EQAvD_BwE
or if you already have some Ryobi tools, grabbing a drill to suit your current batteries is always easy.
Some counter sunk drill bits will make light and neat work of the joinery. Alternatively, join using dowels which can be done using the drill.
Lastly, the finish is all about sanding. Hand sanding still works a treat but if you’re keen to speed it up, getting your hands on a disc sander is always easier! I use a disc sander from Ryobi but again, start with what you are comfortable with purchasing.
Please let me know how you go and if you have any questions that pop up in the creation process - I’m happy to assist! I’m looking forward to seeing the final product 😊
- Alicia
Thank you so much. My Husband has a mixed bag of tools, Ryobi, and now a Makita Sander.
We have one hand saw and that definitely needs to be put into the bin 😋
I am hoping to get the most light weight, for wood (trying to recyle some old frames, boards and fence bits. Just straight line cuts at this stage.
The last two years, I have been working on turning our staircase storage into the boys / reading nook / hidden quiet space. I was trying to build shelves into the spaces where I thought was easy. Between beams like a recessed shelf for example. Cut then glue it in? Nail it in? Ahh so many questions.
It is finally getting there slowly and it seems the missing important items are an electrical rotary saw and understanding what tools does what 🙂
Thank you Jason, I will have a look at all the woodworkers work! Cannot wait!
Hello @Marie_123
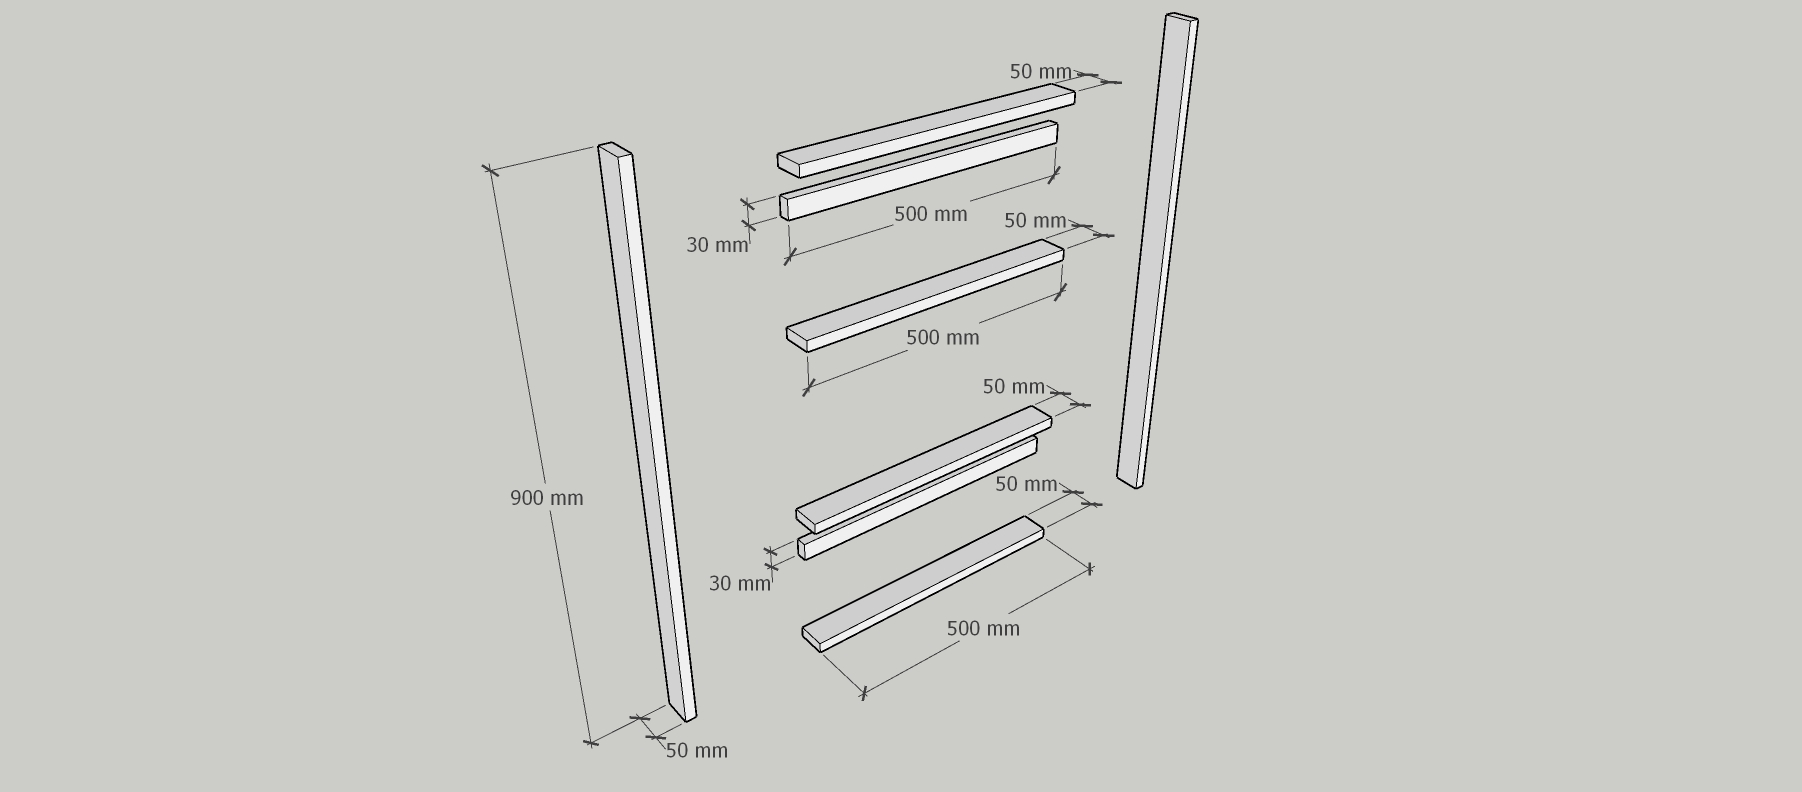
I've placed a basic image below to give you an idea of how you can assemble your bookshelf. Please note that the measurements are for reference only, please adjust them to your needs. The only thing I did not include in the plan is the timber dowel going across at the front. I put this aside so that the image will be clear and not cause confusion.
If you need further assistance, please let us know.
Eric
Hi @Marie_123,
That’s perfect that you already have a couple of tools! A circular saw is definitely best for cutting those long pieces of recycled wood into smaller ones but if you’re looking at just making straight cuts, a drop saw is definitely the way to go!
A reading nook is definitely a challenge but it sounds like you’ve been hard at it and it’s starting to come together. I’d love to see a photo if you’re up for posting the finished product in the future! 😊
Let us know how you go!
That you so very much @EricL!
I will do. The under the stairs nook broke into two zones. Once completed, I will hopefully be able to share.
Thank you so much!