How to install a Matrix Decor screen to a Colorbond fence?
Welcome to the Bunnings Workshop community @firenevac. It's great to have you join us and many thanks for your question.
The Matrix Decor panels can be screwed directly to the Colorbond fence posts and rails with Buildex 12-14 x 35mm Climaseal Hex Head With Seal Cladding Tek Screws 5 Pack. Depending on the height at which you want to fix the Matrix panel, you might find there is no top rail to screw into and just the Colorbond sheet. If this is the case you can fix strips of timber between the Colorbonds upright posts and then screw the panels to the timber.
Here's a helpful step-by-step instructional video on installing the Matrix frames which I trust you'll find useful.
Please let me know if you need further assistance or had any questions.
Mitchell
Hi MitchellMC,
You stated The Matrix Decor panels can be screwed directly to the Colorbond fence posts and rails with Tek screws. I have the assembly screws, which requires you to drill a 12mm hole in the decor panel for expansion & contraction. Do I use these assembly screws instead of using the Tek screws? What I was going to do, was follow the instructional video on installing the Matrix frames, but instead of a wall, installing on colorbond fence. A couple of weeks ago, I found a photo of a back fence of colorbond with one sheet of Matrix Decor Screen attached to the fence, but despite searching the net, I cannot find this photo again.
Could you please advise.
Firenevac
Hi @firenevac,
Just wanted to let you know that @MitchellMc will be back on the site tomorrow to assist you with your fencing project.
Let me tag a few helpful members who might be able to share their thoughts on next steps with you:
@Shannon, @Brad, @ProjectPete, @royq , @Nikkaz
Let me also extend a warm welcome to the Bunnings Workshop community. Please don't hesitate to reach out anytime you need a hand getting the most from the forum.
Thanks,
Jason
The screws I mentioned, Buildex 12-14 x 35mm Climaseal Hex Head With Seal Cladding Tek Screws 5 Pack, are self-tapping and will drill their own holes. The screws included in the kit are not self-tapping and will require a 4mm pilot hole as per the installation guide.
Bear in mind that if you don't install a mounting rail and instead screw the Matrix screen directly into the fence panel, then the screws will penetrate out the other side of the fence.
Another option to avoid screwing into the fence would be to drive a post on either side of the panel into the ground directly in front of the fence. The Matrix screen can then be screwed to the posts.
Please let me know if you need further information or had any questions.
Hi,
I am going through the same situation haha!
What screws would be used if I was to attach timber to the posts?
Thank you
Welcome to the Bunnings Workshop community @Simone2. It's great to have you join us and many thanks for your question.
You can use Zenith Gold Passivated Countersunk Head Metal Screws to attach the timber to your fence posts. Select a length suitable for going through your choice of timber.
To attach the Matrix screen to the timber you can use Otter 12g x 35mm Matt Black Class 3 Hex Head Screws - 90 Pack to suit the black screen.
We look forward to hearing more about your Matrix screen project and would encourage you to let us know if you need assistance or would like to share it with us. I trust you'll find loads of inspiration within the community as our creative members are contributing their projects here all the time.
Thank you to MitchellMC, I have installed 3 Matrix Decor Screens to Colorbond fence by scewing into top & bottom rails of colorbond fence.
Many thanks for the update.
It's great to hear you've had success with installing your Matrix screens onto a Colorbond fence. You might like to post some images of your screens as I trust it would provide other members with the confidence to give it a go themselves.
Hi i’m looking at doing this now, can you please show images of how to attach the wood frame and you mention you don’t need to drill it to the colorbond but to put it on the vertical railings, i don’t understand where exactly it sits.
Am looking to use the wood herringbone privacy screens onto colorbond fence by creating a timber frame it screws into. thank you. Very much an image person haha
Welcome to the Bunnings Workshop community @kristn4. It's fabulous that you've joined us, and many thanks for your question about hanging screening.
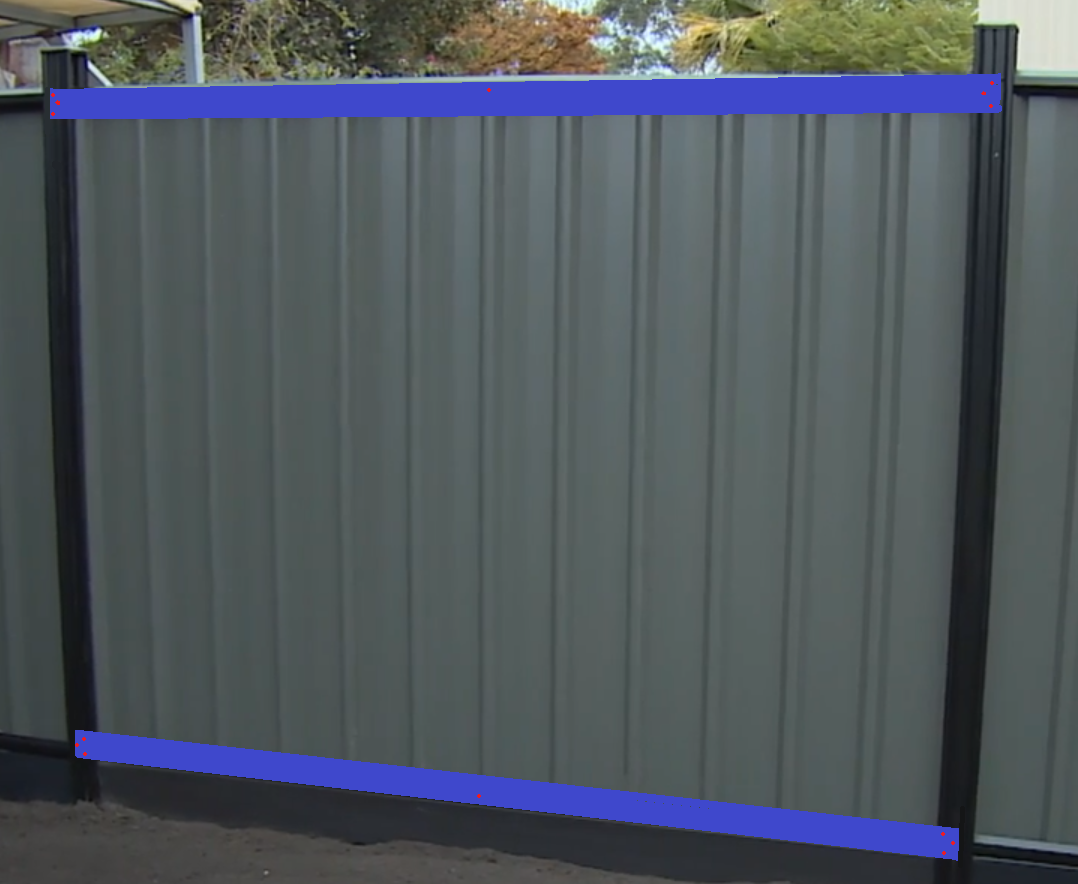
I've taken the image of a Colorbond fence from the beginning of this thread and pointed out the two vertical posts and the top and bottom horizontal rails(these rails are hidden behind the blue lines). You can attach your frame to any of these points. The posts are what hold the thin Colorbond sheeting upright. They are made of thicker material and are more suitable for attaching items onto. By attaching the frame timber between these two solid posts, it prevents you from having to drill and screw into the thin sheet. The Colorbond sheet is only a couple of millimetres thick, and if you were to screw into it, the screws would penetrate through onto your neighbour's side. I'm sure they wouldn't appreciate sharp screws sticking through.
Below I've included a couple of images from @ProjectPete's amazing transformations: Poolside fence makeover and Feature fences. They show how he's attached cladding to a Colorbond fence.
I'd suggest you screw the timber to the fence's upright post at the same height as the top and bottom of the Lattice Makers 1800 x 900mm Herringbone Hardwood Screen Panel. That would be 1800mm apart and positioned where you would like the screen to sit. If you were happy for the top of the screen to sit at the top of the fence, this would be best. You'll then be able to screw into the vertical posts and the top horizontal rail for additional support midway.
Please let me know if you have any questions.
Hi
I would like to install a Matrix 1800x1200 Decorative Screen Panel centered in a landscape orientation on a Colour Bond Fence. (as in the picture below) The Color Bond Fence is 2300 x 1800. So, fixing it to the post will not keep the panel centred. As you mentioned in the other post screwing to the thin fence will neither be stable nor would the neighbour approve the sharp screw at their end. Is there a solution to address this?
Thanks
Hello @gannugood
Welcome to the Bunnings Workshop community. Thank you so much for joining us and sharing your question about how to install your Matrix Panel in the middle of the Colourbond Fence.
Mounting the Matrix Panel directly to the fence poses the problem of the screws poking out the other side and posing a danger to your neighbors. The common method is using a piece of timber mounted onto the top and bottom posts of the Colorbond fence. In this instance, you could lower them so that they would be close to the center of the fence. You can then mount the Matix panel in the center of the timber posts. In order to disguise the timber, you will have to paint it the same colour as the fence so that it is not very obvious.
Another method is mounting the timber mounts vertically so that it is not too noticeable. Because we have a limited number of mounting points these are the only possible spots you can mount timber onto.
Let me tag our experienced members @diy_hausdesigns and @ProjectPete for their recommendations.
If you need further assistance, please let us know.
Eric
Thanks Eric.
Mounting it vertically seems like a good idea. I think painting it with the fence colour is also going to disguise it better.
Have a great day.
Keep us updated and reach out if you need further assistance @gannugood. I'm sure our members will be very interested in seeing your final project.
Hi @MitchellMc I’m also attaching the matrix 2400 extension to a 2400 wide colorbond fence.
two questions
1. if I drill into the posts of the fence with that sized panel, do I have to add an extra extension pole in the middle of the fence? If I do this it sounds like I have to add a wood piece either horizontally or vertically requiring painting
2. With these dimensions how do I a frame overhang to link all the panels? Or is this not required?
3. if I do do an overhang, what do I do with the last frame that sticks out? Will I have to saw it off?
thanks!
Diana
Hello @dianasilva
Welcome to the Bunnings Workshop community. It's brilliant to have you join us, and thank you for sharing your question about the Matrix fence extension.
If you are installing the Matrix 2400 x 600mm Charcoal Rainforest Fence Extension, the panel comes with a pre-coated steel frame and mounting posts. If circumstances dictate that a centre post needs to be attached, you can order another leg from the special orders desk. However, you can only mount it to the top rail of the Colorbond fence.
Here is a handy step-by-step guide:
Thanks but it still doesn’t answer questions 2 and 3.
the video is great and I haven’t watched it a dozen times but it only addresses 1 straight forward case of putting it on a wood fence
Hi @dianasilva
In the instructional video at 45 seconds from the start, the installer recommends pushing the panel forward by 60mm if you are joining the panels together as a single unit. You'll see the finished product at 2:36 and clearly see how the panels were joined together. The excess overhang will need to be trimmed off with a saw. The excess steel frame at the start can be cut off with a hack saw or you can use the trimmed panel and use it as filler at the start.
Would it be possible for you to post a photo of your Colorbond fence? This will give our members a chance to assess their condition. We can then make recommendations on how to proceed.
If you have any other questions we can help with, please let us know.