The Bunnings Workshop community can help with your home improvement projects.
- Bunnings Workshop
- >
- Discussion
- >
- Garage and Shed
- >
- How to repair table saw?
How to repair table saw?
- Subscribe to RSS Feed
- Mark Topic as New
- Mark Topic as Read
- Float this Topic for Current User
- Bookmark
- Subscribe
- Mute
- Printer Friendly Page
- Mark as New
- Bookmark
- Subscribe
- Mute
- Subscribe to RSS Feed
- Highlight
- Report Inappropriate Content
How to repair table saw?
Hi, I have an older model GMC(?) table saw that I bought second-hand several years ago. When I got it the winder handle to adjust the blade height was broken, but I could still manage to use it. Over the weekend I decided to see if I could fix it. I managed to manufacture and fit a suitable winder which looks reasonable (not pretty, but functional).
My problem is that I had to remove the spindle bolt to fit the new winder and (stupid me) I didn't take a photo of how it goes together before I dismantled it. Thinking it was simple enough, I pulled it apart and now I cant work out how it is supposed to go together and work. I just can't get my head around the concept of how it works.
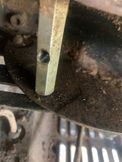
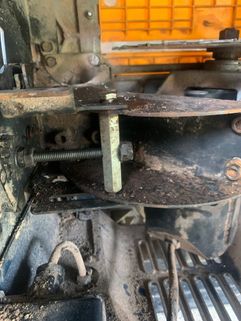
I am hoping that someone has a similar style of table saw and can provide a photo of the same part. I will provide some photos of it now. The problem is where the 2x sets of nuts should be positioned and tightened to make the saw raise and lower.
The close-up photo shows a long hex shaft with with a threaded hole through the middle (sideways). The spindle bolt which is turned by winding the (new) handle, goes through the threaded hole in the hex shaft. There are two pairs of nuts on the spindle bolt, which were locked up tight. I'm pretty sure one pair was on each side of the hex shaft.
I just can't work out where to fix each pair to make it work. I thought there is likely to be other saws out there that work in a similar fashion, and a phot of the setup might help me work it out.


- Labels:
-
Repairing
-
Tools and Materials
- Mark as New
- Bookmark
- Subscribe
- Mute
- Subscribe to RSS Feed
- Highlight
- Report Inappropriate Content
Re: I broke my table saw...sort of.
Hello @TekBoffin
I can relate to how you feel at the moment. I purchased a second-hand pushmower and I gave it a thorough clean, inside was a free-wheeling self returning jumping gear. It's supposed to lock the rotating blades when pushing the mower forward, but for the life of me, I could not figure out how it was installed.
In your case, I recommend trying the following technique:
- Positioning the winder to its lowest level.
- Position the motor housing until it moves the hex bolt to the end of the spindle bolt.
- Make sure the locking nut at the end of the spindle bolt is locked into position with the washer on the inside of the assembly.
- Move the other locking nut on the inside right next to the hex bolt and make sure to leave a gap so that the spindle bolt can turn freely and not trap the hex bolt. Please keep in mind to position the washer on the inside next to the hex bolt.
I've placed an image below to give you an idea of how to position the locking nuts. However, it will be necessary for you to adjust the level of the saw until you find that sweet spot where the saw is at its maximum safe height.
Let me call on our experienced members @TedBear and @JoeAzza for their recommendations.
If you need further assistance, please let us know.
Eric

- Mark as New
- Bookmark
- Subscribe
- Mute
- Subscribe to RSS Feed
- Highlight
- Report Inappropriate Content
Re: I broke my table saw...sort of.
Lovely schematic again Eric. 👍 @EricL
And I think you're spot on with your mechanical logic - the nuts are locked in place with just enough play to allow the spindle to move freely and 'push/pull' the hex shaft.
Under mine is a worm gear system...there is a problem with this method.
- Mark as New
- Bookmark
- Subscribe
- Mute
- Subscribe to RSS Feed
- Highlight
- Report Inappropriate Content
Re: I broke my table saw...sort of.
Hi @Noyade ... that is poorly thought out design. Maybe you could mount a toothbrush to wipe against the teeth. That way you could wind the saw up and down occasionally to clean the system.
I am pretty sure that my own saw is similar to @TekBoffin so I will check and send a photo asap if it is. (Unfortunately I am not able to do that this morning. )
But @EricL 's suggestion seems like a good approach (of course).
- Mark as New
- Bookmark
- Subscribe
- Mute
- Subscribe to RSS Feed
- Highlight
- Report Inappropriate Content
Re: I broke my table saw...sort of.
Hi Ted @TedBear
"Maybe you could mount a toothbrush to wipe against the teeth."
Thanks for the suggestion, but sawdust isn't the problem. It's powered by an induction motor that's hinged at the back which creates the tension on the belt. However at some saw blade depths the belt angle changes and with it the tension, so you sometimes get a "clatter" between the worm gear threads. Usually stops when you raise or lower the blade by a few millimeters. Hard to explain in words. But yeah, I think it's a poor design.
Much better is a very old saw bench from the 40's. The induction motor is below the blade - constant belt tension. This is the blade depth adjustment...
- Mark as New
- Bookmark
- Subscribe
- Mute
- Subscribe to RSS Feed
- Highlight
- Report Inappropriate Content
Re: I broke my table saw...sort of.
Hi Eric,
Thanks for that suggestion. I just tried it and unfortunately it didn't work. The reason it didn't work, is that the hole in the hex shaft is threaded! So it jams as soon as it hits either set of nuts.
Now as I type this, that means that the two sets of lock nuts must be at the two extremities of the spindle bolt travel. They must act as stoppers. I will go back down to my shed and try that. I did look at that yesterday and couldn't get it to work, but I'll have another play.
And I agree, it is a very nice image that you drew!
Cheers,
Greg
- Mark as New
- Bookmark
- Subscribe
- Mute
- Subscribe to RSS Feed
- Highlight
- Report Inappropriate Content
Re: I broke my table saw...sort of.
Hi again Eric and all,
I got it worked out.
Here is a photo of the threaded hex shaft

But there was another problem: the blade tilt is adjusted by turning the big outer surround of the handle. (I haven't used any other table saws, but I think that might be pretty standard.) Anyway, the tilt is driven by a bush that sits on the spindle bolt and goes through the table frame. It has a spline on the outside to mesh with the handle and it has a cog on the inside that meshes with a semi-circular toothed piece, which is driven up and down when the tilt handle is turned.
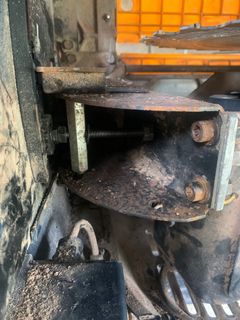
I found that this bush kept slipping along the spindle bolt away from the frame and out of the toothed section. I also found that the blade height handle would move away from the frame as I turned it. So, I realised I needed to stop the blade height handle from moving out and the bush from moving in. By locking the left hand set of nuts up close to the frame/bush (but not tight against it) that kept the handle and bush in place. Now when I turn the handle it moves the hex shaft along the spindle bolt. The right hand set of nuts acts as a stopper to prevent the spindle from winding right through the hex shaft.
Here are photos of the rectified situation, showing highest and lowest positions.


It all makes sense now. Thanks for your help. Sometimes I find that just by explaining the problem to someone else, I can get a better understanding of things. But I love this forum!
Cheers to all,
Greg
- Mark as New
- Bookmark
- Subscribe
- Mute
- Subscribe to RSS Feed
- Highlight
- Report Inappropriate Content
Re: I broke my table saw...sort of.
Hello @TekBoffin
Thank you so much for posting those updates. It's good to hear that you've sorted out your table saw mechanism. It's definitely one of the things that I did not consider that the hex bolt had a threaded shaft. I forgot to mention how ingenious your repair job is for the winder.
We look forward to seeing a test cut of the table saw.
Eric
- Mark as New
- Bookmark
- Subscribe
- Mute
- Subscribe to RSS Feed
- Highlight
- Report Inappropriate Content
Re: How to repair table saw?
Hi @TekBoffin, I have attached 2 photos of my saw table's mechanism that has some similarity to yours.
Sorry that they are a bit blurry, they looked ok on the phone screen, but less so on my PC screen, but hopefully you can get the idea....
My saw mechanism pivots at the white-looking bolt at the back of the lower picture, whereas yours appears to pivot in a larger arc from the top left corner of your picture.
Mine has the same hex-shaped threaded pusher but also has another thinner plate set in place after that, which just keeps the winder threaded winder-bolt in line.
My assessment of how yours would have been is - after the threaded winder-bolt passes through the front, there would be a washer and two of the nuts locked together, then another washer. This would locate the handle end of threaded bolt against the front, so it can then push the hex-shaped pusher away from the front when the handle is turned or pull it back when turned the other way.
The other two nuts with a washer would go on the far end of the winder bolt to prevent the threaded Hex pusher from winding off the end of the bolt when you get to the maximum travel. I guess you would be able to set the maximum travel by those if need be.
I hope this helps you to see the how and why of your mechanism.


- Mark as New
- Bookmark
- Subscribe
- Mute
- Subscribe to RSS Feed
- Highlight
- Report Inappropriate Content
Re: I broke my table saw...sort of.
Hi again @TekBoffin, I should have looked further down this thread before posting my pictures, but at least it is working now, and I am relieved to see that it does work as I had explained it, even if a bit late.
It's a great feeling when you solve such a problem isn't it?
Why join the Bunnings Workshop community?
Workshop is a friendly place to learn, get ideas and find inspiration for your home improvement projects
You might also like
We would love to help with your project.
Join the Bunnings Workshop community today to ask questions and get advice.


