
- Bunnings Workshop
- >
- Discussion
- >
- Outdoor
- >
- Re: Repairing a staircase
How to repair a staircase?
- Subscribe to RSS Feed
- Mark Topic as New
- Mark Topic as Read
- Float this Topic for Current User
- Bookmark
- Subscribe
- Mute
- Printer Friendly Page
Share
- Mark as New
- Bookmark
- Subscribe
- Mute
- Subscribe to RSS Feed
- Highlight
- Report Inappropriate Content
How to repair a staircase?
Hi Bunnings Workshop team,
I have an outdoor staircase with two sections. The upper section is in better condition, but the lower one is more damaged.
I need to fix and refresh the stairs and a few steps. What would be the best and most budget friendly way to do this?
Replacing the steps fully isn’t an option, as it would mean taking the whole staircase apart, which I can’t do.
Some steps have cracks and gaps up to about 1 cm.
Thanks in advance for any tips.


- Mark as New
- Bookmark
- Subscribe
- Mute
- Subscribe to RSS Feed
- Highlight
- Report Inappropriate Content
Re: Repairing a staircase
Hi @OlgaK,
Looking at what you have, the upper section of the staircase does appear to still have some usable life left in it. Those steps could be sanded back to remove the existing paint and surface deterioration, then recoated with a good-quality exterior paint such as Cabot's Timbercolour. That will help seal the timber, protect it from moisture, and freshen up the overall look, which should buy you some extra time on that section.
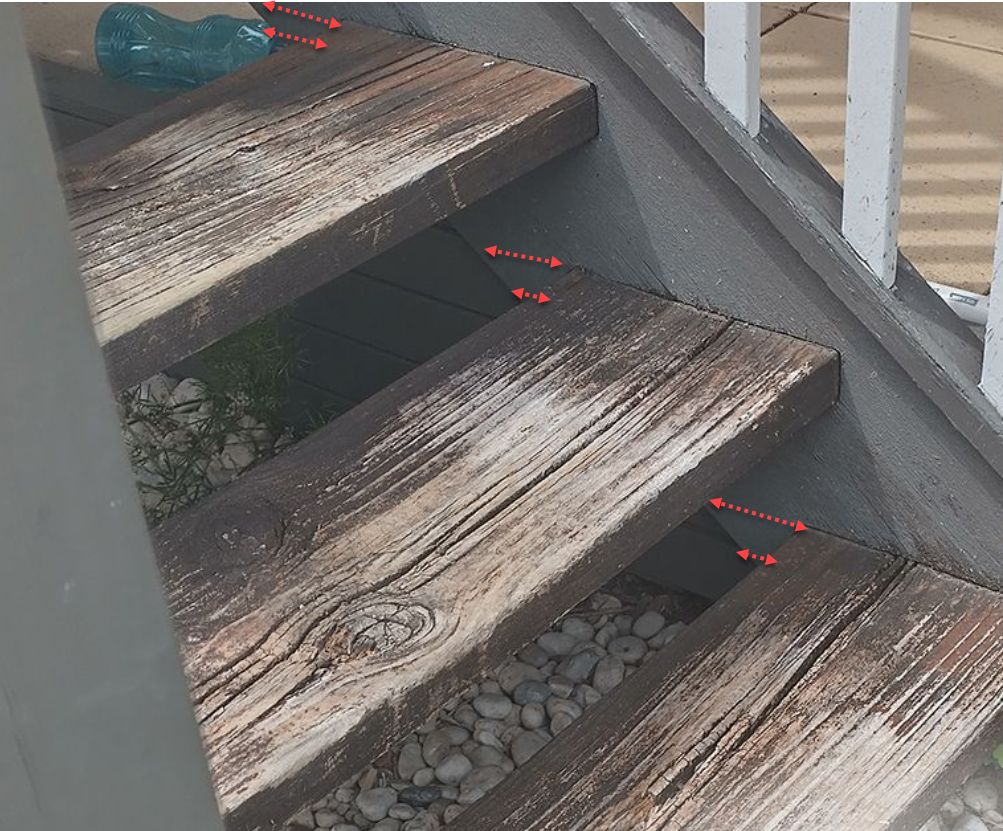
Unfortunately, the lower steps are a different story. The cracking, gaps up to around 10 mm, and visible decay indicate that those treads are no longer structurally sound. At that point, patching or filling is not safe or effective, especially on an outdoor staircase that is regularly exposed to weather. The last couple of photos are particularly concerning, as those steps are a genuine safety hazard. If a tread were to fail under load, there is a real risk of someone falling through and being injured.
Once timber stairs reach that level of decay, replacement is the only safe option. The good news is that this does not usually mean dismantling the entire staircase. Provided the side stringers are still in reasonable condition, individual stair treads can normally be removed by undoing the fixings through the stringers and tapping the treads out the rear. New treads can then be slid back into place and fixed off. I have replaced a full run of stair treads in a similar situation in a single day, so it is very achievable either as a DIY job or by engaging a professional.
I know replacement is not what you were hoping to hear, but safety really does need to come first here. Those lower steps, particularly the top one or two in that section, look close to failing.
Please let me know if you have any questions.
Mitchell
- Mark as New
- Bookmark
- Subscribe
- Mute
- Subscribe to RSS Feed
- Highlight
- Report Inappropriate Content
Re: Repairing a staircase
Hi @MitchellMc ,
thanks so much for the reply.
Unfortunately, removing the treads there isn’t that straightforward. The side fixings, especially on the bottom step, aren’t accessible from one side due to the way the staircase is built.
Also, the treads sit in routed pockets notches in the stringers, so simply undoing the side fixings isn’t enough. To remove them, the flight or one of the stringers would need to be moved or released. See photos.
I understand I could remove the upper treads by cutting them out, but I’m not confident I’d be able to fit new treads back into those pockets.
Are there any options to repair or reinforce the steps without dismantling the whole flight?


The treads are housed in routed pockets in the stringers, so simply undoing the fixings isn’t enough. To remove them, the flight or one of the stringers would need to be moved or released. Please see photos.
I understand that the upper treads could be removed by cutting them out, but I’m not confident I would be able to fit new treads back into those pockets.
Are there any options to repair or reinforce the treads without dismantling the whole flight?
- Mark as New
- Bookmark
- Subscribe
- Mute
- Subscribe to RSS Feed
- Highlight
- Report Inappropriate Content
Re: Repairing a staircase
Hi @OlgaK,
I see what you mean; that makes things rather difficult, but I would still agree with @MitchellMc that they need to be replaced.
What I would do in this situation is cut the treads out using a Reciprocating Saw, clean out the pockets using a hammer and chisel to remove any remaining timber and an angle grinder to remove any screws. I would then extend the routed pocket to the back of the stringer, using a handsaw to cut either side of the pocket, and a chisel to remove the material between the cut lines. You could then slip a replacement tread into the pocket from the back of the stringer.
You can then use a Galintel Galvanised Tread Mounting Bracket on the underside of the treads, with 40mm Galvanised Coach Screws to screw them in place. You would likely need to attach the brackets to the bottom tread before slipping it in place and you may need to dig out the stones beneath to have access to screw it to the stringers once in place.
Let me know what you think and if you have further questions, please don't hesitate to ask.
Jacob
Why join the Bunnings Workshop community?
Workshop is a friendly place to learn, get ideas and find inspiration for your home improvement projects
You might also like


We would love to help with your project.
Join the Bunnings Workshop community today to ask questions and get advice.