- Bunnings Workshop
- >
- Featured Projects
- >
- Marble-look benchtop using paint
Marble-look benchtop using paint
Share
- Subscribe to RSS Feed
- Mark as New
- Mark as Read
- Bookmark
- Subscribe
- Printer Friendly Page
- Report Inappropriate Content
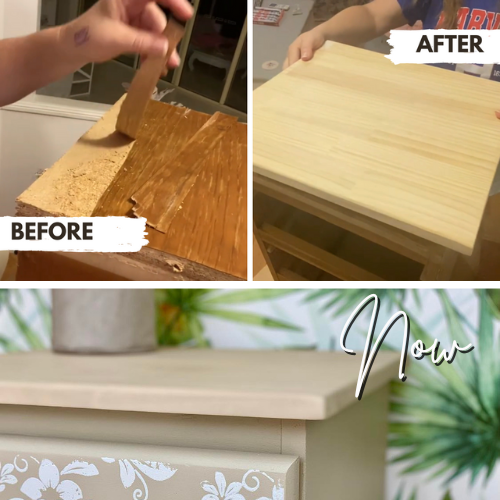
A marble-looking benchtop created with a feather, foam brushes, sponges and paint.

The project
I wanted to have the marble look for my benchtop, but not the hassle (or price) of removing and replacing the whole benchtop. I watched a few different techniques on Youtube and found this method to be the easiest with the best result.
Tools and materials
Materials used in the project:
- Dulux renovation range satin
- Renew tile and laminate paint
- Porter's Original paints
- Flexovit sandpaper roll
- Zinsser Bulls Eye 1-2-3 undercoat
- UNi-PRO mini roller set
- Plastic drop sheet
- Sugar soap
- Paint partner masking tape
- Clean up rags
- Foam brushes
- Car wash sponge
- Goose feather (from craft store)
- Glazing fluid (from craft store).
Tools used in the project:
Steps
Step 1
Thoroughly clean the benchtop with Sugar Soap. Then sand the benchtop to take off the sheen. Then wash again to remove the sanding dust. Ensure the benchtop is completely clean and dry.

Step 2
Tape up the edges of the benchtop with paint partner masking tape. Tape the drop sheets to cover the cupboards. Use newspaper to cover any sinks or stovetops.

Step 3
Apply the undercoat using the 100mm microfibre roller. I used the Zinsser Bullseye 1-2-3 as it's something I had already, and can be used on tiles, cupboards, frames and benchtops. It's very versatile and budget friendly.
Next, apply two coats of the gloss white paint. I used the White Knight tile and laminate paint (again so I could use for both the benchtop and the tiled backsplash).

Step 4
Mix up in a small cup a blend of one part glaze, one part water and one part grey paint (from the sample pot) mixed with some white tile paint. The aim is to have a light grey colour. (Later you will make a dark grey glaze).
Pour this glaze mix onto a plate or bowl. Use the sponge to stamp down and around in diagonal patterns, using images of marble as inspiration. Make sure to continue the pattern over the edges to make it look realistic. Work in small sections at a time.
Use a dry, clean rag to blot and blend the edges to create a subtle effect. This will give depth to the finished effect. At this point I did struggle a little with the paint not sticking to the base coat and bubbling a little. I found that once I squashed the paint in with the rag, it seemed to stick better, and second coats worked better.

Step 5
Wait for the first layer to dry before moving to the next step. Add more glaze to a plate and dip the feather in the paint until covered.
Wipe the excess onto some paper and start in one corner, working diagonally to drag twirling patterns with the feather to create veins. Working quickly, whist still wet, use a thick, dry brush to stamp at the veins and create a cloudy look. Keep wiping the brush clean on a rag. Work in small sections at a time, and continue over the edges.

Step 6
Make up a dark grey glaze (same as before but no white paint added). Using the feather, add darker highlights to small sections to add dimension. The key to this step is knowing when to stop.
Step 7
Mix up a white glaze, one part white paint and three parts water. Using the sponge brush, spread a thin coat over the benchtop, working in sections at a time.
Use a dry, clean rag to blot the glaze in random diagonal sections, which will lift up some white sections, and leave others cloudy, giving more dimension.
Step 8
To finish, give it a very light sand, using wet and dry sandpaper just to remove any raised sections. Then wipe clean.
Once dry, apply two coats of the sealing top coat. I used the Dulux renovation range satin clear coat. This was the cheaper option on the shelf, and I didn't experience any problems with mixing and matching my brands of undercoat, paint and sealer to get the best value.

All up this project was completed over a week. One coat each day (undercoat, 2 x topcoat), then the two days for the marbling, then two days for the two sealing coats. The total cost was under $300.
Other projects in this kitchen update were:
How to plan a kitchen renovation
Experienced Workshop member Adam has compiled a comprehensive guide How to plan a kitchen renovation.

More inspiration for your kitchen renovation
Community member ProjectPete completed an 80s kitchen renovation for less than $1000.

Workshop community member Nham gave his 20-year-old Hamptons kitchen a renovation that included custom cabinetry.

Check out our Top 10 most popular kitchen projects for more inspiration for your home.
Why join the Bunnings Workshop community?
Workshop is a friendly place to learn, get ideas and find inspiration for your home improvement projects