Workshop
Ask a question

The Bunnings Workshop community can help with your home improvement projects.

Training climbers to screen a fence

royq
Having an Impact
royq
royq
Having an Impact


This simple project uses Star Jasmine and cable to train the plant to cover a Colorbond fence. It has inspired many Bunnings Workshop members to create living screening solutions.


DSCN1955.JPG


The project


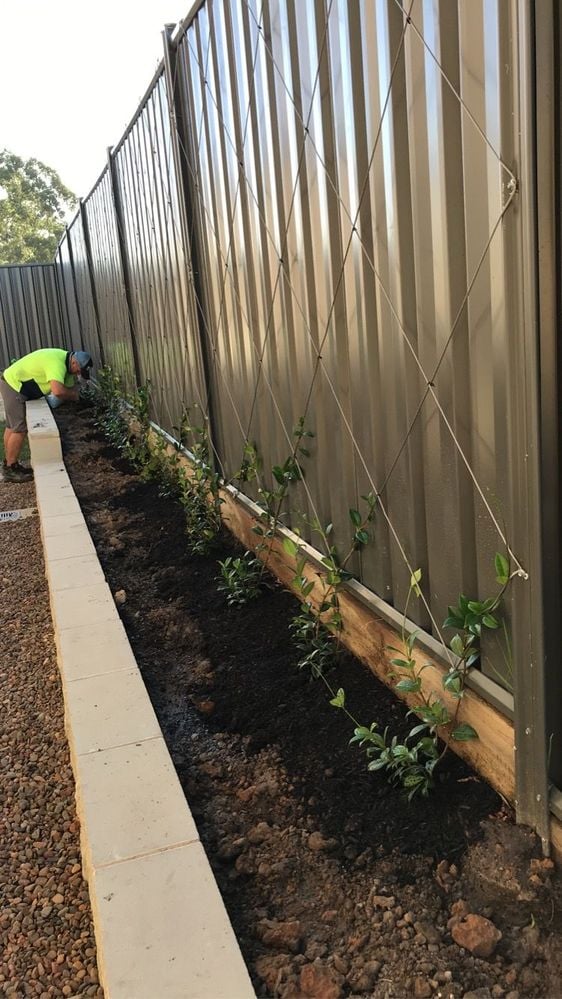
Easy little project at my brother-in-law's place. Took about 5 hours and cost less than $100 to cover 10m of fence: plants $68, wire $20, screws $8.50.


Really makes a difference.


The fence is all you can see from one of the bedroom windows, so it needed something to make it less bland. However the fence is very close to the house so we wanted to do something that wouldn't take up too much space.


I planted Chinese Jasmine Star because I know they work well in the climate and grow really fast. Added bonus they have a pretty white flower in spring. They were only $5 each too so no complaints.


I used a roll of stainless steel cable around 3mm diameter. Ordinary fencing wire would also work. I also used some small type 17 self tapping roofing screws.


To get the cable to tighten, I wound it around the screws in a clockwise direction so that as the screws tighten down they grab the cable and pull it tight. 


I made a quick video with a time lapse camera just for fun. 


Tools and materials


Tools:

  • Tape measure
  • Pen or marker
  • Battery powered drill or screwdriver
  • Correct drive piece for your chosen screws
  • Cable cutters
  • Gardening spade.


Materials:

  • Cable or wire
  • Screws (make sure the screw head is wide enough to clamp your wire)
  • Climbing plants (species dependant on your climate and personal preference)
  • 4-5 hours of you precious time.


How to


1. Measure and plan


FLSH8RMJF8IU6TR.jpegMeasure your fence panels so you can work out the layout of the trellis.


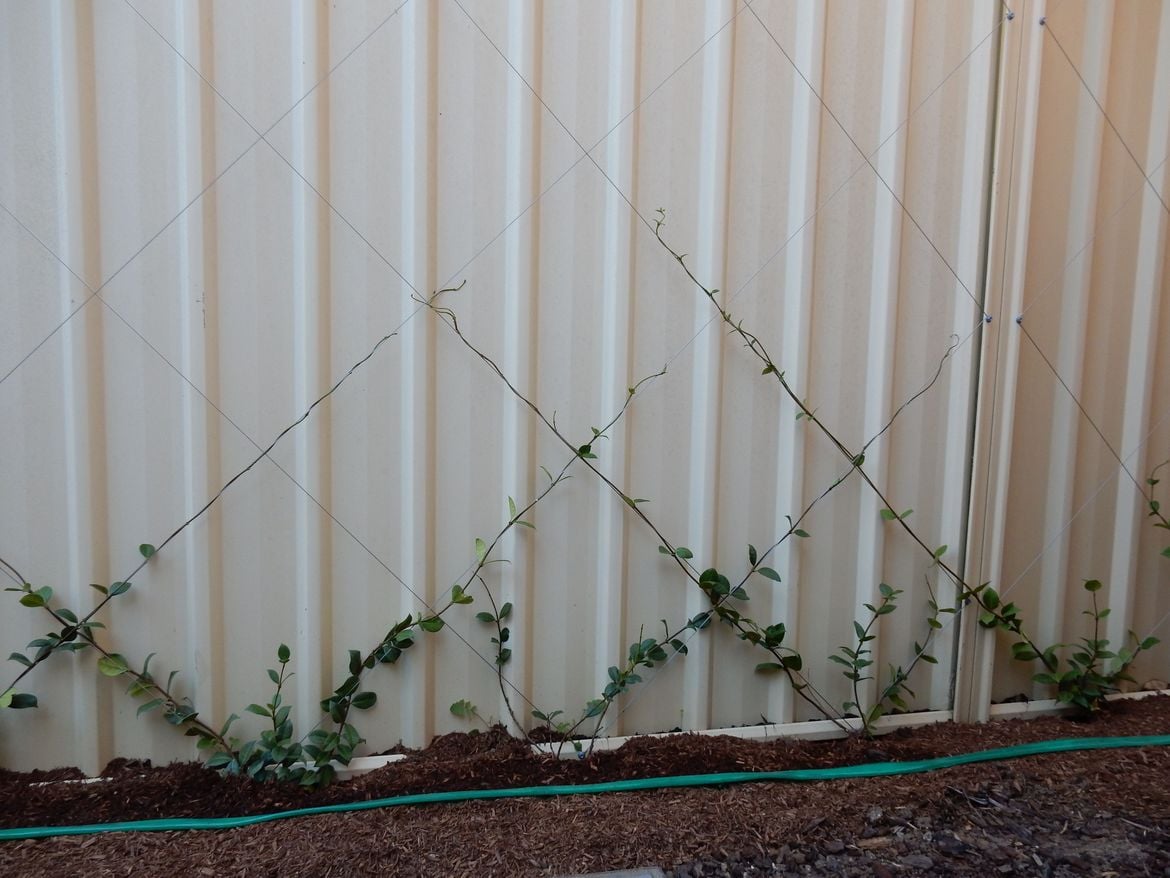
Sketch your fence panels on a piece of grid paper and work out what you want it to look like. From your sketch you can work out the dimensions you need the cables to work to. When sketching think about how far apart you want your plants to be and how many you want to plant.


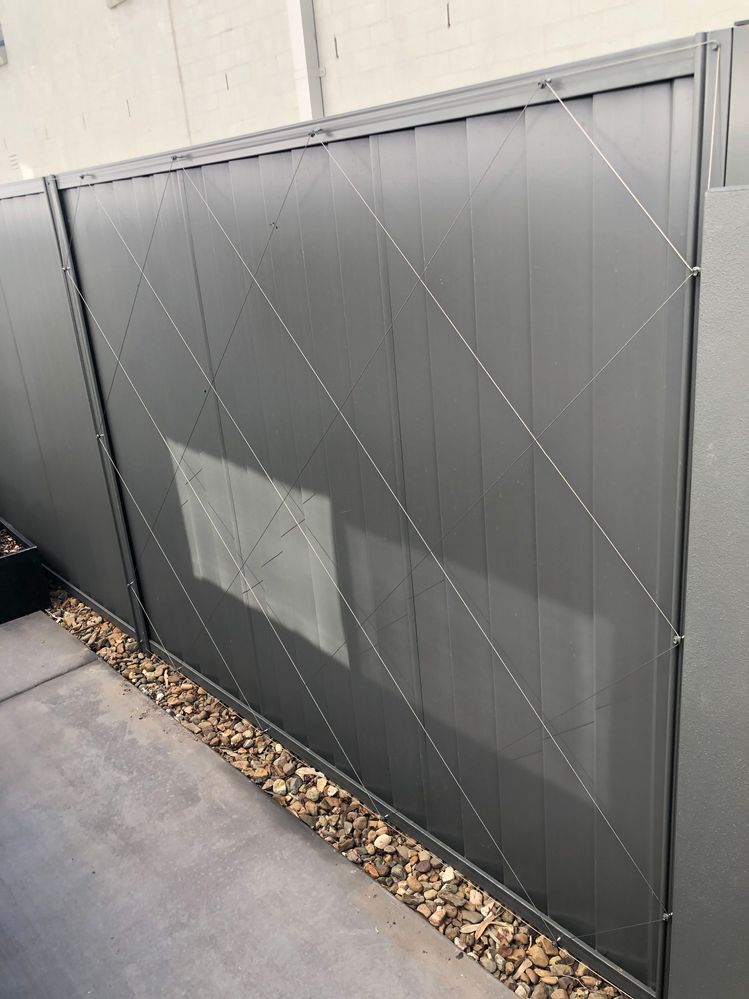
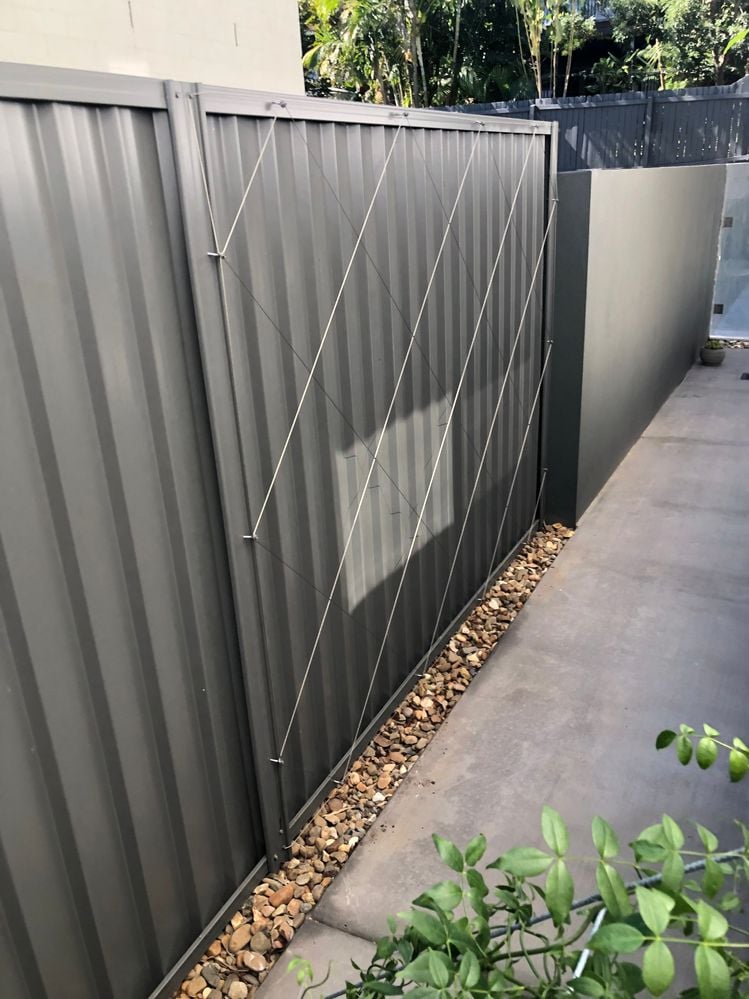
I decided on a simple diagonal checker pattern because it fitted the look I was after and suited the size of my fence panels.


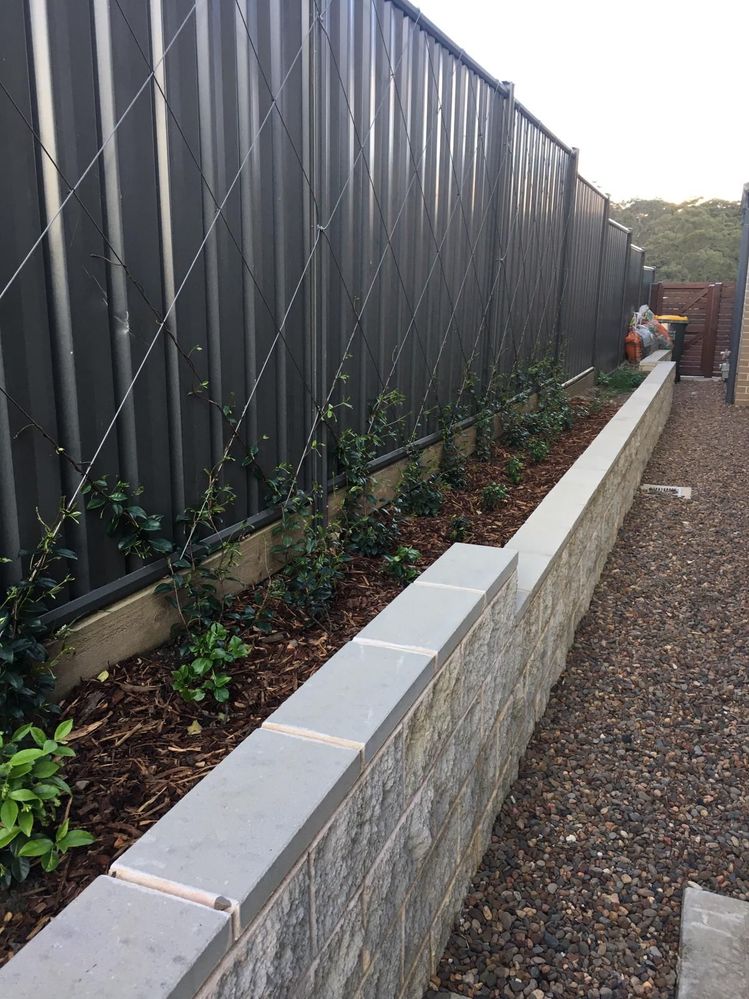
Note: Depending on your climate these metal fences can get really hot in the sun, here in Australia a dark coloured metal fence will burn your skin if it’s in full sun. If there wasn’t something on the other side of the fence shading it, I wouldn’t be planting this close to it as it will also burn the plants.


2. Mark out


Take the edge dimensions from your sketch and mark them onto the fence panel, this will tell you where to put screws. Put a screw into the fence at each mark, but don’t wind it right in just yet, leave enough room under the screw head to wind the cable around it.


3. Fit cables


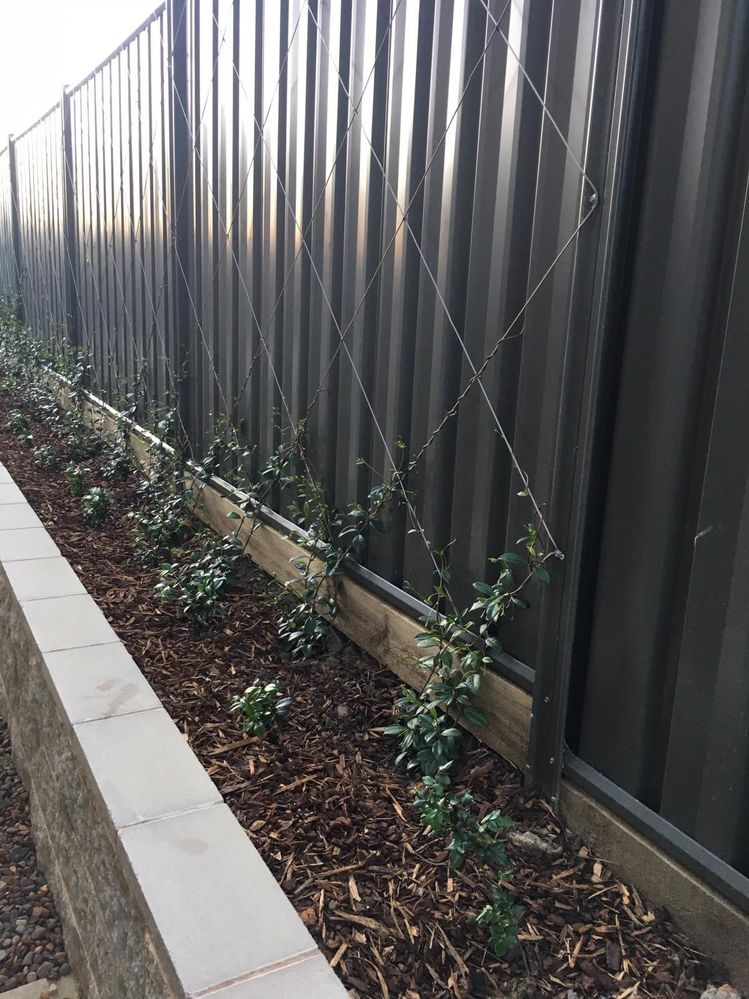
Now the fun bit, thread your cable around the screw heads and do them up as you go to help with the tensioning of the cable. It doesn’t matter how many times you stop and start your cables, the pattern I did was possible with a single length of cable so there is only one termination. When you get to the end point, screw it off and cut the cable nice and close to the screw head.


Tip: Wind the cable around the screws in a clockwise direction, that way it will tighten the cable for you as you wind the screw in.


4. Plant


Select a climbing plant that you want to use for this project and plant them at your chosen interval depending on your design.


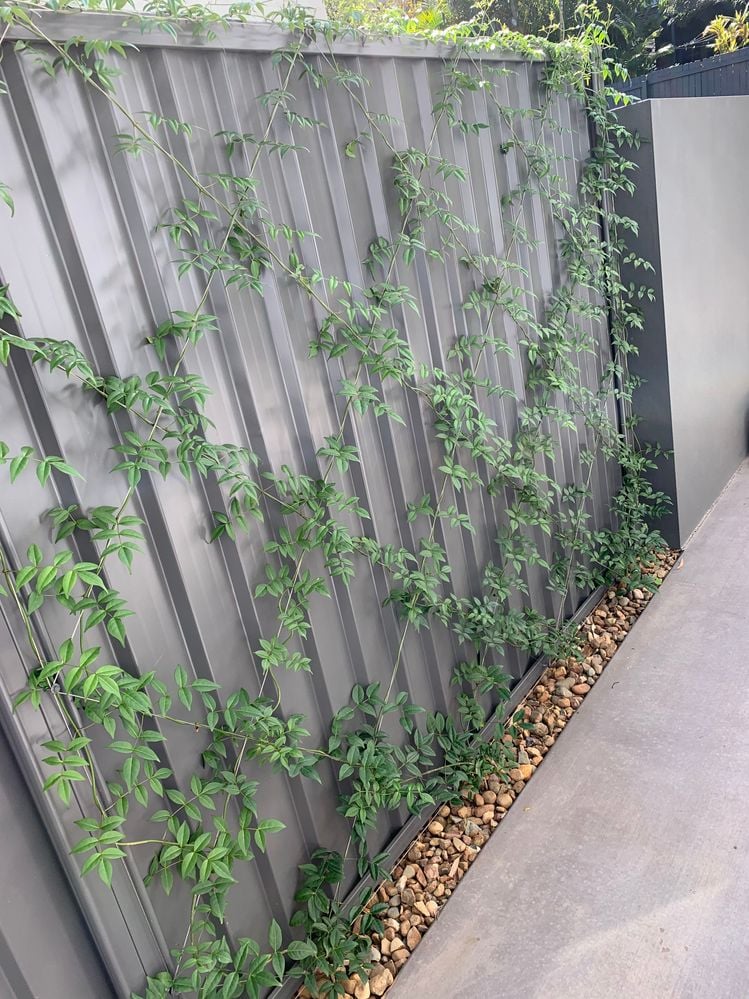
I have planted Star Jasmine (Trachelospermum jasminoides) because they suit the local climate, grow fast and have a really nice flower in spring. There are myriads of climbing plants to choose from.


Once you’ve planted it out, train the runners up the cables. You will need to continue to do this down the track if you want the plants to follow the trellis neatly.


Water the plants and throw some mulch around them to keep the moisture in. Train the vines on the cables, and in a few months your fence will look a million bucks.


Before and after


BeforeBefore

AfterAfter


Comments
far213
Growing in Experience

It’s  beautiful. My only concern is that the screws make hole in the fence so you can’t remove them in the future. Is there a glue that can be used instead?

EricL
Bunnings Team Member

Hello @far213


Let me tag @royq to make them aware of your kind words and question. When you've decided to remove the wire on your fence, I imagine removing the wires but putting the screws back into the holes to cover them. You can even colour the heads in the same colour so they blend in. In regards to the glue, I'm afraid they will not hold the wire because they're under tension. It will be necessary to use screws to hold them in place. 


If you ever decide to give this project a go, please make sure to post an update. I'm sure our members would be keen to see your take on the wireframe for your climbers.


Eric


far213
Growing in Experience

Do you think  I can use Gorilla glue to glue the screws on the shed instead of making holes in it?
  https://www.bunnings.com.au/gorilla-59ml-glue-bottle_p1662678?store=6194&gbraid=0AAAAADtbEB9QyU8TYpE... 

MitchellMc
Bunnings Team Member

Hi @far213,


Glue would not be suitable for this project, and I'd suggest screwing into the structure. What were your concerns in regard to screwing into the fence?


Mitchell


far213
Growing in Experience

Thanks for the reply. That’s good to know. My concern was that I didn’t want to make holes by screws on the shed but looks like there is no other option. It will look amazing in the end. 

cloudy25
Just Starting Out

Hi @royq love this project and hoping to replicate this weekend. Totally rookie here - could you let me know the exact screws and wire you used? Cheers

KatieC
Retired Team Member
Retired Team Member

Hi @cloudy25,


First, let me welcome you to the Bunnings Workshop community! It is awesome you have joined and are interested in creating a fantastic project of your own like @royq's.


In the original discussion thread Climbers to dress up Colorbond fence, @MitchellMc gave a suggestion to a similar question: From the video, it appears he (royq) is using Tek screws to attach the wires to the fence. These Buildex Metal C4 Hexhead No Seal Tek Screws 10g x 16 mm Shale Grey would be similar to what he used. The screws are placed in the fence and the wire is wrapped around their heads. When Mitch is back online on Friday and I am sure he can give a suggestion as to which wire would work best.


We would love to see what you create in your backyard, please share with the community when completed with your journey.


Katie


MitchellMc
Bunnings Team Member

Hi @cloudy25,


It's great that @KatieC has already provided my recommendation for the screws. I suggest Whites 1.60mm x 15m Stainless Steel 304 Grade Tie Wire for the wire. It would be perfect for this project, and I use it extensively around my home for training vines.


Please let me know if you have further questions.


Mitchell


mcgregor17
Just Starting Out

What about using PVC Green tie wire https://www.bunnings.com.au/jack-1-60mm-x-20m-green-pvc-coated-tie-wire_p3040628 instead of the stainless steel 304 grade?


Im just thinking it’s cheaper and blends in better. But any problems with this?

MitchellMc
Bunnings Team Member

Welcome to the Bunnings Workshop community @mcgregor17. It's brilliant to have you join us, and many thanks for your question about tie wire.


You can certainly use Jack 1.60mm x 20m Green PVC Coated Tie Wire. The 1.6mm thickness would be suitable to hold even a heavy vine, and the galvanised core and PVC coating will prevent it from rusting.


I can't see any issues with you using this product.


Please keep us updated on your project and reach out again if you have further questions. I'll be looking forward to seeing your results.


Mitchell


Sean_M
Just Starting Out

Any recommendations for the right type of nails to use with a standard wooden fence and the cable option? Going to give this a go... My fence is an eyesore atm 

EricL
Bunnings Team Member

Hello @Sean_M, 


Welcome to the Bunnings Workshop community. Thanks for joining the discussion.


If you are planning to mount the cable onto a timber fence, I suggest using Buildex 10-12 x 25mm Climaseal Hex Head Timber Screws - 50 Pack or similar. These are galvanized screws that have larger threads for gripping into timber and the hex head provides an excellent holder for the cable.  


In regards to the cable, I recommend using Jack 1.60mm x 15m Stainless Steel 304 Grade Tie Wire or Jack 1.60mm x 20m Green PVC Coated Tie Wire. Both are rated for outdoor use and are easy to bend into shape.


If you have any other questions we can help with, please let us know.


Eric


Sn0wy
Finding My Feet

Just looking into this as a project also, is there a pattern/process for creating the check pattern on the fence? as in using only one wire like the above? a little confused on where to start the process to create the pattern


Cheers

MitchellMc
Bunnings Team Member

Hi @Sn0wy


I've had a bit of a play, and it appears that you can start at any position; by nature, you return to the starting position. Have a look at the image below and see if you can follow the green line.


Please let me know if you have any questions.


Mitchell


wire.png


Sn0wy
Finding My Feet

@MitchellMc great stuff thank you!

Zizou
Just Starting Out

@EricL what's your thought about using something like this :

https://www.bunnings.com.au/everhang-black-magnetic-hooks-4-pack_p0089908


instead of drilling in the fence, it is a joint fence with the neighbours and I don't think they would approve drilling.


Many thanks,

EricL
Bunnings Team Member

Hello @Zizou 


Welcome to the Bunnings Workshop community. It's wonderful to have you join us.


Technically the short screws you use on the fence are attached to the post as well as the top and bottom rail. This means that they will not be visible on the other side of the fence. If you are worried about that, there is no need to as they are hidden inside the structure of the post and caps of the fence.


Unfortunately, the black magnetic hooks can't be used as they will not be able to hold the tension in the wires and will get pulled off.


If you need further assistance, please let me know.


Eric


Jcapelinha
Just Starting Out

Hi team, 


Do you think this would be suitable to hold and support a passionfruit vine? If not what would work best? 


Cheers

EricL
Bunnings Team Member

Hello @Jcapelinha 


Welcome to the Bunnings Workshop community. It's wonderful to have you join us.


It's possible that the training wire will be able to hold the weight of the passionfruit plant. But I suspect there will not be enough hanging wire space to to hold extended growth. I suggest swapping the single wire with either the RapidMesh 180 x 120cm 100 x 100 x 5mm Silver Wire Mesh Panel or the Jack 1800 x 1050 x 5mm Light Duty Reo Mesh


These should be strong enough to hold the passion fruit branches even if the plant gets overloaded with fruit. My best advice is to mount the wire mesh with space at the back. This will allow the plant to grow and expand without getting pressed against the Colorbond fence.


If you have any other questions we can help with, please let me know.


Eric


Jcapelinha
Just Starting Out

Thanks @EricL 


What would you suggest to mount the mesh while leaving a gap between the vibe & the fence? 

MitchellMc
Bunnings Team Member

Hi @Jcapelinha,


You might like to create a timber frame around the Colorbond panel and fix it with metal screws. Your mesh can then be installed onto the frame with fixing clips. The frame will provide the thickness to hold the mesh away from the fence panel.


Please let me know if you have any questions.


Mitchell


Davebro
Just Starting Out

Just a clue for you about attaching climbers directly to fences. The climber eventually gets so heavy that it can pull the fence over. Also the climber can grow between the panels and posts and prise the fence apart. Also the fence panels rust at the screw holes — ugly!! One solution is to NOT attach wires directly to the fence. Or walls too.

USE STAR PICKETS, the galvanised ones, and galvanised or stainless steel wires. About 30 cm from the fence or wall. Once the climber covers the structure you don’t see the star pickets. OK it costs more, but it’s cheaper in the long run!!

ALSO DON’T USE ORDINARY JASMINE: it is out of control after 12 months. As the article suggests, Chinese Star Jasmine is great. Also passion fruit. Also espaliered plum or citrus trees. 

Cheers, Davebro.

hayunit
Just Starting Out

Thanks for this post. I followed the instructions, tips from other questions, it all helped. Today I put up the wire frame and planted the chinese star jasmine plants. It looks great, I am looking forward to nights of winding the vines.


Don't judge me, but a rough sketchDon't judge me, but a rough sketchWire frame doneWire frame doneSmall gap behind tek screwSmall gap behind tek screwJob doneJob doneChinese Star JasmineChinese Star Jasmine

Jason
Community Manager
Community Manager

Great job @hayunit. It's fantastic to see this popular project continue to inspire so many people. 


Let me extend a very warm welcome to the Bunnings Workshop community. We're really pleased to have you join us and look forward to reading about more of your projects and plans in the future. Please feel free to post whenever you need a hand or have a project to share.


Jason


Why join the Bunnings Workshop community?

Workshop is a friendly place to learn, get ideas and find inspiration for your home improvement projects