
The Bunnings Workshop community can help with your home improvement projects.
- Bunnings Workshop
- >
- Discussion
- >
- Outdoor
- >
- Re: How to build Merbau decking for conc...
How to build Merbau decking for concrete alfresco?
- Subscribe to RSS Feed
- Mark Topic as New
- Mark Topic as Read
- Float this Topic for Current User
- Bookmark
- Subscribe
- Mute
- Printer Friendly Page
Share
- Mark as New
- Bookmark
- Subscribe
- Mute
- Subscribe to RSS Feed
- Highlight
- Report Inappropriate Content
How to build Merbau decking for concrete alfresco?
Dear community,
I need your assistance with the promise I made to my mrs to do Alfresco decking for us. I am currently in designing phase, watching plenty of videos. I am handy with day to day home repairing stuff using a drill, screwing, unscrewing things, attaching, detaching, fixing things. This will be my first big project and I have created a plan a detailed drawing for my vision based off the videos I have watched and learnt. I have questions that I will document below step by step. What I am requesting is a legend who knows things inside out, can hold my finger for a bit digitally while I am able to fly on my own.
Alfresco dimension - 3010mm x 3330mm
Step 1 - I have confirmed alfresco slab is all level using a spirit level.
Step 2 - Measure and cut 90 x 45 timber running top to bottom in photo and permiter. I want to avoid attached anything to the house toward family and meals as house is rendered hebel. 375 x 375 hebel pier is marked in red as well.
Step 3 - Total height from slab to door sill (if thats what its called) is 155mm. That means for decking to be almost level, I will have mini foot height 40mm + 90mm timber + 20mm boards.
Step 4 - Install horizontal joists roughly 450-500mm spacing by drilling and screwing and additionally using joist hangers.
Step 5 - Start with perimeter / picture frame on 3 sides and then work outwards.
Questions:
1. Is there anything wrong with the above understanding? Surely there is but I dont know what. All advise welcome humbly.
2. Tools needed: Circular saw, impact drill, driver drill, rotary hammer drill,
3. Are the vertical joists spaced 1m apart enough for 3010mm span?
4. Are 3 mini feet under 90 x 45 enough for structural support?
5. What screws to use to secure mini feet to the slab firmly?
6. What screws to use to attach 90 x 45 to mini feet? Should it go all the way through timber. Would you screw it or bolt it?
7. What screws to use to attached horizontal joists beween 4 x verticle joists? I do understand they should be minimum 90mm so it goes through the verticle joist and atleast halfway through horizontal joists.
8. What nails to use to further strengthen horizontal joints connection with verticle joints using joist hangers?
9. What's the best way to secure the permiter 90 x 45's (all 4 external sides) to the verticle joists?
10. Can 40mm packers be used under 90 x 45's externally as mini foot will be visible and wont give a finished look? Sorry if terminology is too incorrect.
11. What screws to use to fasten decking boards to the horizontal joints?
12. Do you recomment 140mm or 90mm merbau decking board given the area?
13. Can the merbau timber decking bioard be stained in Charcoal colour after whole deck is installed? to match some of the interiors.
14. Investing almost $800 in tools.Is Ryobi a good brand?


I have attached photos of all products i am going to have to order. Please help if i am missing something. I dont know anything about what screws, bolts and nails to use which is asked in the questions above. Also, please advise if there's any question that i should have asked but haven't.
Again, I am grateful, much more than I can explain, to the Bunnings workshop community in giving me clarity to pull this off and score brownie points from my wife 
-
- Mark as New
- Bookmark
- Subscribe
- Mute
- Subscribe to RSS Feed
- Highlight
- Report Inappropriate Content
Re: How to build Merbau decking for concrete alfresco?
Welcome to the Bunnings Workshop community @rohand. It's sensational to have you join us, and many thanks for your question about constructing a deck.
More than happy to hold your finger, but my preference would be to do more like a Jack and Rose on the bow of the Titanic type of arrangement.
You're off to a great start with this project, and it's clear you've put a lot of thought and planning into it. Your approach to building a Merbau deck over your concrete alfresco area is sound, especially given your preference not to attach anything to the rendered Hebel walls. A floating deck using adjustable pedestal feet, treated pine joists (90x45mm), and Merbau decking boards (20mm thick) is a solid, beginner-friendly solution. The total available height of 155mm is workable, and your proposed layout with 40mm mini feet, 90mm joists, and 20mm decking will bring you close to flush with the door sill.
In terms of tools, you're on the right track with essentials like a circular saw, drill driver, and an impact driver—though a single drill driver may be sufficient for the entire build. A rotary hammer drill won’t be necessary since I'm going to suggest not fixing anything to masonry. Ryobi tools are a good, reliable option for home D.I.Y. projects, and many experienced users have successfully completed decks using them.
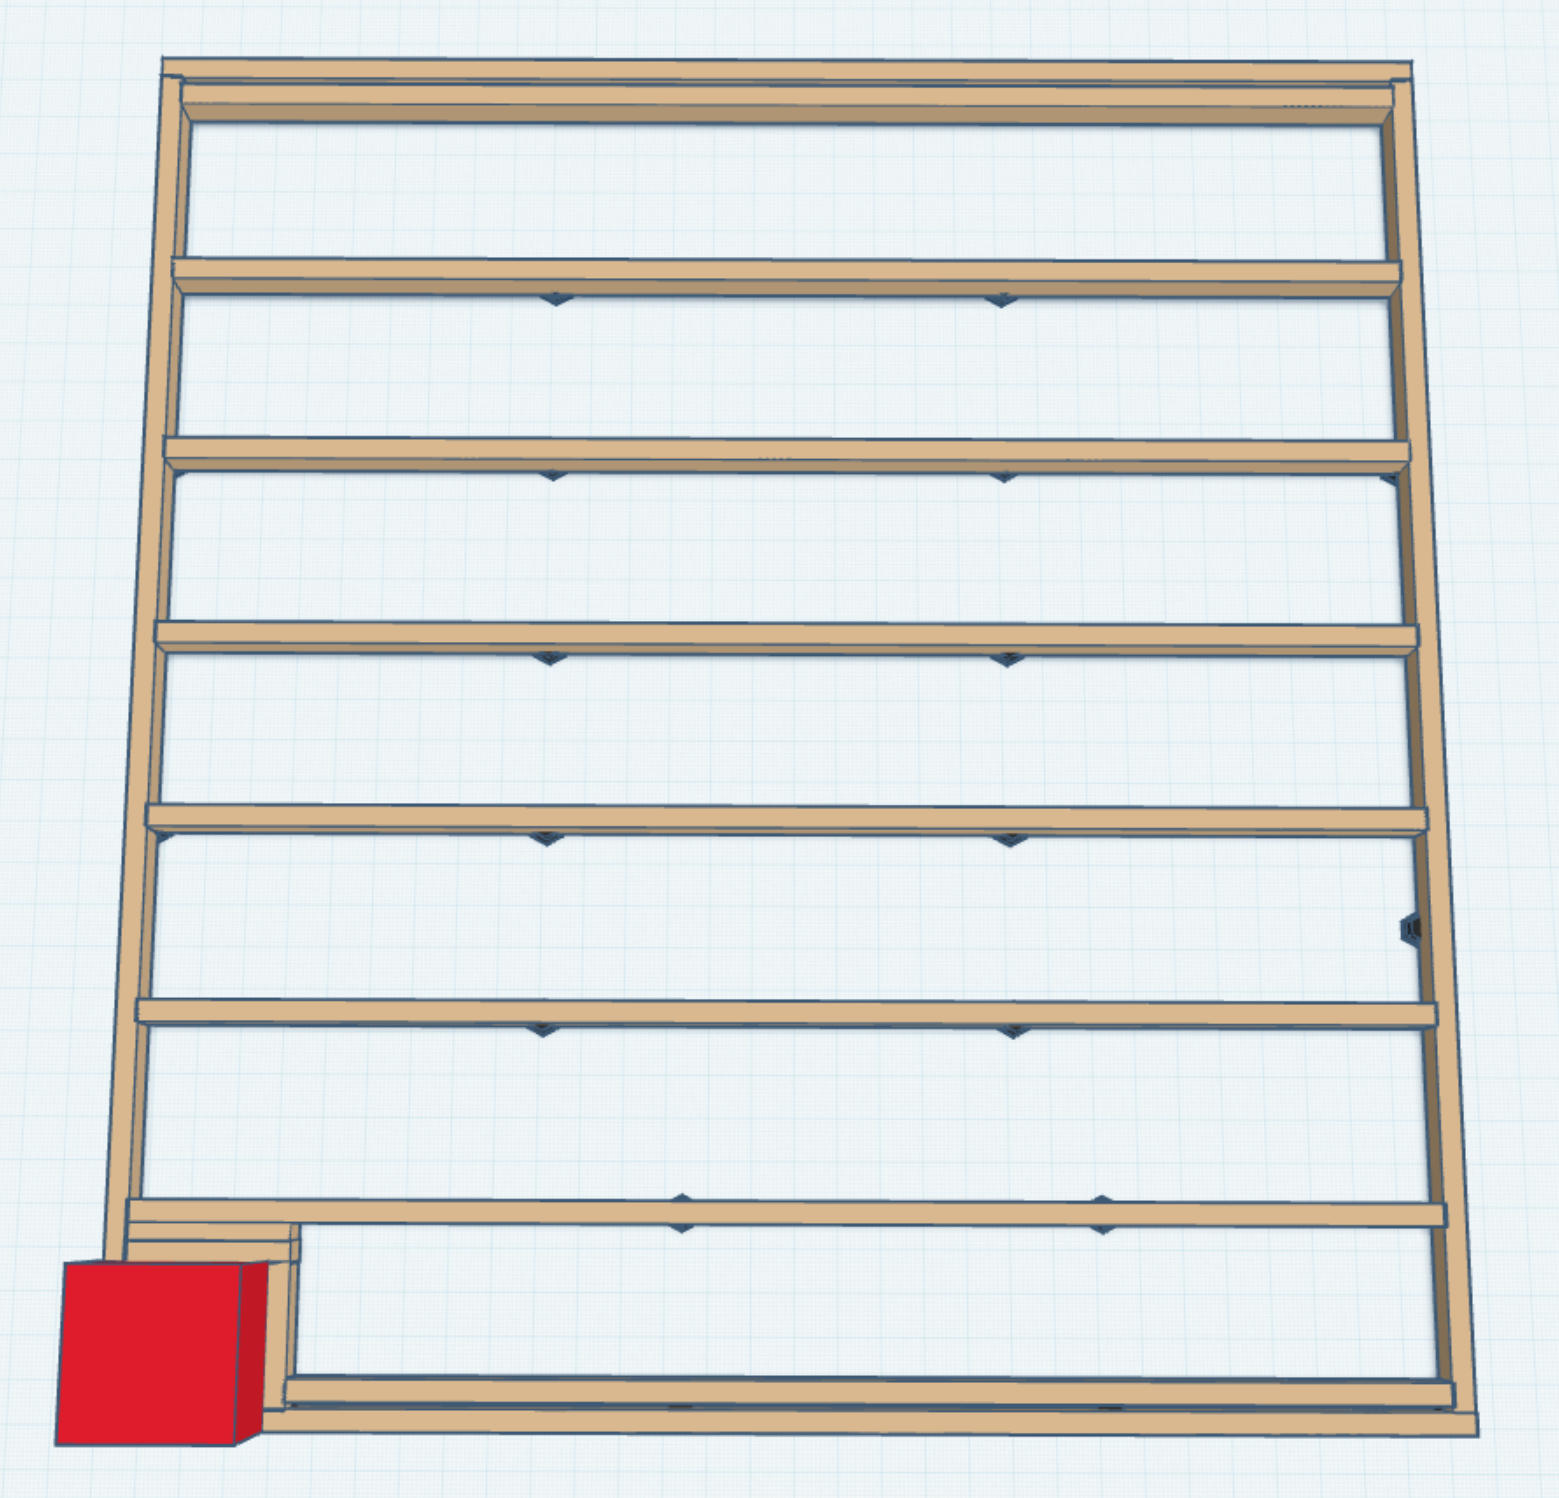
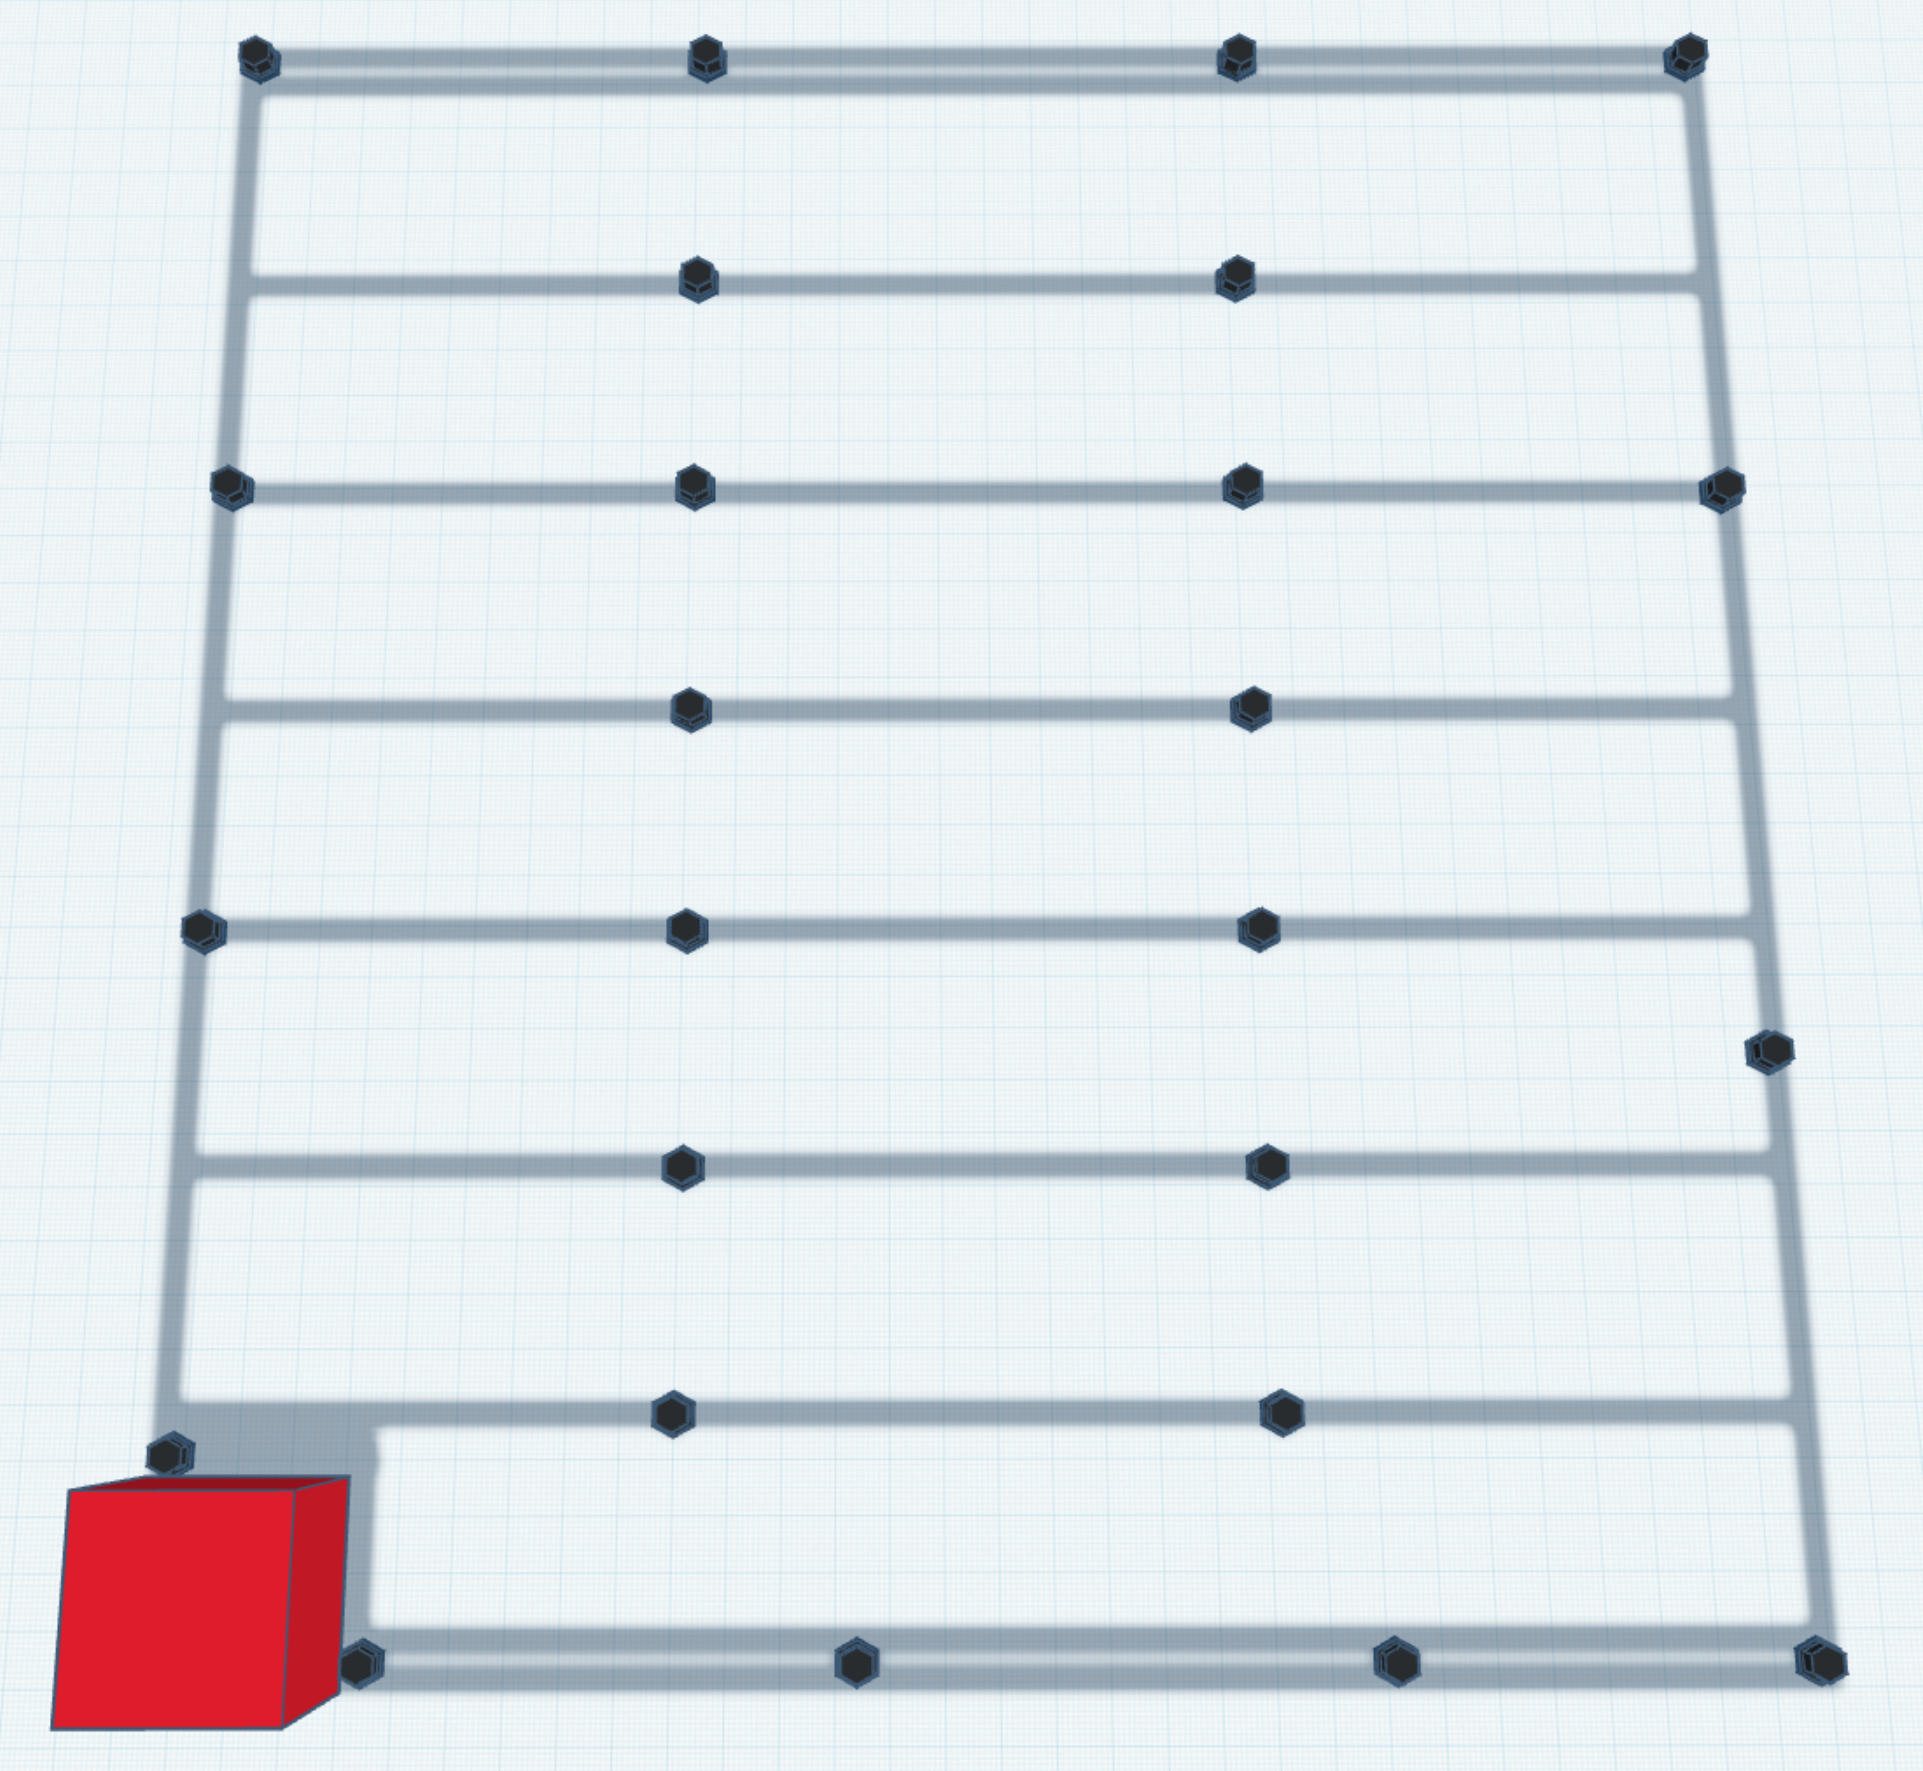
There are a few things to refine in your design. First, your initial joist layout runs into issues with orientation and support. It’s more efficient and structurally sound to run your decking boards perpendicular to your joists. That way, the joists span the short 3m direction and can be better supported. For that 3m span, placing mini feet at the ends and adding two rows evenly spaced (roughly every metre) will ensure the joists don’t bounce. It's recommended to have at least two pedestal feet per joist for that span.
You don’t need to fix the mini feet to the concrete slab. Since this is a low-level deck and as long as you're not in a cyclonic area, the weight of the frame and boards will hold everything in place. Likewise, you don’t need to screw the joists into the pedestal heads unless you want to—if you do, use small timber screws (40mm or so) just to keep them aligned.
To connect the frame, use 75–100mm bugle head construction screws—100mm is ideal so that it passes through the 45mm frame and halfway into the adjoining timber. Always pre-drill with a 5mm drill bit to avoid splitting the pine. There's no need for joist hangers.
For the perimeter or picture frame, you’ll need double joists wherever the decking boards meet the frame—this allows you to screw both the ends of your main decking boards and the picture frame into secure timber. Use a 140mm board for the picture frame and 90mm boards for the main area for a clean, professional contrast.
If you don’t want mini feet visible from the side, avoid using 40mm packers directly. Instead, recess the pedestal feet inward slightly and finish the edge with a 140mm Merbau board as a fascia. This hides the feet and gives a clean edge, matching your picture frame width.
To fasten the decking boards to the joists, use 50–65mm stainless steel decking screws. Two screws per board at each joist are standard. Avoid nailing as screws provide better long-term hold and allow for easier replacement if needed.
In terms of board width, 90mm boards offer a more classic look with slightly better resistance to cupping, while 140mm boards reduce the number of boards needed but require more attention to installation to avoid warping. A mix of 90mm boards inside with a 140mm picture frame is a great visual combination.
As for staining, Merbau is already quite dark and oily. While you can apply a decking oil with a charcoal tint, don’t expect a dramatic colour shift—especially if the boards are already reddish brown. Test any stain on offcuts first and speak with our Paint Experts at your local store to explore compatible options.
Lastly, painting the underside of the joists with a bitumen-based protective coating is a smart move given your low clearance. It helps prevent moisture damage and prolongs the life of the timber.
Check out the rendering I've created for you below and let me know what you think.
You're asking all the right questions—don’t hesitate to ask more as you build. You've got this.
Mitchell
- Mark as New
- Bookmark
- Subscribe
- Mute
- Subscribe to RSS Feed
- Highlight
- Report Inappropriate Content
Re: How to build Merbau decking for concrete alfresco?
@MitchellMc - I am on board with the titanic thing mate, my wife might kill me but if it gets the deck done, she will be alright.
So joists will be running in direction of the shorter side (3m) roughly and decking boards running perpendicular in direction of longer side (3.3m).
What should be the joist spacing based on your best knowledge for deck to be structurally sound?
And I dont know the technical term for 90 x 45 that is at times installed between joists nailed on both joists. Not sure how much i am making sense but is that necessary?
- Mark as New
- Bookmark
- Subscribe
- Mute
- Subscribe to RSS Feed
- Highlight
- Report Inappropriate Content
Re: How to build Merbau decking for concrete alfresco?
Hello @rohand
I suggest spacing the joist at 450mm. Here is a good example of a single level deck - Low-level composite deck over concrete and soil by @oninpena. The timber pieces you are referring to that go between the joist are the noggins. they can be spaced at 750mm or less if you are attaching more of them in a single gap. They are usually installed offset each other to stiffen and brace the decking frame as seen in the link I've provided.
If you need further assistance, please let us know.
Eric
- Mark as New
- Bookmark
- Subscribe
- Mute
- Subscribe to RSS Feed
- Highlight
- Report Inappropriate Content
Re: How to build Merbau decking for concrete alfresco?
Hi @EricL thank you for your response.
I have just gotten 3000mm lengths of H3 treated pine 90 x 45's
Quite a few of them i have seen has slight curve in them, believe they call it warped.
Does it affect the strength or buildabiity and if it does how can i battle that?
I am also going to spirit level across all parts of the frame to ensure its level before starting to lay boards.
- Mark as New
- Bookmark
- Subscribe
- Mute
- Subscribe to RSS Feed
- Highlight
- Report Inappropriate Content
Re: How to build Merbau decking for concrete alfresco?
Hello @rohand
You have the option of returning the warped timber pieces for straight ones at the store. I suggest speaking to the team member you purchased the timber from and telling them that there are some pieces that are warped that you would like to exchange. You can also use them for the noggins as they can be cut down to short pieces. Use only the straight ones for the joist. But if they are very warped then I would definitely suggest exchanging them.
If you have any other questions we can help with, please let us know.
Eric
- Mark as New
- Bookmark
- Subscribe
- Mute
- Subscribe to RSS Feed
- Highlight
- Report Inappropriate Content
Re: How to build Merbau decking for concrete alfresco?

hi Eric and Mitchell. There’s some progress. Thoughts?
- Mark as New
- Bookmark
- Subscribe
- Mute
- Subscribe to RSS Feed
- Highlight
- Report Inappropriate Content
Re: How to build Merbau decking for concrete alfresco?
Hello @rohand
Your decking frame looks fantastic; my only suggestion is to add more noggins if you have any left-over pieces. I tend to over engineer my projects, and I think it just needs a few more pieces to make the frame stiffer. To be specific those areas where you've only placed two noggins.
If you need further assistance, please let us know.
Eric
- Mark as New
- Bookmark
- Subscribe
- Mute
- Subscribe to RSS Feed
- Highlight
- Report Inappropriate Content
Re: How to build Merbau decking for concrete alfresco?
Hi Eric & team,
i am excited to advise that my deck is nearly complete. I will be sharing the photos soon.
quick question - do you recommend water based or oil based stain for merbau decking? I am after that dark brown shade, also called charcoal i guess. Is it possible? Which is better for long lasting decking?
- Mark as New
- Bookmark
- Subscribe
- Mute
- Subscribe to RSS Feed
- Highlight
- Report Inappropriate Content
Re: How to build Merbau decking for concrete alfresco?
Hello @rohand
Allow me to give you a quick comparison between oil and water-based paint for decking.
Oil-Based Paint for Decking Panels
Advantages: Oil-based paints traditionally offer rich colour depth and superior adhesion, especially on older or previously painted surfaces. They penetrate wood more deeply, which helps protect against moisture and can enhance the grain in certain timbers. They also tend to dry to a harder, more durable finish, which was once a major advantage in high-traffic areas.
Disadvantages: The biggest downsides are the strong fumes (requiring good ventilation), longer drying times, and the need for solvents like turps or mineral spirits for cleanup. Over time, oil-based paints can become brittle and more prone to cracking or peeling if not maintained well.
Water-Based Paint for Decking Panels
Advantages: Modern water-based paints have significantly improved and now offer excellent durability, UV resistance, and colour retention, often outperforming oil-based versions in fading tests. They're much easier to apply and clean up—just water and soap. They also dry faster, making recoat times quicker and project timelines shorter. They're more environmentally friendly and produce fewer fumes.
Disadvantages: Historically, water-based paints didn’t adhere as well or last as long on timber, but that gap has mostly closed with newer formulations. They can raise the grain on some woods during application, requiring a light sanding between coats.
Durability Comparison: These days, water-based decking paints, especially high-quality acrylics like those from Cabot’s or Intergrain, rival oil-based ones in durability, particularly under UV exposure. Oil-based still has an edge in wet environments due to deeper penetration, but water-based paints are usually more flexible and less prone to cracking over time.
For most DIYers and especially for decking panels where easier maintenance and faster recoat times are desirable, water-based paint tends to be the better choice, unless you're after that specific look or penetration depth only oil can give.
In regards to the charcoal colour, I suggest testing it on an off cut of your decking timber first and allowing it to dry off and see if you are happy with the finish. If it passes approval, you can then commit the entire deck. My best advice is to allow your fresh decking panels to season properly before you decide to paint the surface.
Please remember to wear personal protection such as gloves, goggles and a mask when painting your deck.
If you need further assistance, please let us know.
Eric
Why join the Bunnings Workshop community?
Workshop is a friendly place to learn, get ideas and find inspiration for your home improvement projects
You might also like


We would love to help with your project.
Join the Bunnings Workshop community today to ask questions and get advice.