
The Bunnings Workshop community can help with your home improvement projects.
- Bunnings Workshop
- >
- Discussion
- >
- Outdoor
- >
- How to fill gap at end of flashing?
How to fill gap at end of flashing?
- Subscribe to RSS Feed
- Mark Topic as New
- Mark Topic as Read
- Float this Topic for Current User
- Bookmark
- Subscribe
- Mute
- Printer Friendly Page
Share
- Mark as New
- Bookmark
- Subscribe
- Mute
- Subscribe to RSS Feed
- Highlight
- Report Inappropriate Content
How to fill gap at end of flashing?
Hi, My roof flashing has a gap at the end of the gutter as shown. I'm no expert but this look like bad workmanship, shouldn't have a gap like this. Any thoughts on how to fill it / fix?
Thanks

- Labels:
-
Repairing
-
Tools and Materials
- Mark as New
- Bookmark
- Subscribe
- Mute
- Subscribe to RSS Feed
- Highlight
- Report Inappropriate Content
Re: Gap at end of flashing / roof, if and how to fill?
Hi @dzg,
It is hard to say from this photo alone whether this is suitable, although I would typically expect to see a flashing covering all of the timber beneath it.
Is it possible to get some additional photos to provide some context about where this flashing sits in relation to the timber beneath it?
Is there an internal gutter or something similar running inside here?
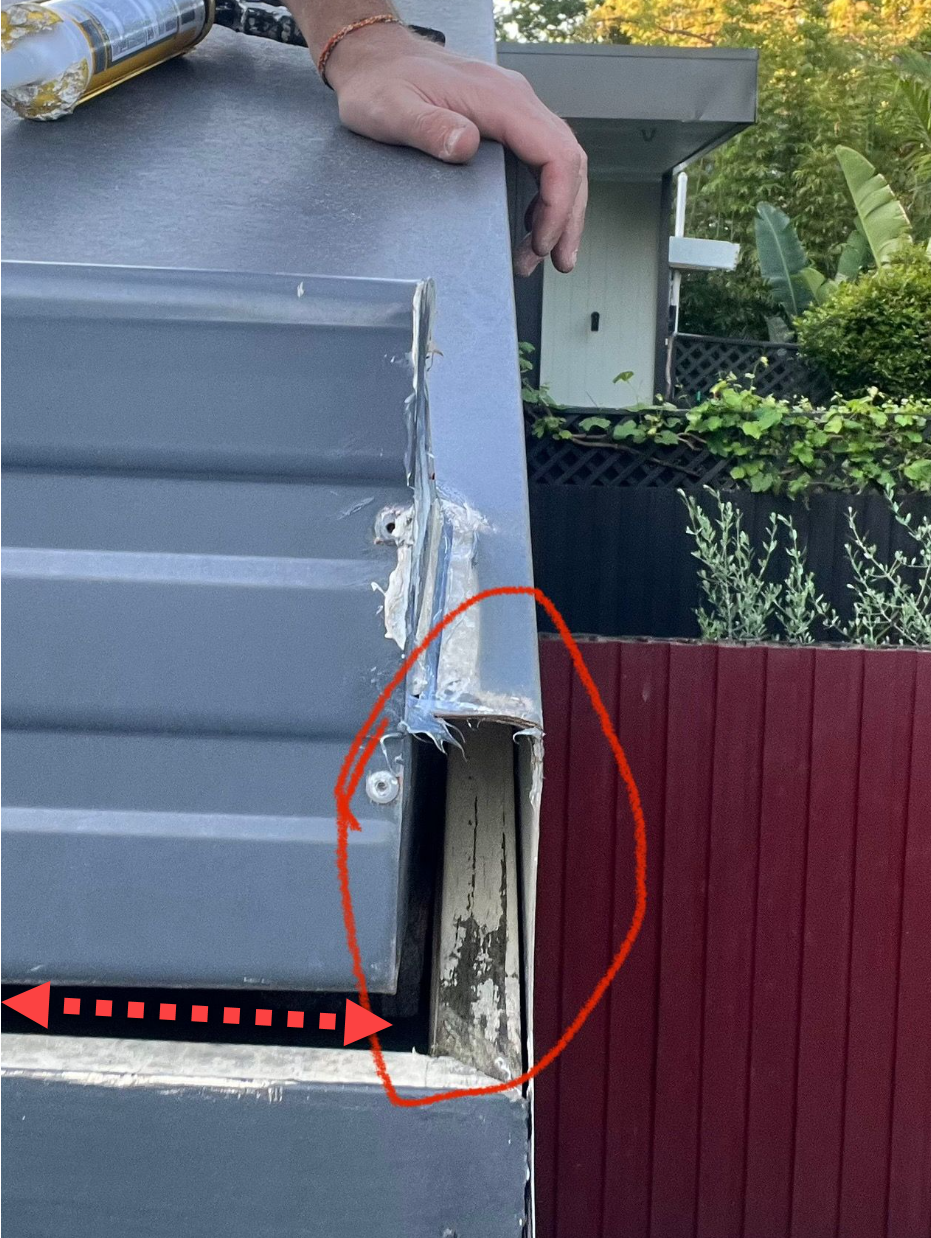
It looks like you'd need a custom flashing to cover this gap, although it's hard to say how you could attach it from this image alone.
You might have to cut and bend something from a Plain Aluminium Sheet, then rivet it to the surrounding metal and seal it with silicone.
We'll need to do a bit more investigation to know the best way to attack it.
Allow me to tag @Nailbag and @AlanM52 to see what they think.
Jacob
- Mark as New
- Bookmark
- Subscribe
- Mute
- Subscribe to RSS Feed
- Highlight
- Report Inappropriate Content
Re: Gap at end of flashing / roof, if and how to fill?
Thanks Jacob. Ill try get more photos. but the timber below appears to have sagged. I think it should be close to flush with the bottom of the flashing, but may have sagged because of water damage (am speculating) due to the missing flashing.
- Mark as New
- Bookmark
- Subscribe
- Mute
- Subscribe to RSS Feed
- Highlight
- Report Inappropriate Content
- Mark as New
- Bookmark
- Subscribe
- Mute
- Subscribe to RSS Feed
- Highlight
- Report Inappropriate Content
Re: How to fill gap at end of flashing?
Hi @dzg
A side view photo and a wider shot of the fully expose area would be helpful to give more accurate advice here. But straight up there needs to be some form of flashing that overlaps the sections above the facia, then with one or two bends over the facia itself. Once we see the photos we can advise on the bends required.
Before installing flashing you will need to address the corner section of the facia board as it appears to be suffering from the beginnings of rot due to long exposure to weather. Sanding the areas back to raw, then apply Earls wood hardener to the ends of any soft sections removed. Fill any hollowed out area with builders bog and use a sharp chisel to shave off any excess before it fully hardens to reduce sanding. Then prime and paint.
Nailbag
- Mark as New
- Bookmark
- Subscribe
- Mute
- Subscribe to RSS Feed
- Highlight
- Report Inappropriate Content
Re: Gap at end of flashing / roof, if and how to fill?
Hi @dzg,
If the structure has shifted or sagged, then there are more than likely issues that would need to be addressed before worrying about the flashing.
If there is rotten timber, something along the lines of what @Nailbag mentioned could be an option, although we would need to see the extent of the issues to be sure.
When we can see more photos, we'll be able to assist further.
Jacob
- Mark as New
- Bookmark
- Subscribe
- Mute
- Subscribe to RSS Feed
- Highlight
- Report Inappropriate Content
Re: Gap at end of flashing / roof, if and how to fill?
hi @JacobZ @Nailbag @AlanM52 , thanks for trying to help. more photos below.i think ye were right, some wood rot happening. i tried to push up the wood (not sure of name) from the bottom side, and applying moderate pressure only, some of it broke.
hope these photos give better idea what is happening.


- Mark as New
- Bookmark
- Subscribe
- Mute
- Subscribe to RSS Feed
- Highlight
- Report Inappropriate Content
Re: Gap at end of flashing / roof, if and how to fill?
Hello @dzg
I'm in agreement with @JacobZ in regards to the structural timber issues that must be addressed before you rectify the flashing. If the timber framing has crumpled directly into your hand, I suggest doing a deeper investigation behind the flashing to see how far the rot has travelled. It is important to repair the damaged timber sections before you re-seal the area with new flashing.
Let me tag @Nailbag, @AlanM52 and @JoeAzza to make them aware of the extra pictures you've shared.
If you need further assistance, please let us know.
Eric
- Mark as New
- Bookmark
- Subscribe
- Mute
- Subscribe to RSS Feed
- Highlight
- Report Inappropriate Content
Re: How to fill gap at end of flashing?
Hi @dzg,
The rotting fascia has parted from the rafters most likely because of clogged/blocked gutters and will need to be replaced.
Cheers
- Mark as New
- Bookmark
- Subscribe
- Mute
- Subscribe to RSS Feed
- Highlight
- Report Inappropriate Content
Re: Gap at end of flashing / roof, if and how to fill?
Hi @dzg
It's a very unusual way to finish that corner section. It appears newish flashing under the guttering has stopped about 400mm short of the end exposing that short piece of facia.
I would remove and replace that end facia, but rebate it into the end 90 x 45mm white post/end cap. Then pry/open up the last 1.5m of the right side flashing to access the facia. Cut the last say 400mm off that and splice in a new piece. This will then meet the new front piece thats now 45mm closer in due to the rebate. Make sure you prime all end cuts before assembly, then paint in Woodland Grey. Also while the facia sections are removed you can clean up the missing piece of cement eve sheet and place a patch piece in to fill the hole.
Return the right side flashing into place. Have made up a new section of flashing to match the profile of the from one but longer by around 100mm and have a return at the right end to go around the corner. Screw and silicone this into place.
The front should now finish flush across the front with the new flashing and a neat return on the corner.
Hope this makes sense.
Nailbag
Why join the Bunnings Workshop community?
Workshop is a friendly place to learn, get ideas and find inspiration for your home improvement projects
You might also like


We would love to help with your project.
Join the Bunnings Workshop community today to ask questions and get advice.