
The Bunnings Workshop community can help with your home improvement projects.
- Bunnings Workshop
- >
- Discussion
- >
- Bathroom and Laundry
- >
- Laundry renovation catering for pets
Laundry renovation catering for pets
- Subscribe to RSS Feed
- Mark Topic as New
- Mark Topic as Read
- Float this Topic for Current User
- Bookmark
- Subscribe
- Mute
- Printer Friendly Page
Share
- Mark as New
- Bookmark
- Subscribe
- Mute
- Subscribe to RSS Feed
- Highlight
- Report Inappropriate Content
Laundry renovation catering for pets

Stepping away from the typical cool white colour scheme, designer Jono creates a space that has colour, texture and charm.
It's obviously a functional space, too. The laundry features a huge sink to wash everything from dogs to doonas, a screened off clothesline, clever storage for gumboots, a living staghorn green wall, and a pet sleeping and feeding area with a hidden pet food trapdoor.
Watch episode five below, and catch earlier episodes on the Bunnings website.
You can let us know what you think of the transformation by replying below.
- Mark as New
- Bookmark
- Subscribe
- Mute
- Subscribe to RSS Feed
- Highlight
- Report Inappropriate Content
Re: Laundry renovation catering for pets
Love how that laundry's a perfect blend of style and function. Reminds me of @mangoaqua's terrific laundry makeover, which includes room to give their dog a haircut!
@mangoaqua - you might be interested in checking out this episode. Keen to hear your thoughts.
Akanksha
- Mark as New
- Bookmark
- Subscribe
- Mute
- Subscribe to RSS Feed
- Highlight
- Report Inappropriate Content
Re: Laundry renovation catering for pets
Hi @Jason, could you explain how they made the dog sink please. I would like to tackle this my self 
- Mark as New
- Bookmark
- Subscribe
- Mute
- Subscribe to RSS Feed
- Highlight
- Report Inappropriate Content
Re: Laundry renovation catering for pets
Welcome to the Bunnings Workshop community @larnsdiy. It's splendid to have you join us, and many thanks for your question about creating a pet washer sink.
The team have created a frame to the required dimensions with framing timbers. They've then sheeted over it with Aquacheck plasterboard. Once the sheeting was in place, they used a water-proofing membrane over the interior of the trough. After the membrane was installed, the waste was installed, and the surfaces were tiled.
Here are some images I've taken from the video that should give you a good idea of the process.
Please let me know if you have any questions.
Mitchell


- Mark as New
- Bookmark
- Subscribe
- Mute
- Subscribe to RSS Feed
- Highlight
- Report Inappropriate Content
Re: Laundry renovation catering for pets
Hi where can I get a basin like this?
Wanting to do exactly the same an already have the cabinetry surrounding
cheers
- Mark as New
- Bookmark
- Subscribe
- Mute
- Subscribe to RSS Feed
- Highlight
- Report Inappropriate Content
Re: Laundry renovation catering for pets
Hi @wilkos,
Thank you for your quetsion.
In the video for The House Project Episode 5: Laundry Renovation at about 4:45, you can see that the basin is custom-made, using pine framing and Aquachek Plasterboard that is waterproofed and then tiled.
If you'd like to give it a try yourself, I'd be happy to help you with materials and a design if you can provide some basic dimensions.
Let me know what you think.
Jacob
- Mark as New
- Bookmark
- Subscribe
- Mute
- Subscribe to RSS Feed
- Highlight
- Report Inappropriate Content
Re: Laundry renovation catering for pets
Hi, thanks very much id love a list of instructions materials etc to be able to make this
thanks
Scott
- Mark as New
- Bookmark
- Subscribe
- Mute
- Subscribe to RSS Feed
- Highlight
- Report Inappropriate Content
Re: Laundry renovation catering for pets
Hi @wilkos,
I was unable to find the exact plans that were originally used, but I have designed my own based on what I can see that would be very similar and could be tailored to your requirements.
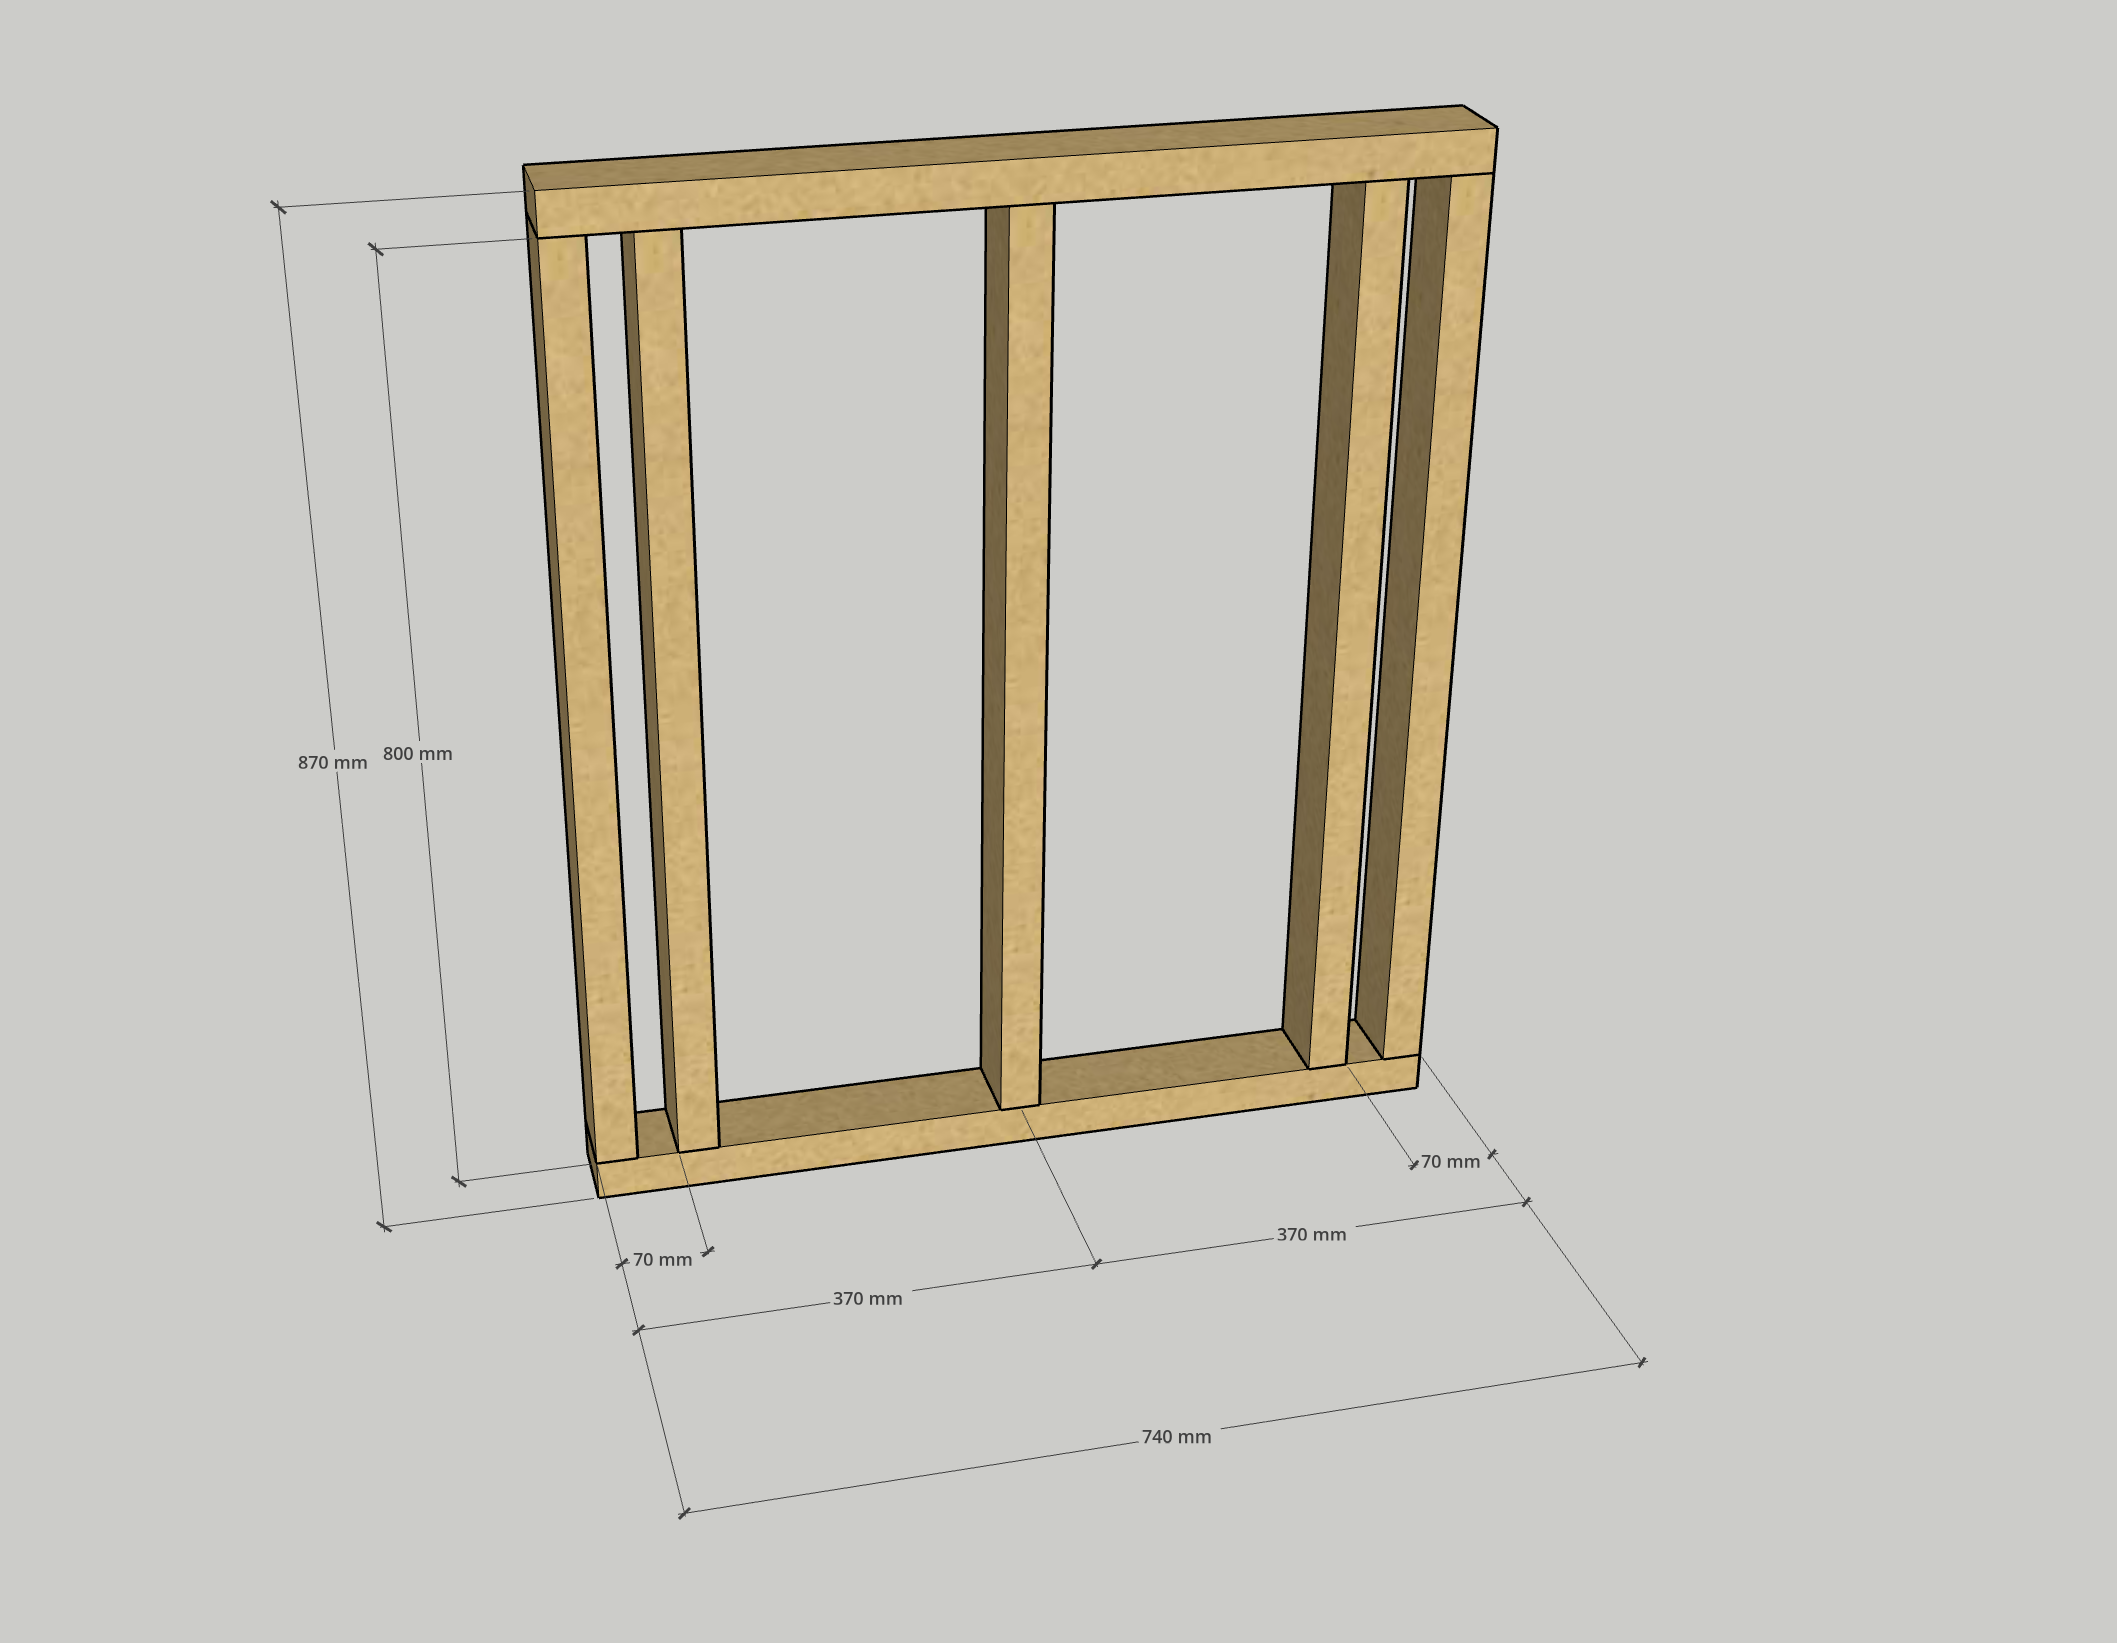
The frame will be made of 70x35 framing pine and fixed together using framing nails fired with a framing nailer. You will essentially be making a series of stud frames and joining them together, so check out How To Build a Stud Wall for a bit of guidance on the process.
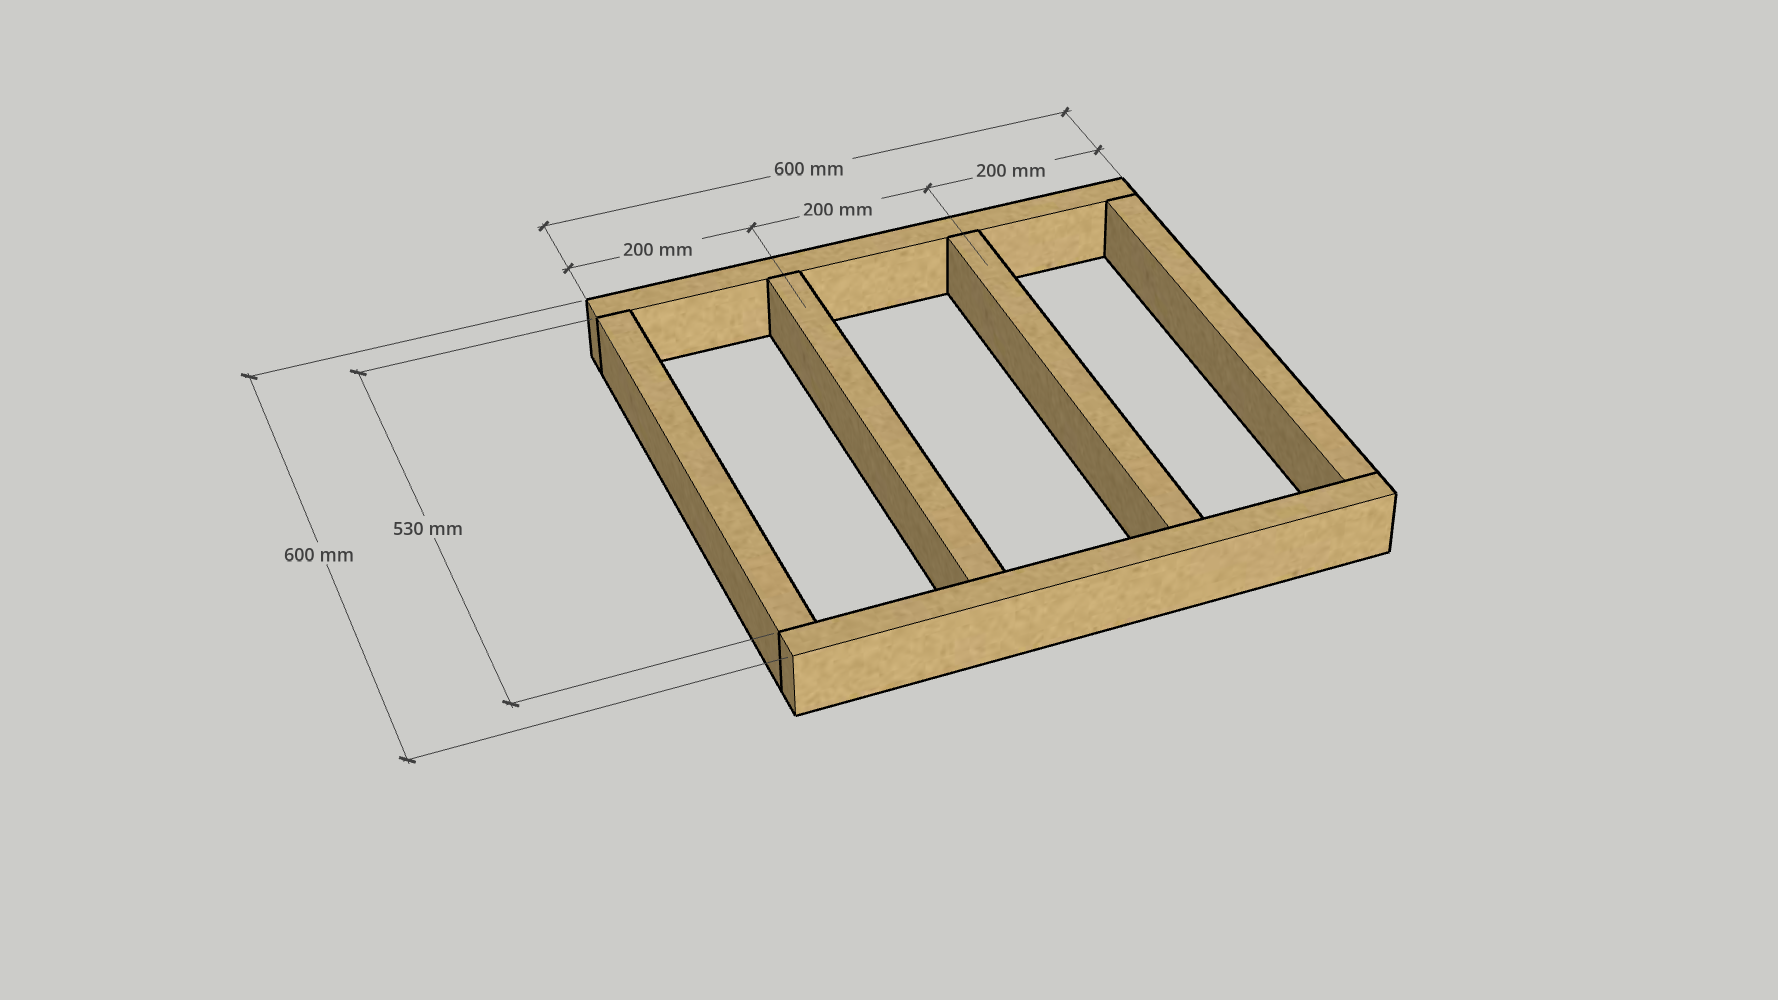
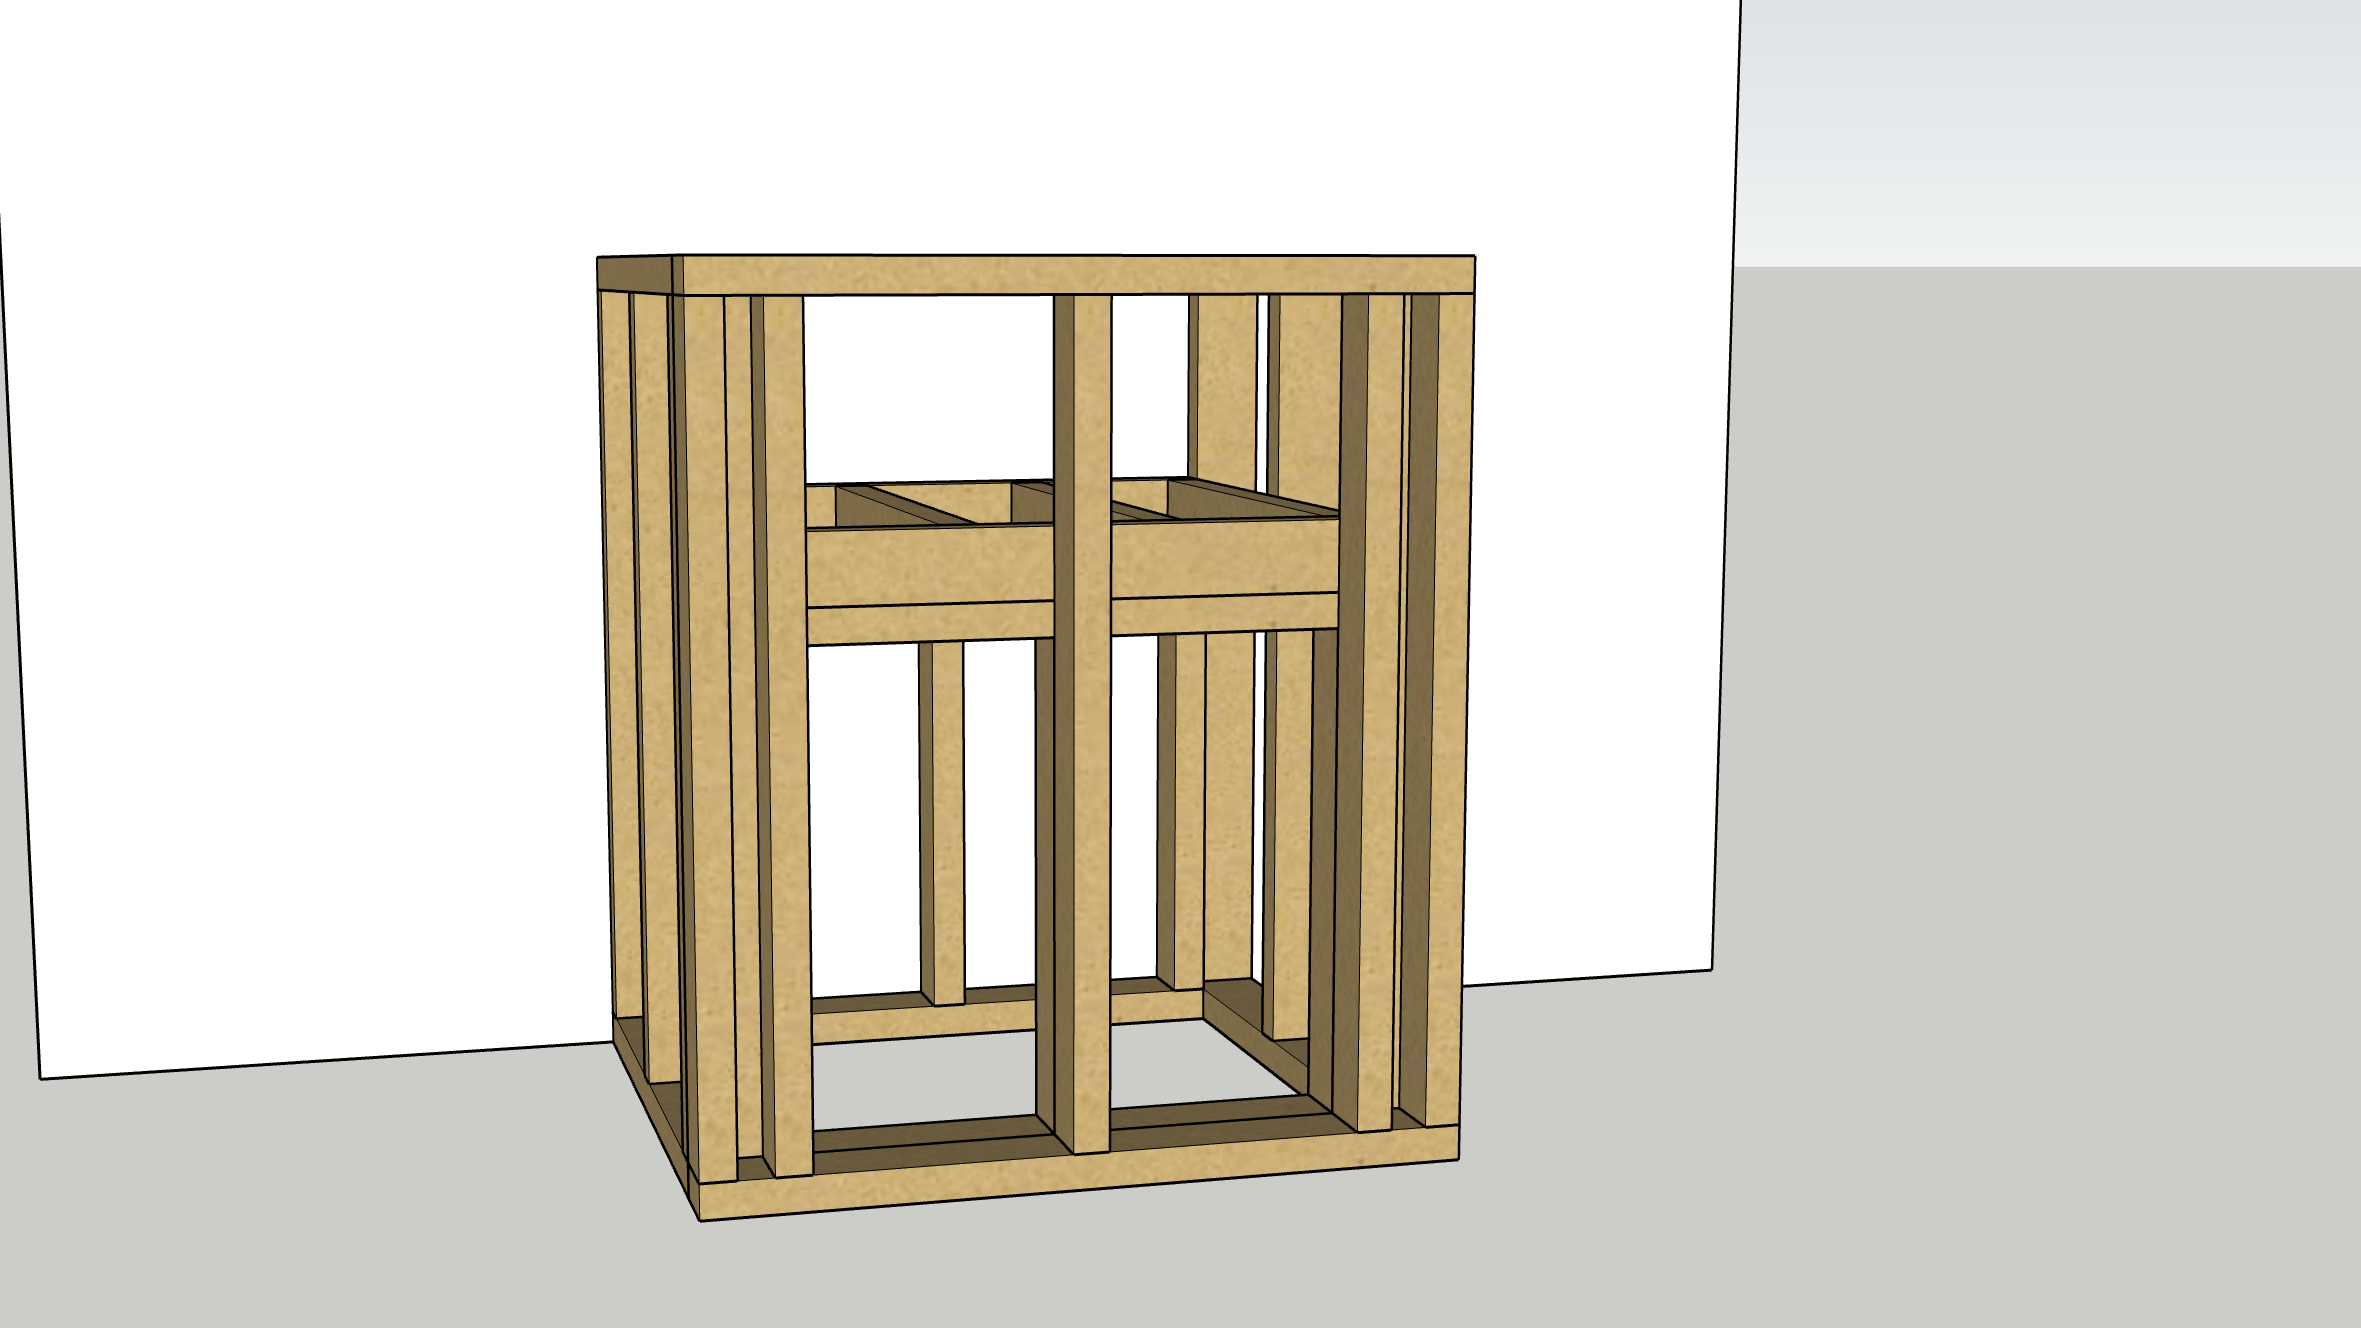
You will start by creating a platform that will act as the bottom of the basin, where the water sits and the drain is attached. As this will need to support weight, it is a fairly sturdy platform. It is made of three separate frames that are nailed together. Please note that the dimensions are arbitrary but will be similar to what was used in the video.
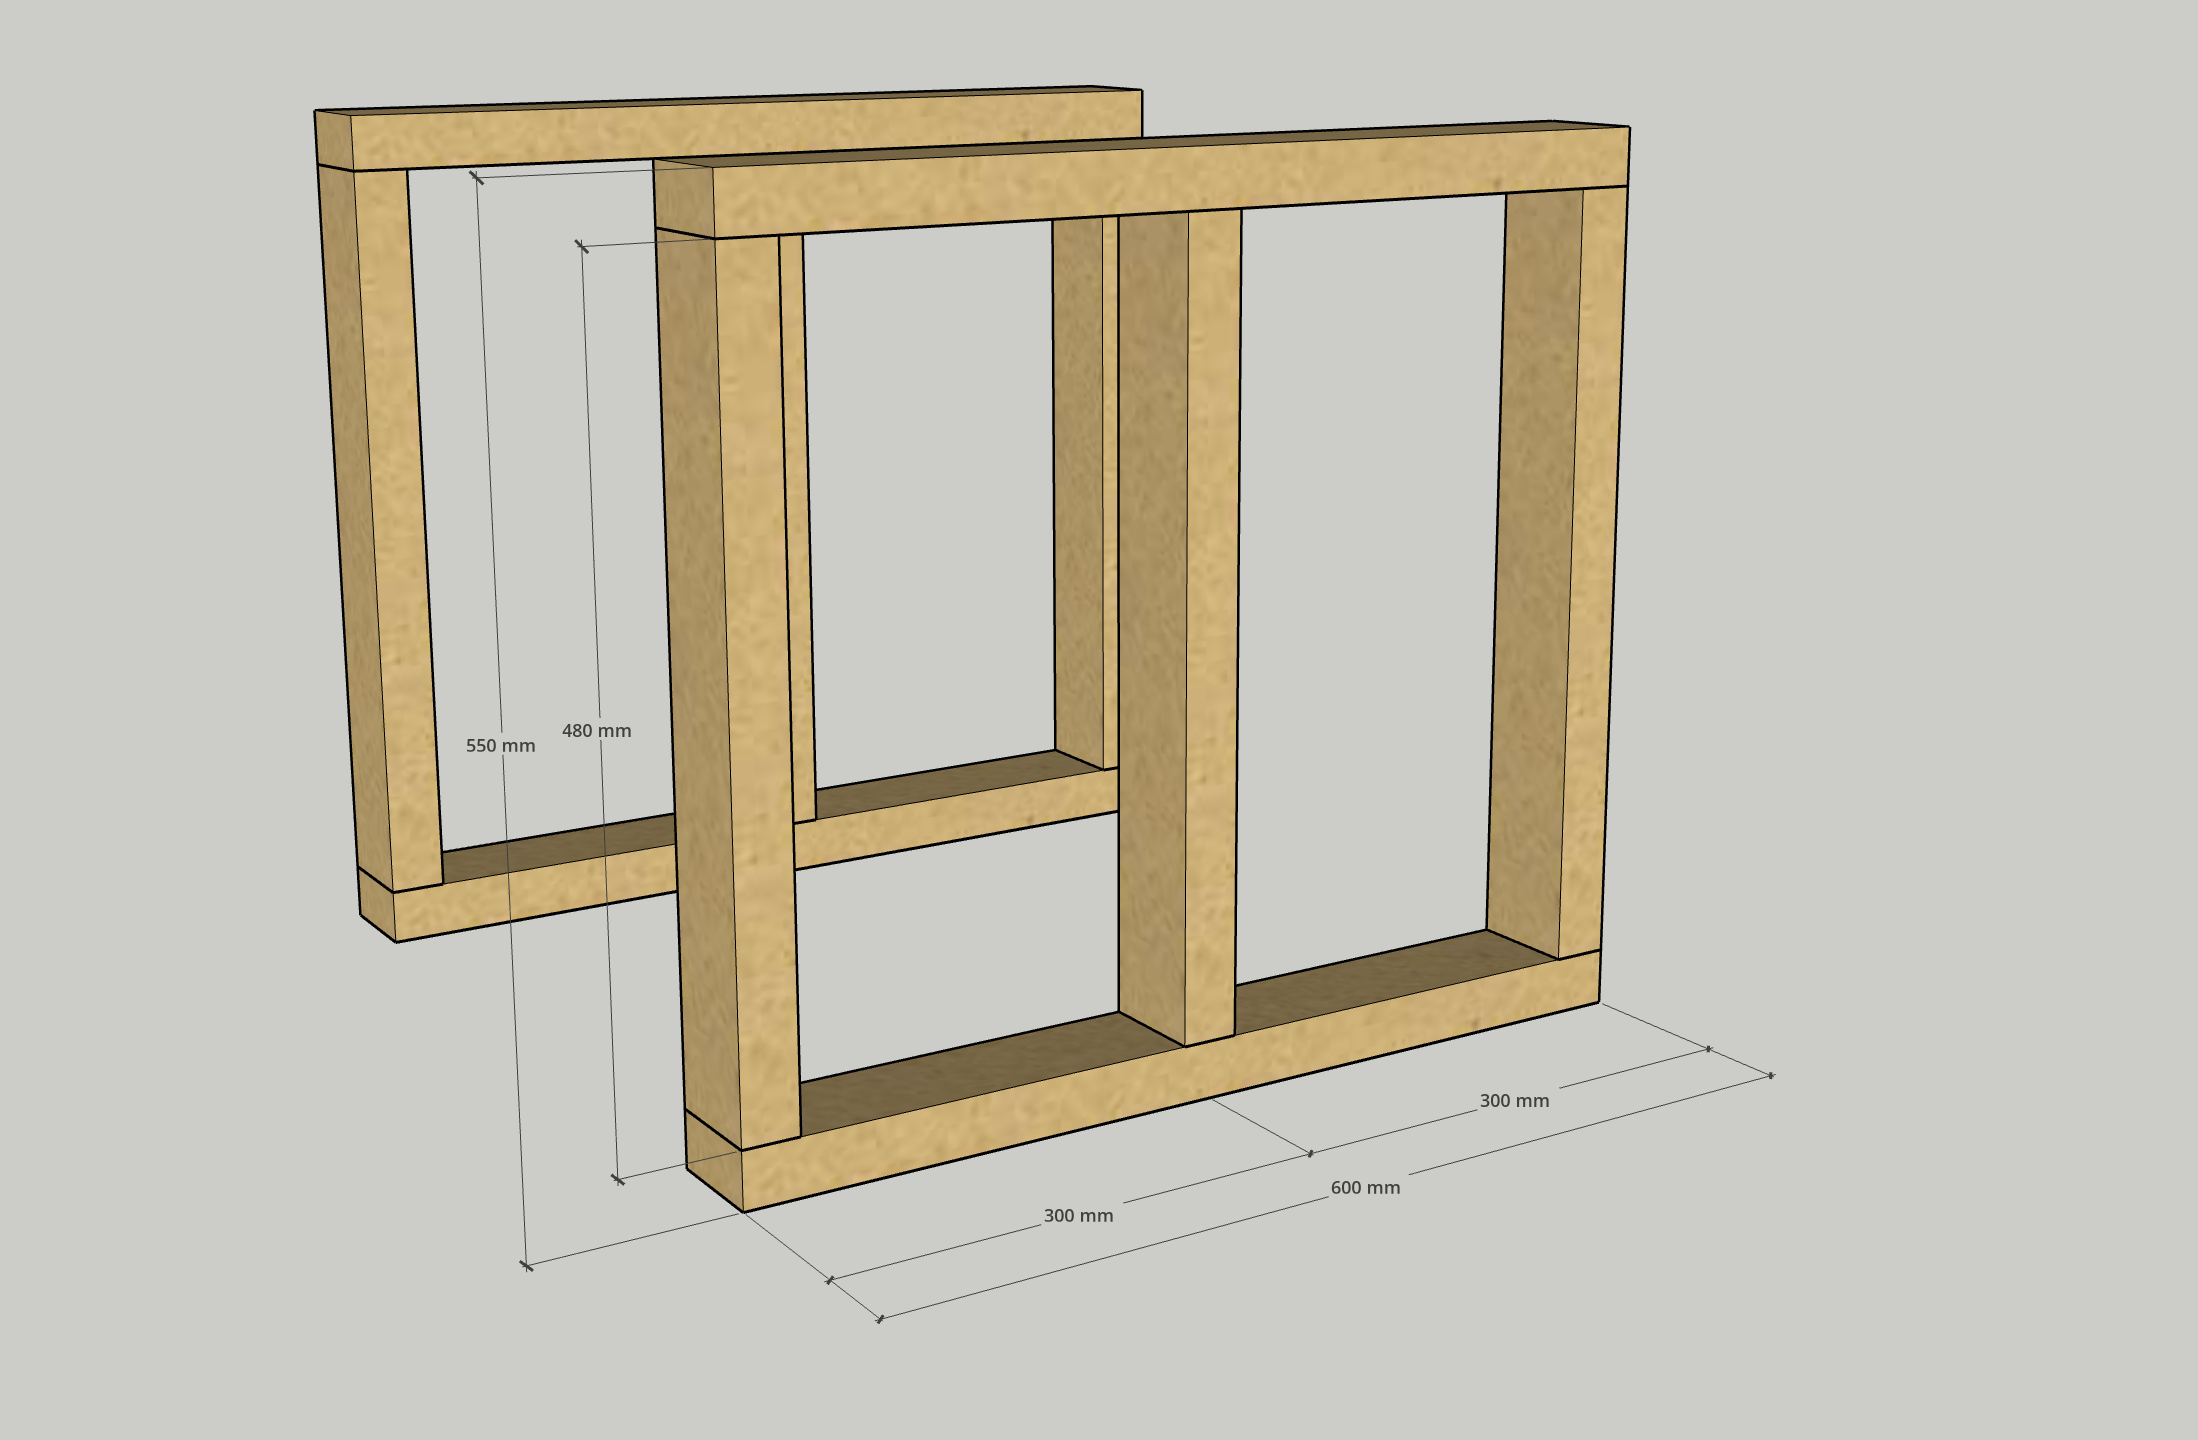
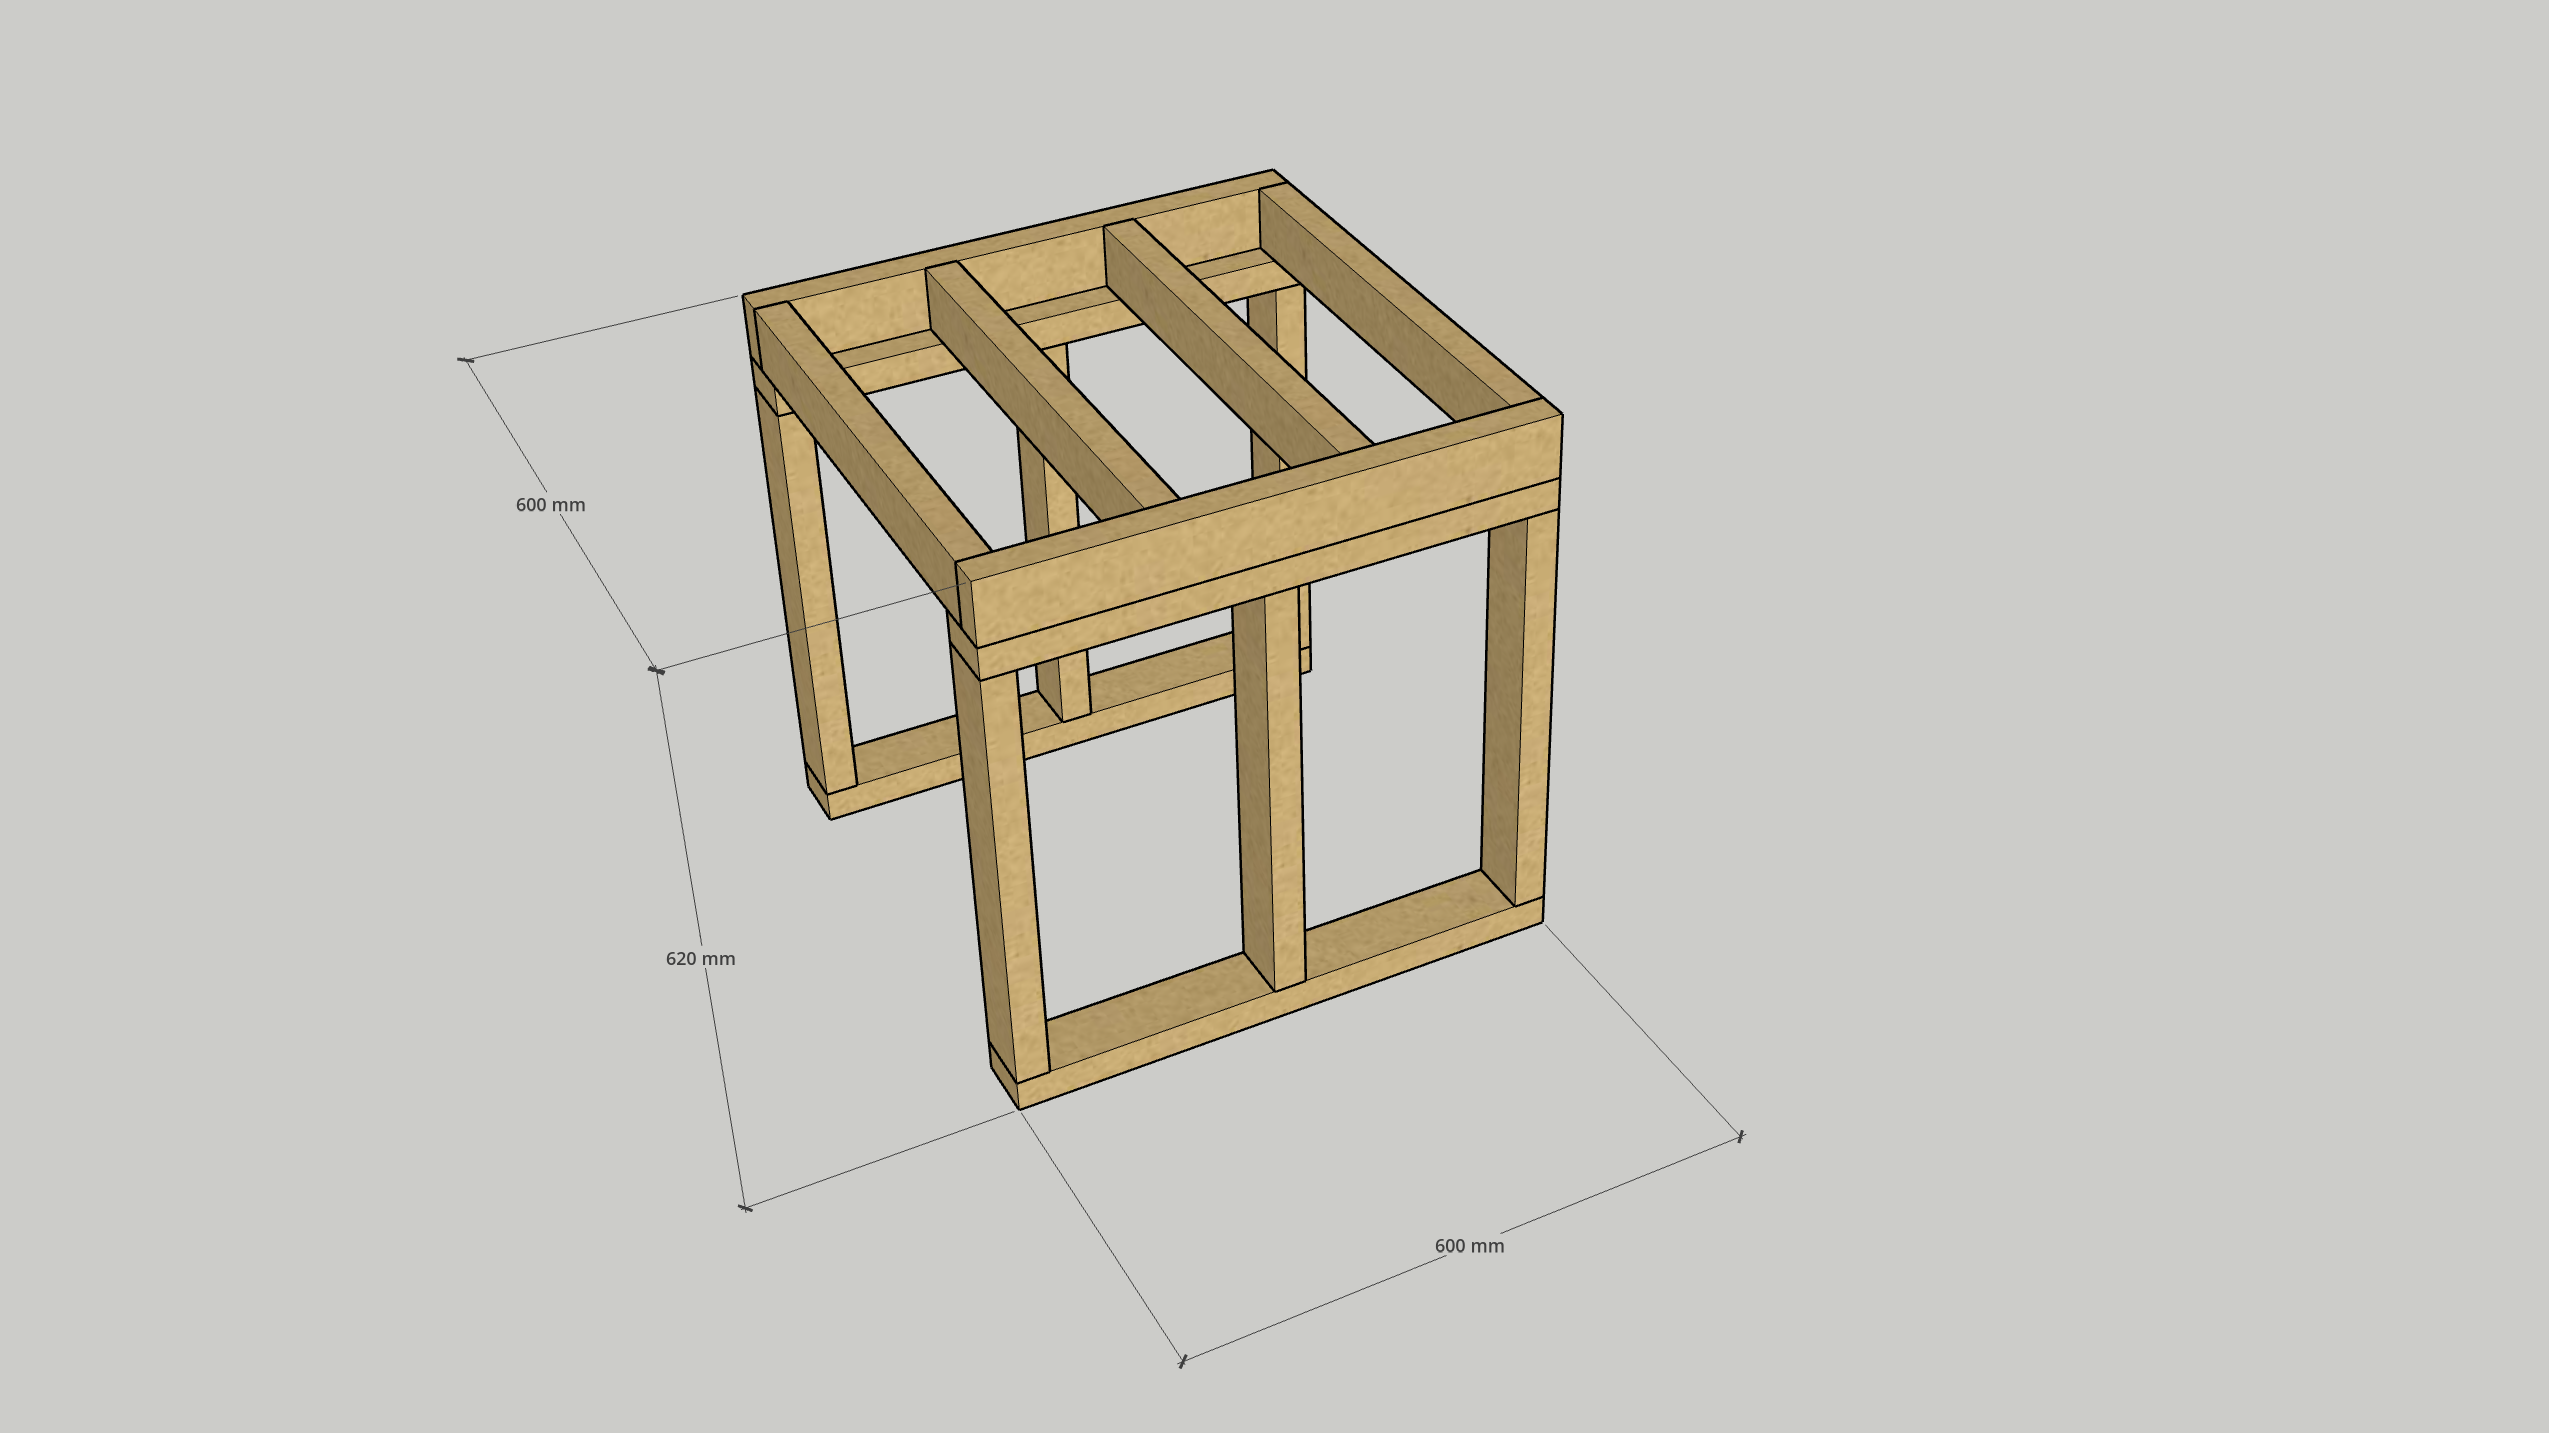
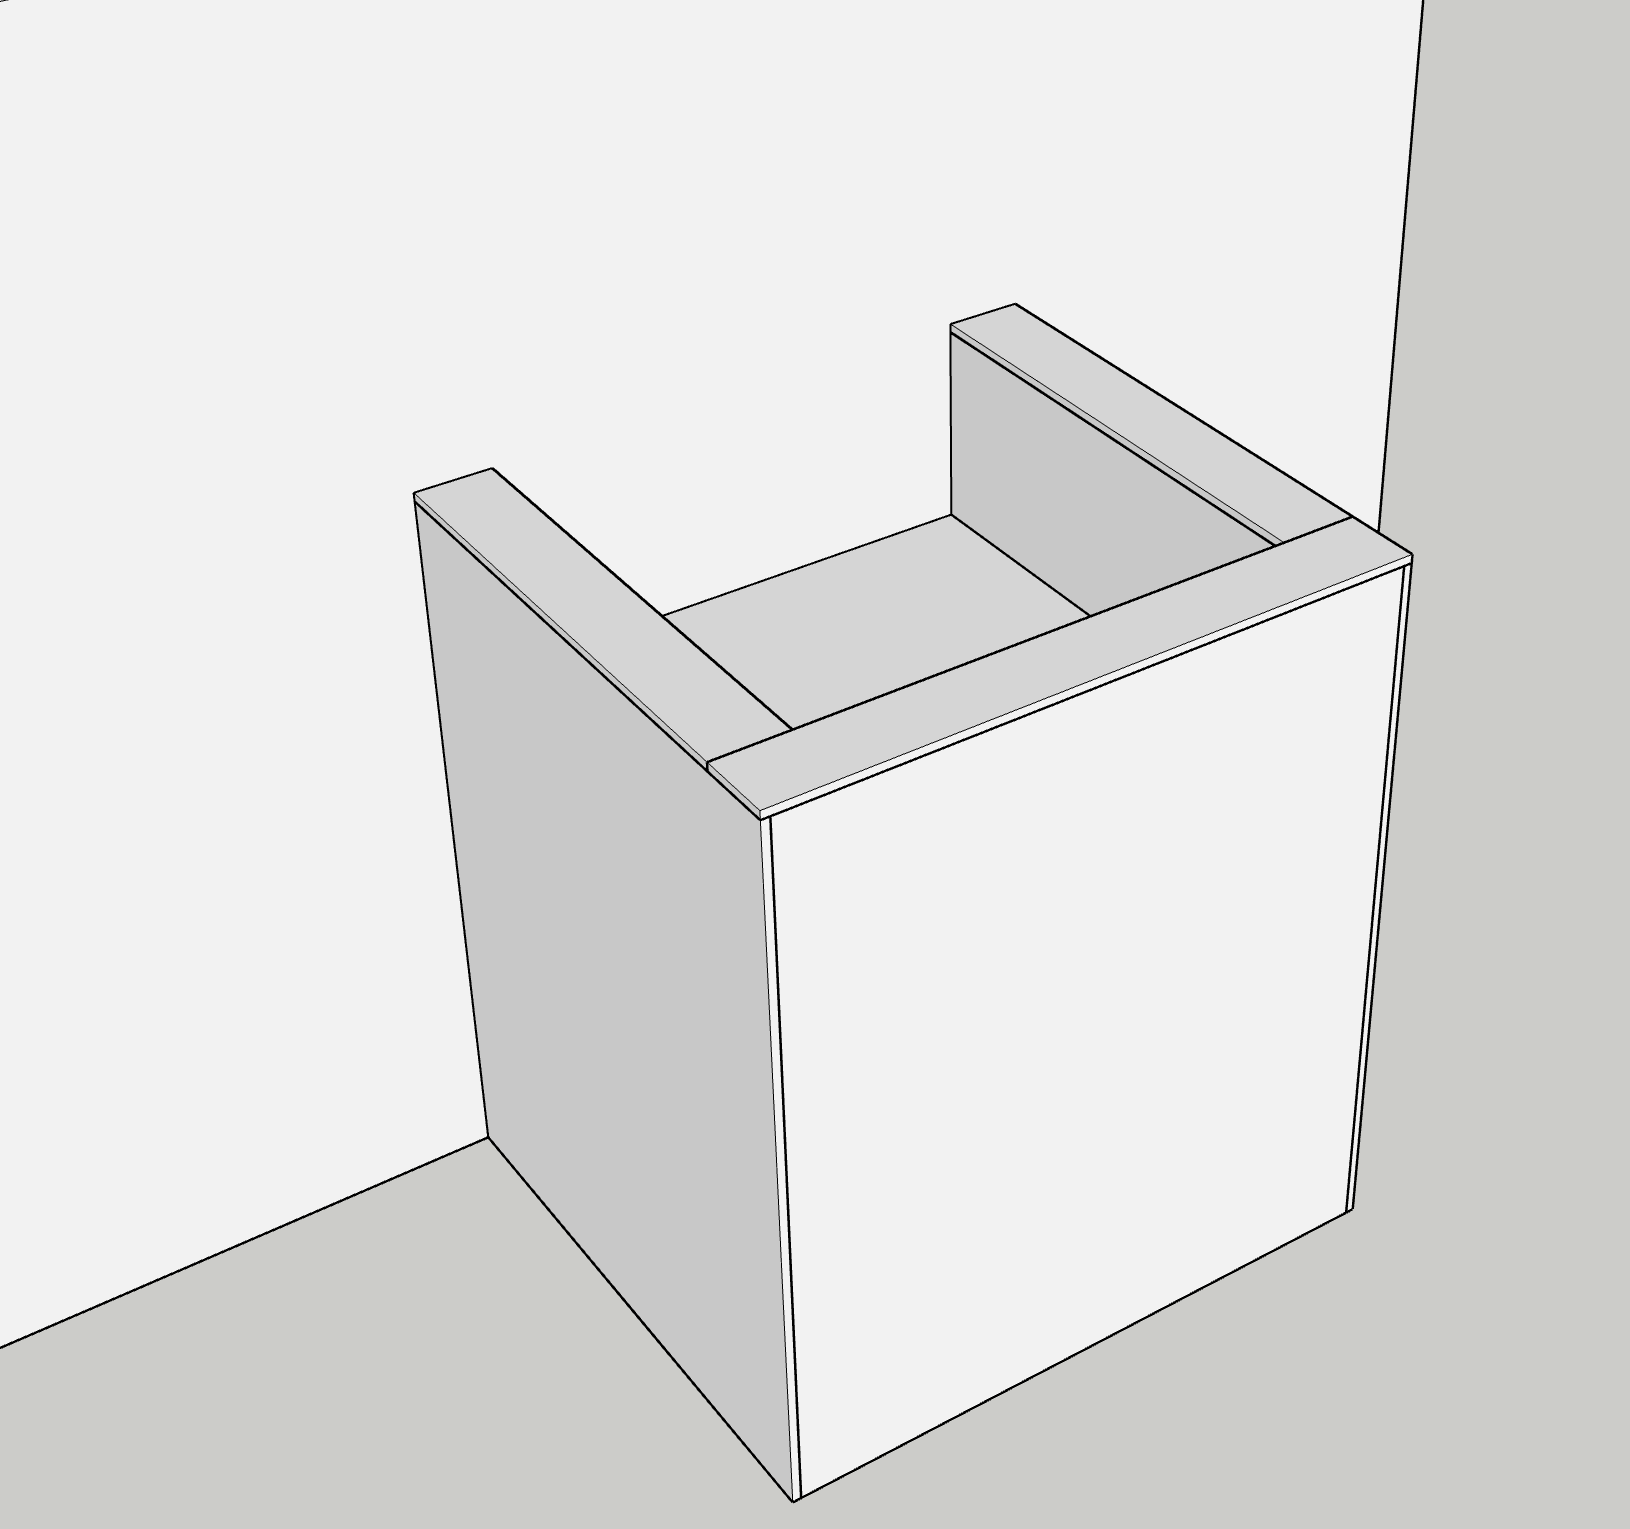
You'll then add three frames that encapsulate this platform. Note that the back of the basin is tied into the wall, so there is no frame added here as the wall will close in the back side of the basin. The white sheet at the back of the basin represents this.

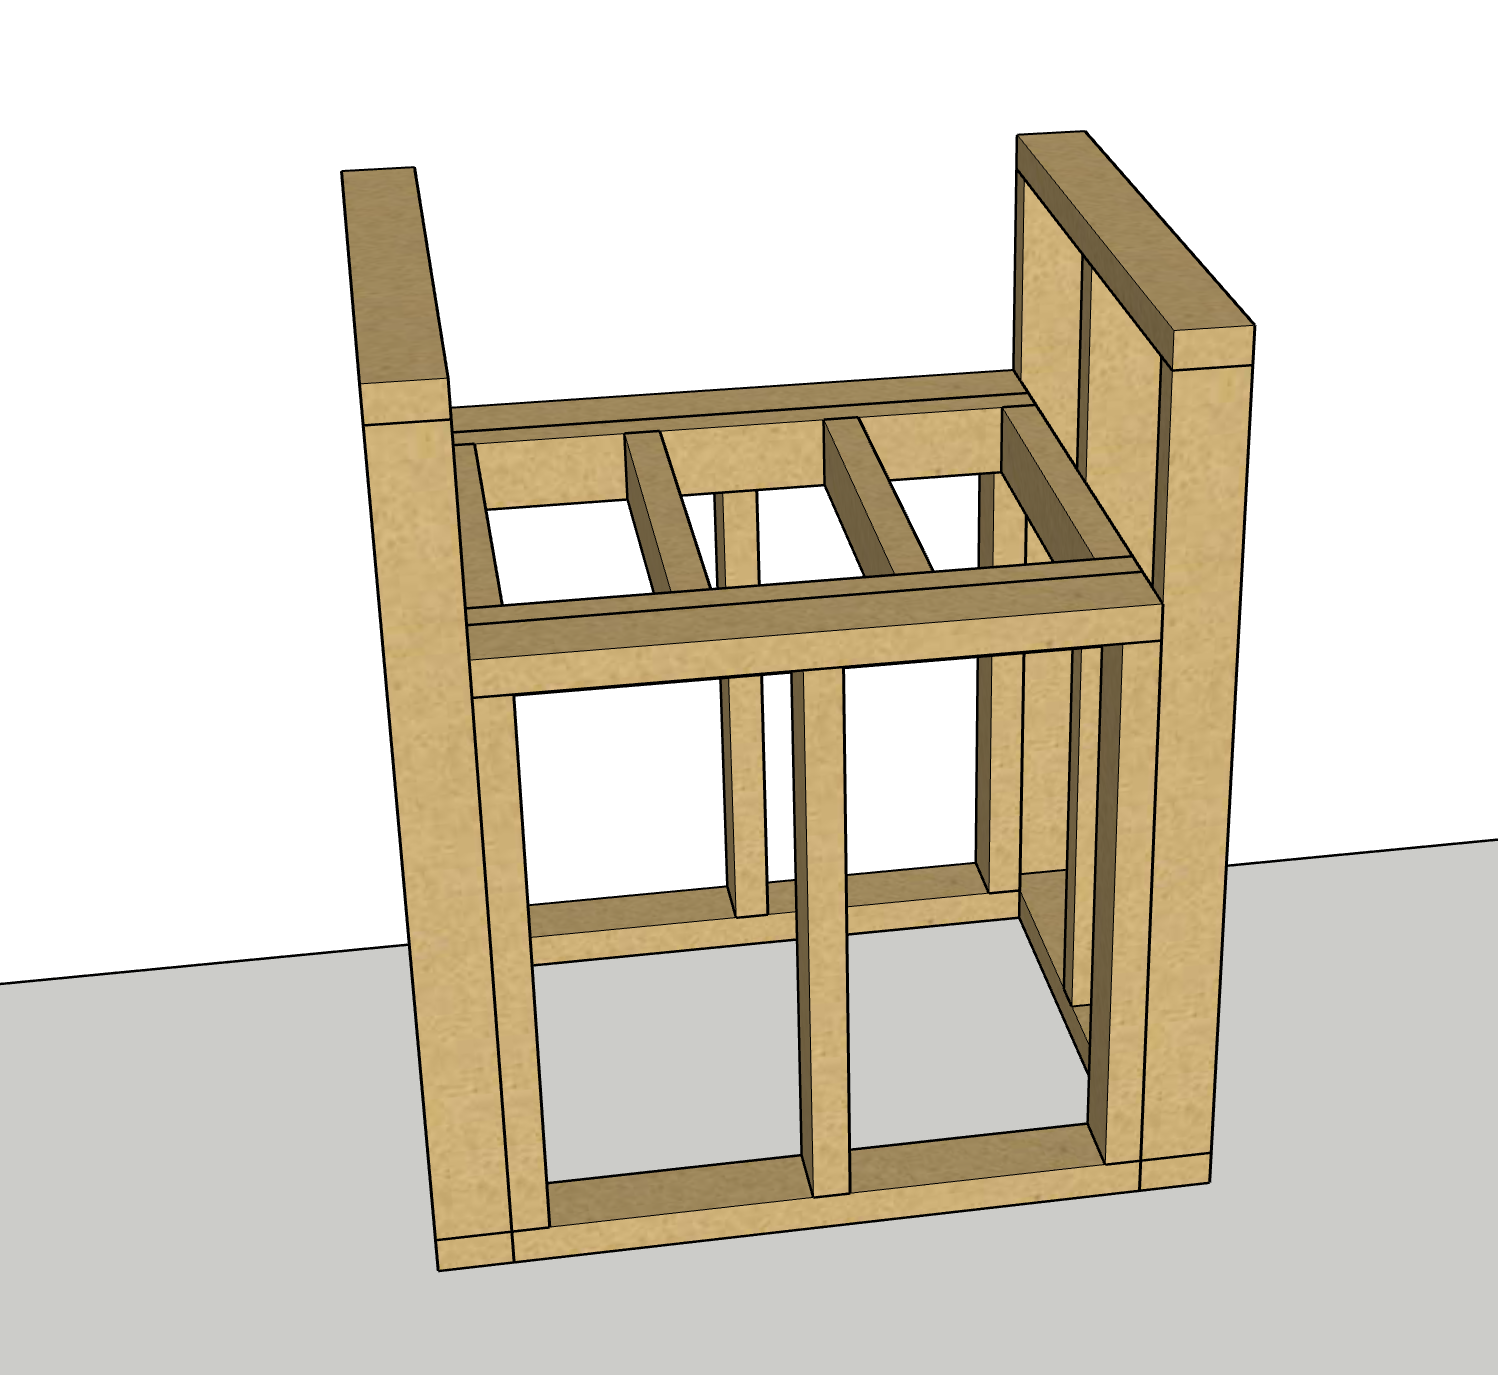
On the frame for the front edge of the basin, note the two additional studs that sit 70mm in from each end. As the basin will need to be waterproofed and capable of holding weight, the corners of the basin must be well supported. These studs are necessary for the sheeting on the inside of the basin to have an attachment point.
At the finished framing stage, you're going to want to have your plumber come in to rough in their pipes and advise what they'll need to do moving forward.
Once you've been given the all clear by your plumber, you can clad the frame with Aquachek Plasterboard, using stud adhesive and plasterboard screws to attach the plasterboard to the frame.
Once clad with plasterboard, screws should be covered with Multi-Purpose Joint Compound.
You'll then need to use a suitable waterproofing membrane, such as this Crommelin Shower Waterproofing Membrane, on the inside of the basin. You'll have to ensure all internal corners are first sealed with Crommelin Hybrid MS Polyurethane Sealant, then reinforced using Crommelin Waterproofing Tape to ensure they are strong and watertight. Check out Waterproofing Buyer’s Guide: What You Need To Know and How To Waterproof Your Bathroom for some guidance on the waterproofing process.
After waterproofing, tiles will be installed and the fixtures will be hooked up. You'll want to clearly communicate and coordinate with your plumber to ensure steps are done in the correct order so additional work isn't required.
As I mentioned earlier, the measurements are relatively arbitrary, but this basin will be functional and around the size shown in the video. You can always change the measurements around if needed.
Let me know what you think and if you have questions or would like any changes, please let me know so I can assist further.
Jacob
Why join the Bunnings Workshop community?
Workshop is a friendly place to learn, get ideas and find inspiration for your home improvement projects
You might also like


We would love to help with your project.
Join the Bunnings Workshop community today to ask questions and get advice.