
The Bunnings Workshop community can help with your home improvement projects.
- Bunnings Workshop
- >
- Discussion
- >
- Outdoor
- >
- Re: Best screws for Merbau decking - col...
Best screws for Merbau decking - colour coded?
- Subscribe to RSS Feed
- Mark Topic as New
- Mark Topic as Read
- Float this Topic for Current User
- Bookmark
- Subscribe
- Mute
- Printer Friendly Page
Share
- Mark as New
- Bookmark
- Subscribe
- Mute
- Subscribe to RSS Feed
- Highlight
- Report Inappropriate Content
Best screws for Merbau decking - colour coded?
Hi all,
I am getting to the 'pointy' end of my decking project and am having some issue on deciding what screws to use.
I am laying 140 x 19 Merbau deck boards for an approx. 4.7 x 4.0mt deck - using approx. 28 deck boards over H3 treated pine joists.
My concern is, I wish to use screws that are close to the same colour as the Merbau colour - rather than 'silver' stainless steel.
I intend to use a natural oil to coat the Merbau and don't really want all the 'silver' stainless steel screws to 'shine'.
Is there a screw (stainless steel coloured or otherwise) that is available that will blend with the Merbau colour.
Was thinking these https://www.bunnings.com.au/buildex-10-8-x-65mm-climacoat-treated-pine-and-hardwood-decking-screws-1... but not sure if they would be suitable being for 'treated pine'.
Thanks for any help/advice.
- Mark as New
- Bookmark
- Subscribe
- Mute
- Subscribe to RSS Feed
- Highlight
- Report Inappropriate Content
Re: Best screws for Merbau decking - colour coded?
Hi @cathalm88,
Welcome to the Bunnings Workshop community, it is fantastic to have you with us.
This Kango 10G Adjustable Countersink Drill Bit Set is more or less the same thing as the one @EricL mentioned above.
Let me know what you think and if you have any further questions, please don't hesitate to ask.
Jacob
- Mark as New
- Bookmark
- Subscribe
- Mute
- Subscribe to RSS Feed
- Highlight
- Report Inappropriate Content
Re: Best screws for Merbau decking - colour coded?
Hi @JacobZ 

I am only installing maybe 14 lengths. I am replacing lengths I had to pull up to fix some rotted timber below at a landing that is fully weather exposed. So it is a small section of deck. The lengths to be installed are 1160mm. The width of the existing lengths is approx. 65mm with some small variances. This deck is probably 25 years old hence the rotted timber below.
The countersunk drill bit you linked is likely to cost almost as much as the timber itself. Is there any other option or is the countersunk bit essential?
I have attached an image of the existing planks. I have been having a hard time confirming the timber but I am thinking its merbau. What are your thoughts?
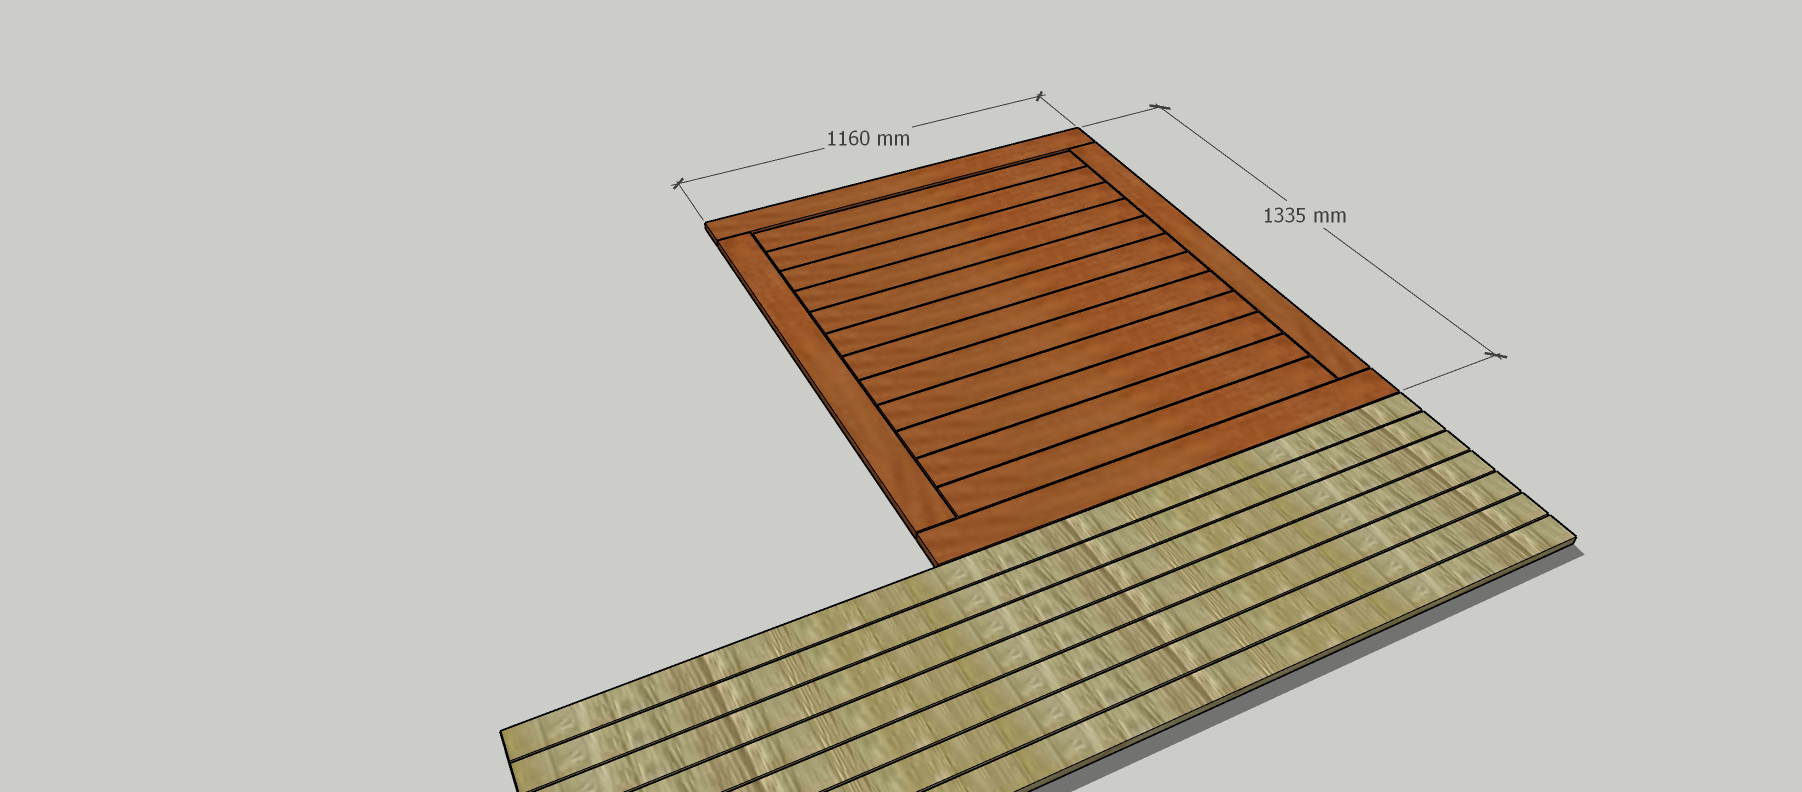
I have also attached an image of the landing where I have removed the old lengths and the old rotted beam. The other issue is because the existing planks are 65mm I can't readily source 65mm at least not from bunnings. I've measured it and the total width to be replaced is 1335mm. This was 19 planks of 65mm plus the gaps.
As bunnings only have 90mm and 140mm merbau decking I am thinking I can use 14 x 90mm planks with 5mm gaps and this measures perfectly to 1335mm. What are your thoughts on my plan of going with the 90mm merbau?
Once I install the new lengths on the landing there is also going to be major contrast with the rest of the deck which has been painted a light navy or grey colour as you can see in the photos. My plan would be to sand back the entire deck and oil it. I have read that you should allow new merbau timber to leach its tannins for maybe 3-6 months before oiling? If this is the case then its likely there will be a period of time that the new landing and old deck wont be uniform looking. Hopefully once I have applied the same oil to the new landing then it will start to look more uniform.
Thanks in advance.
- Mark as New
- Bookmark
- Subscribe
- Mute
- Subscribe to RSS Feed
- Highlight
- Report Inappropriate Content
Re: Best screws for Merbau decking - colour coded?
Hello @Cathalm8
If it is Merbau, its certainly has provided outstanding service to last 25 years. I propose using the same timber to patch up your deck. The countersunk drill bit is to prevent pinching the surface of the decking panel especially if you are using bugle head screws. There is a more affordable counter sunk drill bit which is the Starborn No.10 Smart-Bit Flat Head Countersink Drill Bit.
In regards to using 90mm decking panel, I propose installing it with a picture frame to make it stand out. Instead of blending it in, I propose making it a feature and draw out a positive feature rather than trying to hide it. I've placed an image below to give you an idea of what it might look like. Just keep in mind that you'll need to slightly modify the decking frame to accommodate the picture frame feature.
Your analysis of the contrast and oiling is spot on! But given enough time and seasoning you'll be able to sand the surface and oil it to get a uniform finish.
Let me call on our experienced members @Dave-1, @AlanM52, @diy_hausdesigns and @Remarka6le for their recommendations.
If you need further assistance, please let us know.
Eric
- Mark as New
- Bookmark
- Subscribe
- Mute
- Subscribe to RSS Feed
- Highlight
- Report Inappropriate Content
Re: Best screws for Merbau decking - colour coded?
Good Morning @Cathalm8
Making a repair look like what was originally can be an interesting exercise. Generally I say its on the plus side of bringing whatever back to how you want it to look.
The timber looks like merbau, and also looks very good for lasting 20 years  My deck is 15 years and I think I used spotted gum and jarah and its still going strong.
Sizzing, for an area such as your repair and making it look consistant, I would be very tempted to rip the width from 90mm down to the 65mm so it stays consistant.
Aging it before oiling is a definite, letting it bleed out some of the colour (water will want to stain)
Sanding back your existing deck, now thats a job and a half. Doable yes, hard work and painstaking even more so. Here is when I did some long overdue maintence on my deck at the start of this year Hardwood deck restoration The hardest points I see for you is between the boards and the stairs as in removing the old paint.
If you install the new boards and then start on the sanding, maybe by the time the fine bits have been done you will have that bedding in time for the new boards?
Dave
- Mark as New
- Bookmark
- Subscribe
- Mute
- Subscribe to RSS Feed
- Highlight
- Report Inappropriate Content
Re: Best screws for Merbau decking - colour coded?
Thanks for the response mate. I could be putting myself in for a world of pain. I feel like iam already committed at this stage though because I think i need to put down new boards anyway as the ones ive taken up are pretty beat. I was going to rent the floor sander from bunnings and the edge sander as well to do the egdes.
My main concerns are that there is some cupping / high lips on the edges of the boards. Not sure how to deal with that.
Also as you say the paint in between the boards, how the heck do i remove that?? After sanding I was thinking of oiling it with cutek extreme cd50 and a light colour tone to hopefully show off the timber. Ive already punched down alot of the nails. Yes whoever installed the deck installed with what I think ate 1.6mmx65mm otter head nails. Not ideal!
And yes the stairs, steps, posts, rails and side of the deck would also need sanded which will take a lot of time.
I have already sanded back a small portion of the main deck to try and identify the timber. I think its merbau but might be spotted gum.
So yes its a big undertaking and I may have to pull the pin because I may not have the time with a 2 kids under 4 running around! Also I do not have a pile of DIY experience!
But my priority now is to get that landing fixed up as quick as I can.
Ive attached a few more photos of the existing deck..


- Mark as New
- Bookmark
- Subscribe
- Mute
- Subscribe to RSS Feed
- Highlight
- Report Inappropriate Content
Re: Best screws for Merbau decking - colour coded?
You’re right in thinking this is quite a big undertaking, and with two little ones around, it’s worth carefully considering how much time you can realistically put into it @Cathalm8. You could always do it in sections as time allows.
Unfortunately, there’s no really effective way to remove paint from between the deck boards. A detail sander might let you get into a few corners, but once paint gets into those gaps, it’s almost impossible to get rid of completely. That’s why painting a deck is usually a permanent decision and not something that can be easily reversed.
As for the cupping and high lips, sanding can help to even things out if the issue is minor, but you’ll need to take care not to sand the boards too thin. If the cupping is severe, replacement is often the only practical fix. Flipping the boards would sometimes be an option if they were screwed down and the undersides were unpainted, but since yours are nailed, that’s not really feasible.
When it comes to identifying the timber, Merbau and Spotted Gum can look quite similar once they’ve weathered. Sanding back a larger test area should give you a clearer idea. Once you’ve got the surface prepared, finishing with a natural decking oil will really help highlight the natural grain and protect the boards going forward.
Mitchell
- Mark as New
- Bookmark
- Subscribe
- Mute
- Subscribe to RSS Feed
- Highlight
- Report Inappropriate Content
Re: Best screws for Merbau decking - colour coded?
Thanks @EricL . I was wondering is the counter sunk drill bit adjustable? Or does it matter? I will be using 19mm hardwood. Having sanded back more I actually think that the timber is spotted gum now. I have attached another photo. I can more readily source 64-68mm spotted gum as well.

- Mark as New
- Bookmark
- Subscribe
- Mute
- Subscribe to RSS Feed
- Highlight
- Report Inappropriate Content
Re: Best screws for Merbau decking - colour coded?
Hello @Cathalm8
Yes, the Kango brand that JacobZ recommended is adjustable, but the Smart-bit is fixed in position. Countersinking too deeply is also not recommended as they act like water reservoirs and damage the surface of the decking panel. Should you decide to invest in this tool, I strongly suggest testing it on decking off cuts in order to get an idea how it works. I propose visiting your local store and having a long chat with the senior tool specialist about countersinking tool bits and its advantages.
Eric
- Mark as New
- Bookmark
- Subscribe
- Mute
- Subscribe to RSS Feed
- Highlight
- Report Inappropriate Content
Re: Best screws for Merbau decking - colour coded?
Hi @EricL is the https://www.bunnings.com.au/starborn-no-10-smart-bit-flat-head-countersink-drill-bit_p6360119 suitable to use for the following screws https://www.bunnings.com.au/buildex-10g-x-65mm-10-tpi-rapiddrive-treated-pine-climacoat-screws-50-bo... for fixing down 19mm spotted gum to treated pine frame below?
Thanks
- Mark as New
- Bookmark
- Subscribe
- Mute
- Subscribe to RSS Feed
- Highlight
- Report Inappropriate Content
Re: Best screws for Merbau decking - colour coded?
Hello @Cathalm8
I suspect that the Starborn No.10 Smart-Bit Flat Head Countersink Drill Bit might not be big enough to counter sink for the Buildex 10G x 65mm 10 TPI RapidDrive Treated Pine Climacoat Screws - 50 Box. It's possible that you'll need to use a bigger one. I suggest looking at the Craftright 3 Piece Countersink Bit Set as a possible alternative. This technically will require you to use two drills, the first drill is for the pilot hole, the second drill is for the counter sinking bit. My best advice is to always check with the tool specialist before purchasing the countersinking bit.
Eric
- « Previous
- Next »
Why join the Bunnings Workshop community?
Workshop is a friendly place to learn, get ideas and find inspiration for your home improvement projects
You might also like


We would love to help with your project.
Join the Bunnings Workshop community today to ask questions and get advice.