
The Bunnings Workshop community can help with your home improvement projects.
- Bunnings Workshop
- >
- Discussion
- >
- Outdoor
- >
- Re: Replacing Decking
How to replace decayed decking?
- Subscribe to RSS Feed
- Mark Topic as New
- Mark Topic as Read
- Float this Topic for Current User
- Bookmark
- Subscribe
- Mute
- Printer Friendly Page
Share
- Mark as New
- Bookmark
- Subscribe
- Mute
- Subscribe to RSS Feed
- Highlight
- Report Inappropriate Content
How to replace decayed decking?
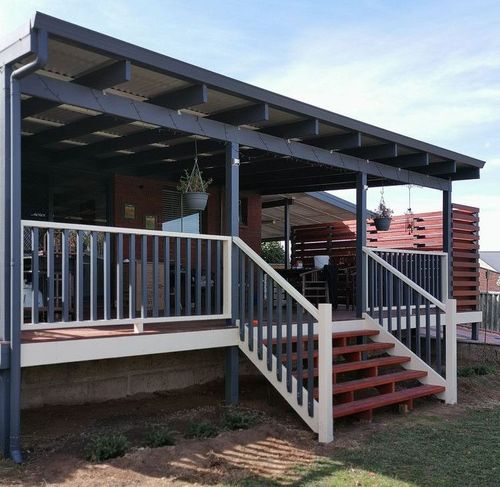
We intend to replace decking about 12 meter sq. Photos attached.
please let us know if your are running any related weekend workshops in Broadmeadows/Craigiebun bunnjngs. Ali looking for some videos that could suggest us material and tools required to complete DIY task. Thank you.


Solved! See most helpful response
- Mark as New
- Bookmark
- Subscribe
- Mute
- Subscribe to RSS Feed
- Highlight
- Report Inappropriate Content
Re: Replacing Decking
I would assume this bucket of Betta cemseal would have been sitting on the shelf for an extended period of time hence the discount, these usually have an expiry date or something marked somewhere. It could be that is just needs a good stir but maybe if something feels too solid it would be best to just return.
I would also recommend a product like this to put on the top of the joists before laying the decking boards down. https://www.bunnings.com.au/protectadeck-45mm-x-50m-flexible-pvc-joist_p0910783 As it looks like that step for one would be prone to copping alot of rain, there are other styles that are cheaper like a type of tape etc. Could be worth also seeing if the frame can be raised a little more off the ground if it is in direct contact with the soil and concrete.
- Mark as New
- Bookmark
- Subscribe
- Mute
- Subscribe to RSS Feed
- Highlight
- Report Inappropriate Content
Re: Replacing Decking


- Mark as New
- Bookmark
- Subscribe
- Mute
- Subscribe to RSS Feed
- Highlight
- Report Inappropriate Content
Re: Replacing Decking
Hi @smhasnain,
I think the timber is borderline needing to be replaced. There is a certain amount of weathering, and this will only continue to get worse over time. If you're going to the expense of installing new decking, then it would make sense to fix it over new framing and joists. With the decking removed, now is the time to consider whether you'd like the new deck to last 5-10 years or more than ten years. There are signs of weathering but no obvious areas of decay. If there was decay, then I'd 100% recommend you replace the timber now.
To remove the current joists, you'd cut through them in the middle and use them to lever the Pryda nail fixtures off. If they are stubborn, you can use a prybar to remove them. It appears that 90 x 45mm H3 Pine has been used, and I'd stick with that for replacement.
Protectadeck is installed by laying it over the joists and stapling it into position.
Adding bitumen paint to the underside of timber, whether it's raised or not, is of benefit. The closer the timber is to the ground, the more important it is to coat the underside.
Please let me know if you have further questions.
Mitchell
- Mark as New
- Bookmark
- Subscribe
- Mute
- Subscribe to RSS Feed
- Highlight
- Report Inappropriate Content
Re: Replacing Decking
Would agree seeing you are already at this point it would be easier to replace now than at some point having to pull all the decking boards back up and replace at a later date. But if money or time is a factor you could leave it all open like this for awhile to try and get it all as dry as possible, see how your levels look etc as you may have to plane the tops a bit if they are warped. You could then use the same bitumen stuff on them to help keep the moister out.
Is it worth putting something down on top of the soil to lesson the moisture rising?
- Mark as New
- Bookmark
- Subscribe
- Mute
- Subscribe to RSS Feed
- Highlight
- Report Inappropriate Content
Re: Replacing Decking
Hi,
i have installed ~ 12 meter square surface area new Merbau deck, 3 months ago. Please refer uploaded images.
i would like to know the following:
(1) Is it right time to apply either oil or stain? Which one is preferable and dconomical


either oil or stain?
(2) how should I prepare new 3 months old deck, before any applications?
(3) what essential tools and material (quantity), i need to buy from bunnings to complete this project.
(4) How soon i can walk on the deck after proposed applications.
Thank you.
- Mark as New
- Bookmark
- Subscribe
- Mute
- Subscribe to RSS Feed
- Highlight
- Report Inappropriate Content
Re: Replacing Decking
Can i please get some advice from Bunnings on my previously posted questions regading oiling the new deck. Thank you
- Mark as New
- Bookmark
- Subscribe
- Mute
- Subscribe to RSS Feed
- Highlight
- Report Inappropriate Content
Re: Replacing Decking
Hello @smhasnain
Your deck looks very well-seasoned and it's just about the right time to oil it. The general steps are to clean the surface of the deck with Cabot's 1L Deck Clean or similar in combination with an Oates Long Handle Deck Scrub Brush. If you're going to use a pressure washer, just make sure that you have it at its lowest setting to prevent splintering the surface of the decking panel. Once the deck has been properly cleaned and is totally dry you can then begin oiling the surface.
Here are some handy step-by-step guides:
A good example of a decking oil is Cabot's 4L Merbau Aquadeck Exterior Decking Oil. It is a highly durable, low odour decking oil that provides exceptional durability to all exterior surfaces and lasts twice as long as traditional decking oils. Aquadeck's advanced dual technology allows natural oils to penetrate and nourish timber, creating a durable acrylic barrier for a beautiful natural finish. It is ideal for use on decks, garden furniture, pergolas, fences and gates.
One factor that greatly affects drying time is the weather. The colder it is the longer it will take the surface to dry off. In ideal weather conditions the surface should be touch dry in 4 to 6 hours, it should be safe to walk on in 12 hours and you can put your furniture back in 24 hours. However, this will depend on the prevailing weather as I mentioned.
I propose using your best judgement and if it still looks soft or wet, I suggest using another entrance for the meantime until the surface is dry and solid.
If you have any other questions we can help with, please let us know.
Eric
- Mark as New
- Bookmark
- Subscribe
- Mute
- Subscribe to RSS Feed
- Highlight
- Report Inappropriate Content
Re: Replacing Decking
Thank you.
Does 1L Deck Clean and 4L Aquadeck will be sufficient to cover 12 meter square area?
- Mark as New
- Bookmark
- Subscribe
- Mute
- Subscribe to RSS Feed
- Highlight
- Report Inappropriate Content
Re: Replacing Decking
Hi @smhasnain
The Cabot's 1L Deck Clean is rated to cover 10 square meters. If applied judiciously, you should be able to extend it and cover the remaining extra two square meters. The Cabot's 4L Merbau Aquadeck Exterior Decking Oil is rated to cover 24 square meters with two coats.
If you need further assistance, please let me know.
Eric
- « Previous
-
- 1
- 2
- Next »
Why join the Bunnings Workshop community?
Workshop is a friendly place to learn, get ideas and find inspiration for your home improvement projects
You might also like


We would love to help with your project.
Join the Bunnings Workshop community today to ask questions and get advice.