
The Bunnings Workshop community can help with your home improvement projects.
- Bunnings Workshop
- >
- Discussion
- >
- Outdoor
- >
- Re: How to build an elevated loft style ...
How to build an elevated loft-style cubby?
- Subscribe to RSS Feed
- Mark Topic as New
- Mark Topic as Read
- Float this Topic for Current User
- Bookmark
- Subscribe
- Mute
- Printer Friendly Page
Share
- Mark as New
- Bookmark
- Subscribe
- Mute
- Subscribe to RSS Feed
- Highlight
- Report Inappropriate Content
How to build an elevated loft-style cubby?
Hi everyone,
Im planning an elevated cubby house build for my 4 boys for Christmas.
1- because I cant afford, nor justify spending 2k on a flat pack one
2- I LOVE recycling, upcycling and creating something out of nothing while saving money in the process.
3- I want to make my boys proud.
Im no expert at all so im hoping someone can help me please!
My original plan was to pave an area for the cubby to stand on as the ground isnt completely level and I wanted to prevent any possible rot to the legs. However, I have since scrapped that plan as the cubby will have a sandpit base and I don't want a potential waterlogged area which will ruin the paving. Saves me money anyway.
Except now I either need to have the back posts longer than the front to level the deck for the cubby or I need to level the ground and put a paver under each beam? Is this necessary with treated pine? Are the metal screw footings worth the money?

This is what Im roughly aiming for (found on familybackyarddesign instagram located in the US). Deck about 1.2m off the ground and 2mx1.8m deck base. Height of walls/roof also about 1.1/1.2m. I've read that I will need 100x100 for the "legs" (please note now that I do not have a carpenters vocabulary 😅). Do I also need 100x100 to frame the deck? What exactly do I need to secure the base to make it sturdy and as safe as possible? Im talking screws/ braces/ brackets etc?
I already have roof sheeting and a truck load of Merbau decking for the floor/ external walls and I already have the beam and A frame for swings that are from an old costco cubby that I have fixed up and painted.
What thickness of timber for wall and roof framing to support the roof as Ive read thats very important?
Should the front two posts (or all 4) go from ground to roof? Or can I build the landing and incorporate the top posts into the side wall framing? (Am I making sense 😬)
Ive asked so many questions already, but lastly; do I need to incorporate anything special into the wall that the swings will be attached to?
Thank you for helping this mumma out 🙏
- Mark as New
- Bookmark
- Subscribe
- Mute
- Subscribe to RSS Feed
- Highlight
- Report Inappropriate Content
Re: How to build an elevated loft style Cubby
Welcome to the Bunnings Workshop community @Jordan_. It's lovely to have you join us, and many thanks for your question about building a cubby house.
I absolutely love the reasoning behind your build; it really brought a smile to my face. Some of my fondest memories are of the cubby my father built for me when I was four. Just knowing he made it himself made it magical, and years later when the property was sold, the new owners called us because their children had outgrown it. My father went back, disassembled it, and reassembled it at our new place, which made it even more special. That’s why I really admire your approach. Wanting to build something yourself for your boys that they’ll remember forever.
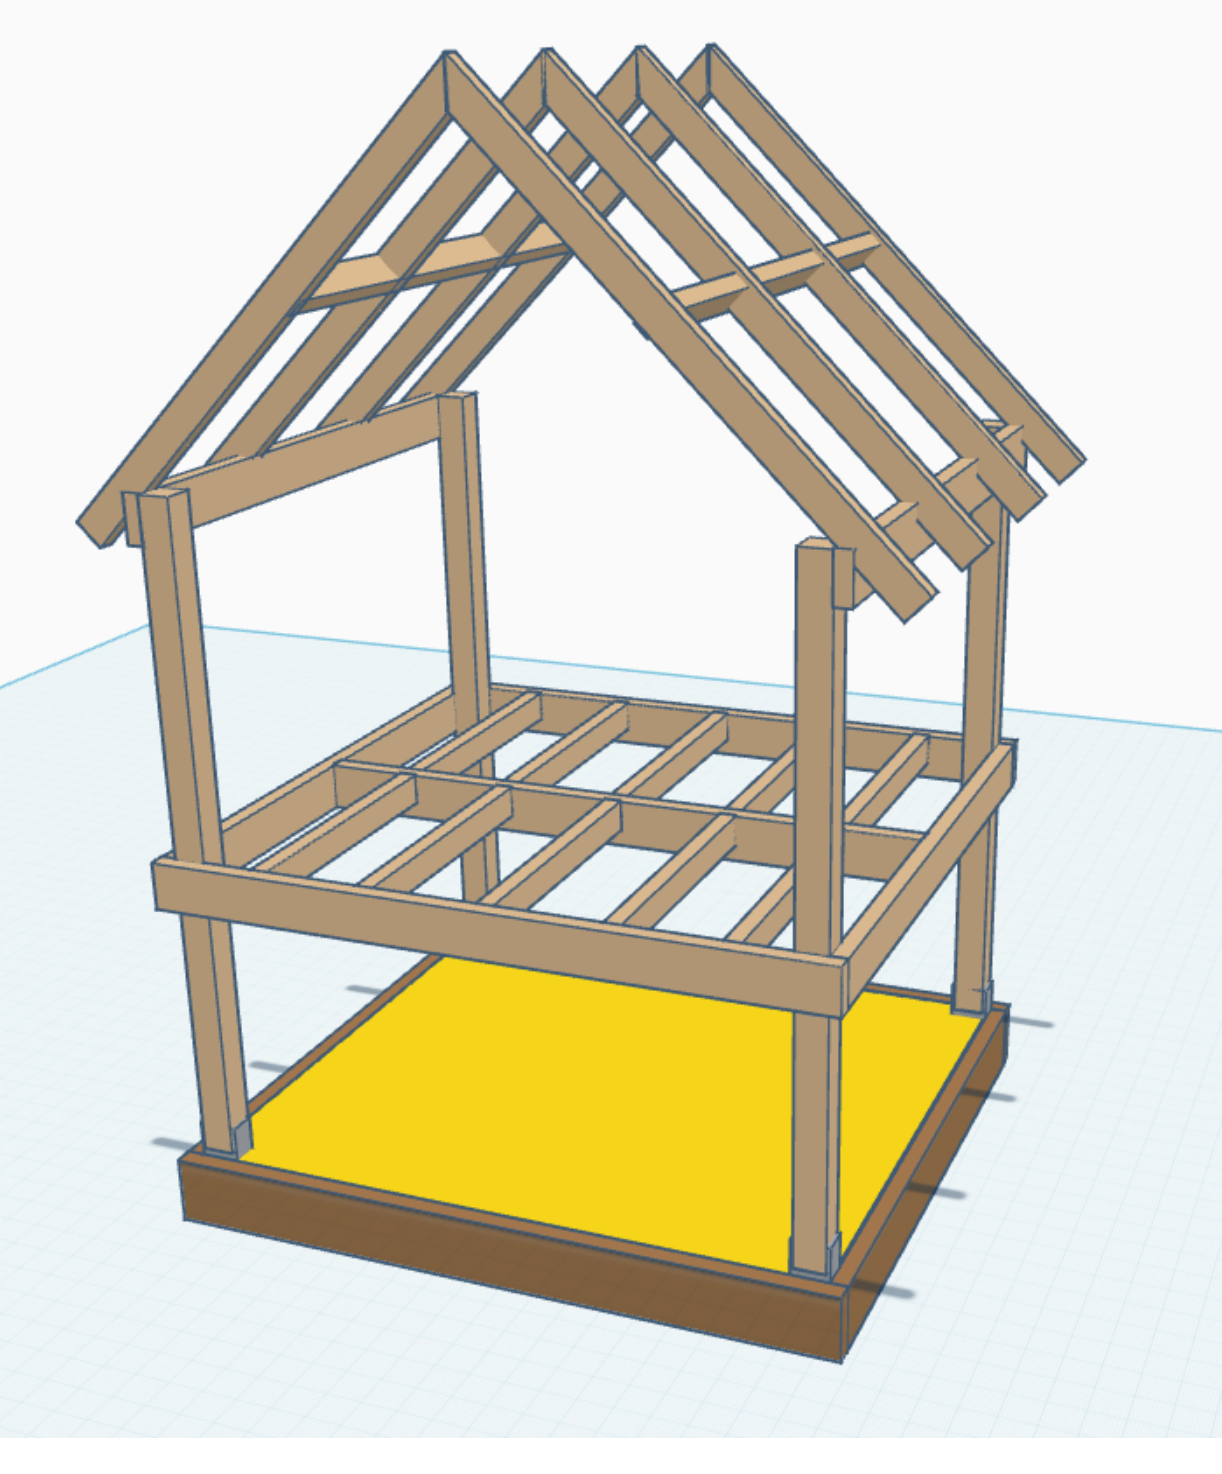
At the same time, this is a considerable project. Elevating a cubby adds complexity and safety considerations, so I strongly recommend spending time reading guides on building elevated cubbies and, if possible, getting a professional to check your plans. For your current questions, starting with a level-based approach is ideal. Even if that means cutting into the slope for a sandpit, it gives you posts of equal length and a safer, level structure. I’d personally use non-CCA-treated pine sleepers to line the cut area and set your posts within that perimeter. For the posts themselves, concreting them into the ground with proper post supports in concrete footings is best — screw-in footings are convenient but not as solid for this size and height.
Regarding timber sizes, your 100x100 “legs” are fine for upright posts, and for H3 treated pine posts, that might be closer to 88–90 mm. The deck frame doesn’t need to be 100x100 — 140x45 H3 treated pine will work well. Run a central 140x45 beam and use 90x45 joists to support the floor, secured with screws or joist hangers. For walls and roof framing, 90x45 timbers are sufficient as long as you use enough to give rigidity. I would continue the posts all the way up to support the roof rather than stopping at the deck landing. This adds strength and allows you to attach the roof securely. For swings, ensure the wall they attach to has additional reinforcement, such as doubled studs or bracing, to safely handle the load.
With these points, you should have a solid starting framework, but take your time planning, double-check measurements, and prioritise safety at every step.
I've created the rendering below to help understand how it could go together.
Please let me know if you have any questions.
Mitchell
- Mark as New
- Bookmark
- Subscribe
- Mute
- Subscribe to RSS Feed
- Highlight
- Report Inappropriate Content
Re: How to build an elevated loft style Cubby
@MitchellMc Im baaack !
Its been a minute, theres been a lot going on and now im under the pump to get this done before christmas 😬
Thank you so much for your wisdom. Ive definitely utilised your information.
Plans have changed slightly though!
Im now raising the base height to 1.5m and the deck/ cubby base will be 2x2m. I realised it makes it easier for me and i wanted it a little taller so the kids have a bit more room in the sandpit.
My posts are 100x100 h4. I have h4 sleepers for the sandpit and 140×45 for the deck surrounds and support beams x2 with joist hangers to suit.
Question 1- do I HAVE to use 140x45 for the noggins? Can I use 90x45 or is it at too much risk of rolling either side?
Question 2- do I have to notch the 140s into the 100x100 posts?
Because i have someone in my ear who's spoken to someone else telling me these have to happen and Im not positive they do? Yes notching gives a cleaner look, but does the cubby really need that for support?
I was planing on bracing the corners with timber or is that not enough and would I need a cross brace each side?
So far I have my supplies, and the ground is excavated and level so I can say its started but not really.
The kids think im building a 2 storey "shed" !

- Mark as New
- Bookmark
- Subscribe
- Mute
- Subscribe to RSS Feed
- Highlight
- Report Inappropriate Content
Re: How to build an elevated loft style Cubby
Great to see you back and that the project is moving along, it sounds like the kids are going to love it @Jordan_.
On the noggins: I’d need to clarify exactly what you mean by “noggins” in your setup. In my previous plan, I didn’t include noggins, only bearers and joists. If you’re talking about the 90×45 pieces spanning between the bearers, that size is usually fine for short spans because the larger 140×45 bearer they are connected to is carrying the main load. The key is knowing the exact spacing and what load those noggins are expected to carry.
Notching the 140×45 into the 100×100 posts is mostly for neatness and to keep everything flush, but structurally, bolting through is generally sufficient for a small cubby. Notching will transfer weight directly into the post, which is stronger, but it’s not strictly necessary if you have good bolted connections and corner bracing.
Bracing the corners will go a long way to keep the structure stable. The more bracing, the stronger and less likely the frame is to twist or sway, but for a cubby of this size, solid corner bracing and well-fixed posts should be enough.
If you can clarify exactly where you’re thinking of putting the noggins, I can give more detailed guidance. Ultimately, aiming for a safe, stable cubby is the best route, and it sounds like you’re already on the right track.
Mitchell
- Mark as New
- Bookmark
- Subscribe
- Mute
- Subscribe to RSS Feed
- Highlight
- Report Inappropriate Content
Re: How to build an elevated loft style Cubby
Oh sorry! That was another thing thats been put in my head.
Ive been told I need them 😅
- Mark as New
- Bookmark
- Subscribe
- Mute
- Subscribe to RSS Feed
- Highlight
- Report Inappropriate Content
Re: How to build an elevated loft style Cubby
You'd typically use the same size noggins as the joists that they are making more rigid @Jordan_. So, if you're using 90 x 45mm joists, you'd use 90 x 45mm noggins; same with the 140mm.
Mitchell
Why join the Bunnings Workshop community?
Workshop is a friendly place to learn, get ideas and find inspiration for your home improvement projects
You might also like


We would love to help with your project.
Join the Bunnings Workshop community today to ask questions and get advice.