
The Bunnings Workshop community can help with your home improvement projects.
- Bunnings Workshop
- >
- Discussion
- >
- Garage and Shed
- >
- Re: Movable garden shed base
How to build a movable garden shed base?
- Subscribe to RSS Feed
- Mark Topic as New
- Mark Topic as Read
- Float this Topic for Current User
- Bookmark
- Subscribe
- Mute
- Printer Friendly Page
Share
- Mark as New
- Bookmark
- Subscribe
- Mute
- Subscribe to RSS Feed
- Highlight
- Report Inappropriate Content
How to build a movable garden shed base?
Hi, I want to install a garden shed (approx 2 X 2 metres) in a location where there is a water pipe and electric/gas lines underground, so I can't dig too deep, and I need it to be movable without a huge amount of effort in the case that something needs to be accessed in the ground. See the area in the photo below...
I was thinking of buying this Lifetime shed (Lifetime 2.1 x 2.1 x 2.27m Desert Sand Polyethylene Plastic Garden Shed - Bunnings Australia) because it should be easier to move than a metal or wooden shed.
And, I was thinking of building a wooden shed base, something like this (How to build a floating shed foundation // Great for uneven and flat yards! - plans available!).I Just have a few questions related to the shed base...
* Firstly, does a wood base seem like the best way to go considering my requirement for it to be movable and not require much digging?
* In the video I linked above, the base uses concrete blocks to rest the wood beams on (I know something like TuffBlocks can also be used). I've seen some videos that just have the wood resting directly on the ground with anchor points going into the ground. Just wondering which would be best for my situation. There's a slight slope on the ground, but I think I should be able to level it fairly well.
* Also, in the video he puts floor sheeting (OSB) down on top of the frame. I'm just wondering if I would need floor sheeting given the Lifetime shed will have its own flooring. Or will this help to keep it level or provide better anchor points for the shed floor? Do you have any other suggestions for what to put on top of the frame?
* What timber would you recommend for the wood frame? Would H3 treated pine be ok (i.e. 140 x 45mm Outdoor Framing H3 Treated Pine - 4.8m - Bunnings Australia), or would H4 treated pine be better, or something else?
* Should I put down a gravel or similar base under the timber frame base, or is it ok directly over soil?
Any advice is appreciated,

Cheers,
Stephen
- Mark as New
- Bookmark
- Subscribe
- Mute
- Subscribe to RSS Feed
- Highlight
- Report Inappropriate Content
Re: Movable garden shed base
Hi @nieldy,
Thank you for your question about constructing a base for your Lifetime 2.1 x 2.1 x 2.27m Desert Sand Polyethylene Plastic Garden Shed.
I'll start by mentioning that the installation manual for this shed, which contains a guide for constructing a timber shed base, can be found here: Lifetime 7 Ft. x 7 Ft. Outdoor Storage Shed.
In your situation, a timber base is going to be your best option as it will give you a flat, solid foundation to anchor your shed to, while still being movable if required.
The main thing I would be tossing up is whether to have it raised, like in your video or sitting flat on the ground. If it were raised, you would just need to level under the foundation blocks or pedestals, whereas if it were sitting on the ground, you would need to level all the areas where it is in contact with the ground.
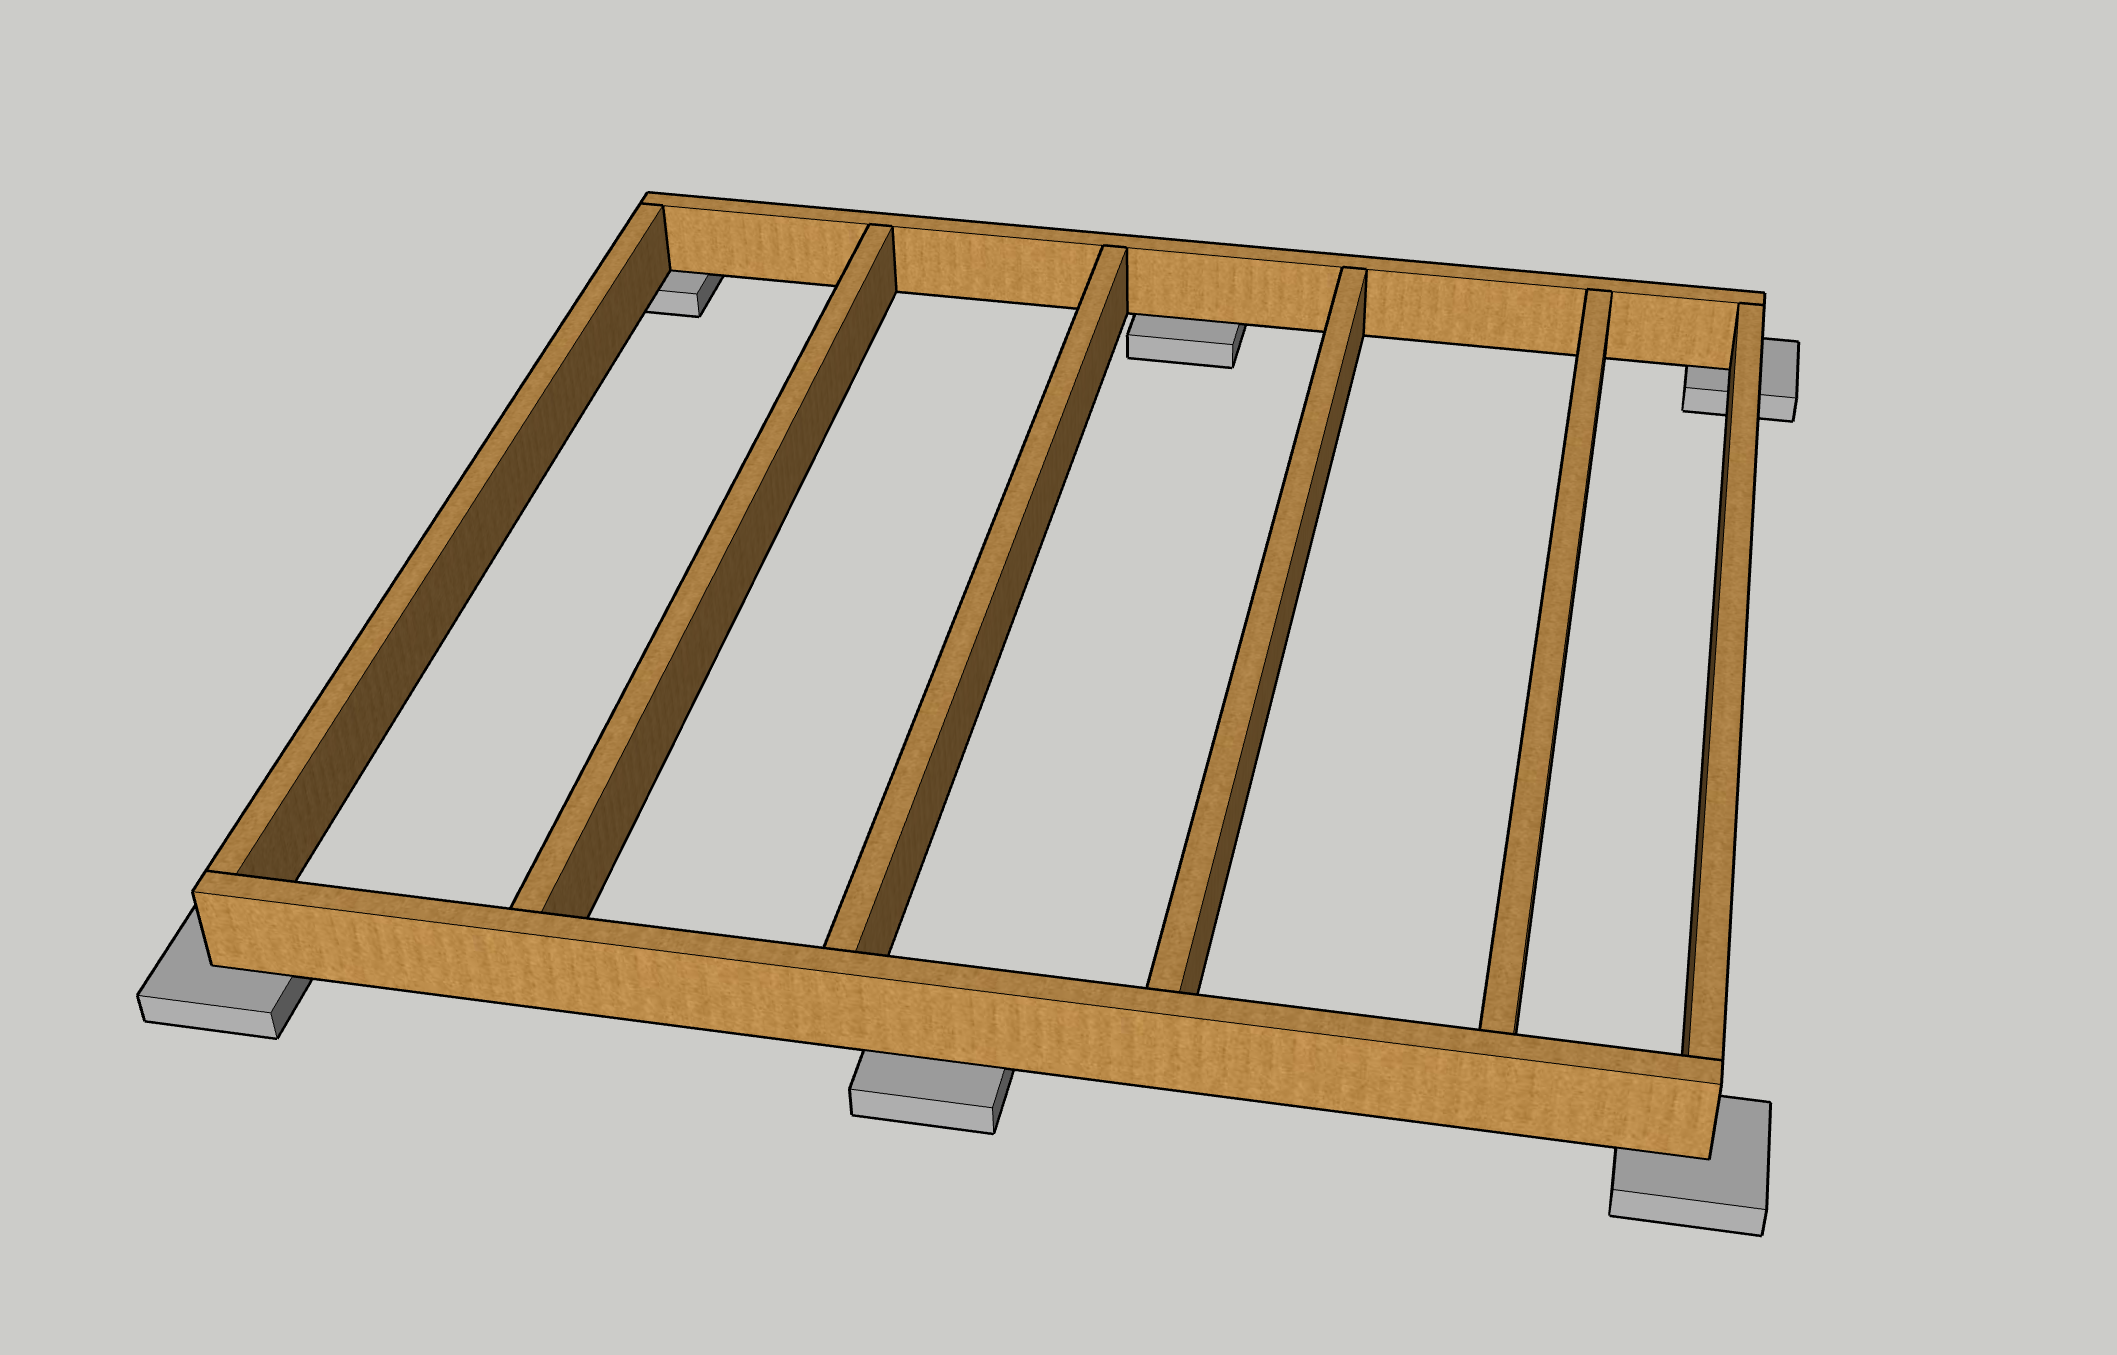
If you were to use a raised base like in the video above, you could use H3 materials, but you would essentially be building a deck, so we should follow the principles of deck building and use the appropriately sized timbers for the spans. In this situation, where you require a 2070mm x 2120mm base (measurements from the manual), you would need to use 140x45 H3 with 3 pedestals per bearer, which would look like this.
While this is an option, I think having your base sit directly on the ground would be a better option because the materials are cheaper, the construction is easier, and anchoring would be simpler. You would just have to put in a bit of extra work to level it out at the beginning, but every other aspect of construction would be simpler as it would be directly supported by the ground all throughout. Being in direct contact with the ground, you would need to use H4-treated timber. I'd suggest using sleepers. You could build essentially the same frame as above using 200mmx50mm sleepers.
As a foundation, I would suggest digging out trenches for the footprint of the frame and adding around 50mm of drainage gravel for both levelling and drainage purposes. Use a tamper to level and compact the gravel to create a solid base.
You could then connect the frame together with landscape screws and attach the frame to the ground using sleeper stakes.
This shed requires support under the entire floor, so you couldn't just leave the frame as is, you would need to add a flat surface to it. Instead of plywood or OSB, which don't usually hold up well where moisture is present, I'd suggest using 90 x 22mm Decking H3 Treated Pine.
Let me know what you think and if you have further questions, please don't hesitate to ask.
Jacob
- Mark as New
- Bookmark
- Subscribe
- Mute
- Subscribe to RSS Feed
- Highlight
- Report Inappropriate Content
Re: Movable garden shed base
Hi Jacob, thanks a lot for your detailed response. I think I'll go the sleeper option you suggested, as it does sound a little easier, and there's probably no great need for it to be raised above the ground.
Just a couple of follow up questions...
* For the foundation, are you suggesting I add drainage gravel just in the dug trenches for the footprint of the frame, or should the whole foundation area be filled with gravel and then the frame laid on top?
* Also, are you suggesting digging to a depth of 50mm and filling with gravel to essentially fill in the dug area, or should the gravel be raised above ground level?
Cheers,
Stephen
- Mark as New
- Bookmark
- Subscribe
- Mute
- Subscribe to RSS Feed
- Highlight
- Report Inappropriate Content
Re: Movable garden shed base
Hello @nieldy
I believe that you just need to add gravel in the dug trenches for the footprint. I don't think you need to cover the entire area with drainage gravel. Since Jacob suggested using a tamper, I don't think its necessary to overfill the trench, it just needs to be level with soil after tamping.
Let me tag @JacobZ just in case he wishes to add anything else.
If you need further assistance, please let us know.
Eric
- Mark as New
- Bookmark
- Subscribe
- Mute
- Subscribe to RSS Feed
- Highlight
- Report Inappropriate Content
Re: Movable garden shed base
Thanks Eric, makes sense. I'll give this a go.
- Mark as New
- Bookmark
- Subscribe
- Mute
- Subscribe to RSS Feed
- Highlight
- Report Inappropriate Content
Re: Movable garden shed base
Hi Jacob,
I'm finally getting on with this project. I've made a list of parts I'll need from Bunnings as you suggested (for the frame that sits directly on the ground). Just wanted to check this with you to see if what I've put makes sense.
I have a few questions about the parts:
* Are the landscape screws I selected ok, or should I go for something different?
* How many screws would I need per connection? I'm thinking 3 to connect the sleepers, but not sure about attaching the pine boards for the surface.
* How many stakes do you think I'd need. I've selected 4 corner stakes and 2 flat stakes, but let me know what you think.
* Does 24 decking wood boards seem right to cover the area (calculated based on max width of 2120mm)... I might be able to get away with 23.
• Sleepers for frame - 200mm x 50mm - H4 - 2.4m long (x8) (https://www.bunnings.com.au/200-x-50mm-2-4m-green-ecowood-tan-e-sleeper_p0506065) - cost = 8 * $22.20 = $177.6
• Decking wood for frame surface - 90mm x 22mm - H3- 2.4m long (x24) (https://www.bunnings.com.au/90-x-22mm-decking-h3-treated-pine-2-4m_p8032583) - cost = 24 * $10.48 = $251.52
• Tamper (https://www.bunnings.com.au/trojan-205mm-tamper_p0057896) - cost = $65.90
• Landscaping screws (https://www.bunnings.com.au/buildex-14g-x-100mm-class-4-bugle-batten-screws-100-pack_p0890607) - cost = $26.45
* Corner Stakes (x4) (https://www.bunnings.com.au/jack-450mm-heavy-duty-steel-corner-stake-sleeper-peg_p1100604) - cost = 4 * $10.50 = $42
* Flat stakes (x2) (https://www.bunnings.com.au/jack-450mm-heavy-duty-steel-sleeper-peg-flat-stake_p1100606) - cost = 2 * $9.50 = $19
Thanks again,
Stephen
- Mark as New
- Bookmark
- Subscribe
- Mute
- Subscribe to RSS Feed
- Highlight
- Report Inappropriate Content
Re: Movable garden shed base
Hi @nieldy,
I'm glad to hear you're almost ready for your project.
Those screws will work well. You'll want to grab a 5mm Long Series Drill Bit to predrill holes for them. Three screws per sleeper connection isn't really necessary; two will be fine.
Your decking boards should have two screws down into each sleeper. These Bremick Ultrafast 10g x 50mm Stainless Steel 316 T20 Trim Head Screws are a good option for your decking.
The four corner stakes and two flat stakes should also be enough.
Keep in mind that your decking boards should have a slight gap between them to allow for expansion of the material, so you'll need to account for that gap in your calculation. Typically, you'd use a 3-6mm gap between boards. With a 3mm gap, you'd need 23 boards, and you'd end up with a 16mm overhang. If you halved this and had an 8mm overhang on each end, this would make things consistent, and your gaps would be perfect.
Let me know what you think and if you have further questions, please don't hesitate to ask.
Jacob
- Mark as New
- Bookmark
- Subscribe
- Mute
- Subscribe to RSS Feed
- Highlight
- Report Inappropriate Content
Re: Movable garden shed base
Cheers!
- Mark as New
- Bookmark
- Subscribe
- Mute
- Subscribe to RSS Feed
- Highlight
- Report Inappropriate Content
Re: Movable garden shed base
Hi @nieldy,
Yep, your calculations look spot on: 276 decking screws and 24 sleeper screws. Using the Bremick 18g screws for the sleepers will work fine, and the 5 mm drill bit is perfect for those.
For the decking screws, 5 mm is actually a bit too large. I’d recommend picking up a screw pre-drill and countersink bit. That way, it will pre-drill the correct size hole and countersink the heads so they sit flush. Without doing that, driving the screws straight in could split the timber, so this little extra step makes a big difference. Use the middle #8 bit.
Please let me know if you have any questions.
Mitchell
- Mark as New
- Bookmark
- Subscribe
- Mute
- Subscribe to RSS Feed
- Highlight
- Report Inappropriate Content
Re: Movable garden shed base
Hi again,
I've got all the wood and will start constructing it on the weekend. I notice in the Lifetime manual they have 2 pieces of wood next to each other on one side of the frame, which is something I wasn't planning to do (I only got 8 sleepers). Do you think this is important? I guess that's for extra strength?

Why join the Bunnings Workshop community?
Workshop is a friendly place to learn, get ideas and find inspiration for your home improvement projects
You might also like


We would love to help with your project.
Join the Bunnings Workshop community today to ask questions and get advice.