The Bunnings Workshop community can help with your home improvement projects.
- Bunnings Workshop
- >
- Discussion
- >
- Garage and Shed
- >
- Mobile workbench with storage and drawer
Mobile workbench with storage and drawer
- Subscribe to RSS Feed
- Mark Topic as New
- Mark Topic as Read
- Float this Topic for Current User
- Bookmark
- Subscribe
- Mute
- Printer Friendly Page
- Mark as New
- Bookmark
- Subscribe
- Mute
- Subscribe to RSS Feed
- Highlight
- Report Inappropriate Content
Mobile workbench with storage and drawer
Firstly, shout out to @Baggs for his own workbench project that inspired parts of this build and his advice.
Problem
With a single car garage and a small townhouse, storage space is always at a premium, and my old compact workbench didn't have enough storage for the many tools and fixings etc I've accumulated. The bench had only a 7mm MDF top meaning it wasn't suitable for mounting a vice either. I also didn't have a work surface for larger pieces of wood etc so I wanted a mobile bench I could wheel into the middle of the garage when I needed to cut or work on something longer.
Solution
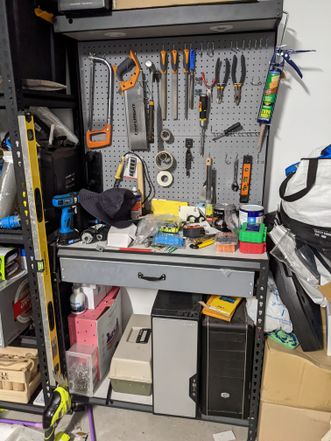
The goal of the project was to create a larger, mobile, sturdy bench which could eventually have a vice mounted and have the same storage (shelf and drawer). Peg board would be wall-mounted.
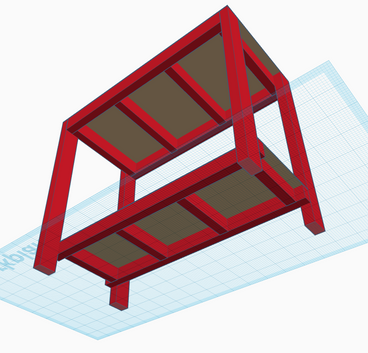
I came up with the following designs based off this 1200x596x18mm Pine Ply as the benchtop and 90x35mm MGP10 as the main structure:
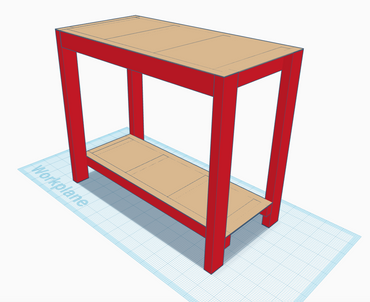
I used an online CAD tool to make the designs so I could get the Bunnings Cut-Shop to cut all the pieces for me to the millimetre so construction would be a breeze.
Construction
Including detailed shots of the process for anyone else like me who doesn't have a great work area for projects like these. I was quite afraid of constructing the frame pieces without a work surface, bracing system etc to keep things square, but it worked out great with my hacky methods.
1. Put together bench-top frame using the benchtop as a base to help keep things square. Used an extra piece of the 90x35 and two f-clamps to keep the joint square and tight as I pre-drilled and drove in two bugel-head screws per joint.

Had put together the entire top frame before I realised the cut-shop had cut the two edge-pieces too short! First D'oh! moment and another trip back to Bunnings ![]()
2. Top frame re-assembled with correct side lengths, I now lay the bench perpendicular to the ground and screwed two of the legs on with a single bugel-head so I could square things up later.
3. Attached the side of the bottom shelf frame using a spare piece of the same timber as a spacer from the bottom of the legs for a small amount of ground clearance.
4. This step worried me but it worked perfectly. Stood the table up and held the other two legs on using the f-clamps so I could drill and screw bugel-head screws in to fix on the other two legs.
5. Safety inspector surveyed the work and gave the tick of approval.
6. Using spare pieces and off-cuts again to ensure the right ground clearance, I assembled the bottom frame using 2 bugel-heads per joint. I decided to construct the bottom frame from 70x35mm MGP10 just to save weight, but you could use 90x35 as well. I then checked square on everything and fixed the top frame to the top of the legs with an extra screw.
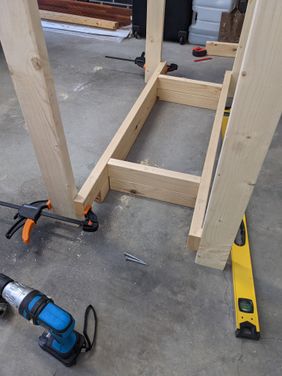
7. To make the top of the frame more seamless in the end, I added an extra piece of 90x35 between the top legs and screwed it in with normal timber screws.
8. Prepped and painted the legs.
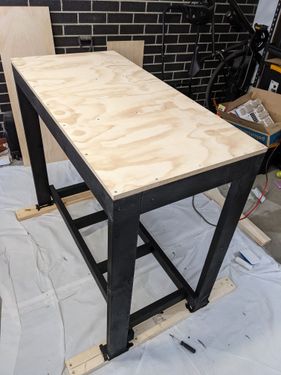
9. Ruled guidelines and screwed on the benchtop. I didn't know if the ply was prone to splitting so to be safe I pre-drilled the ply. After this was done, I sanded and varnished the top.

For reference, to get to this point took me less than a day. I only did a single coat of paint on the legs so I was able to come back to it in the evening and fit the top then apply the first coat of varnish on the same day, then I had to put a couple more coats on later.
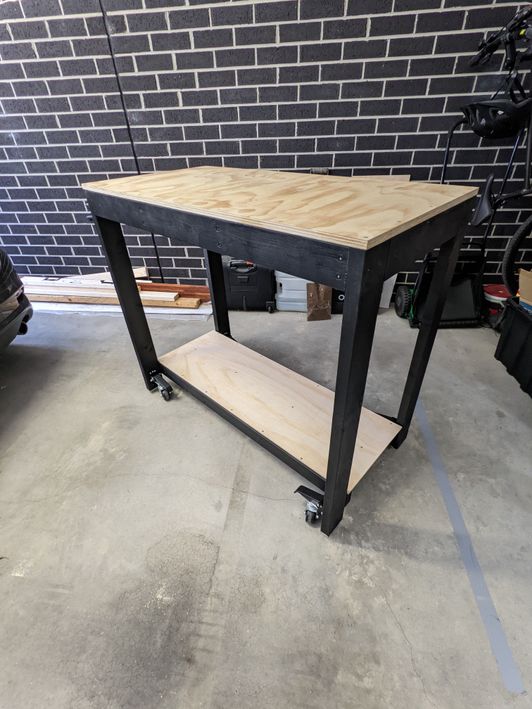
10. Finally, I fit my castors, which I purchased online as I wasn't able to find lift-away castors at Bunnings. @Bunnings maybe one to add to your inventory?

Finished product
This was the final bench by itself, but the last thing was to add a drawer. I had to look around, it needed to be a sturdy drawer that hung from the runners so the runners could be attached to the underside of the top frame.
I found the drawer I wanted from another shop which I won't mention here, and fitted it, here's the new setup:
- Mark as New
- Bookmark
- Subscribe
- Mute
- Subscribe to RSS Feed
- Highlight
- Report Inappropriate Content
Re: Mobile workbench with storage and drawer
Outstanding work @Adrianno! Not only have you built a terrific workbench and created storage for your tools and materials, but you've also provided a really comprehensive guide for others to replicate your project. Thank you so much for sharing. We're so glad to see you have been inspired by @Baggs as that's what this wonderful community is all about. I'm sure that in turn you will inspire plenty of other Bunnings Workshop members and visitors alike.
Looking forward to seeing what you can create using your new workbench. Please reach out if you ever need a hand with anything and don't hesitate to post anytime you have a new project to share with the community. We'd love to see it.
Thanks again,
Jason
- Mark as New
- Bookmark
- Subscribe
- Mute
- Subscribe to RSS Feed
- Highlight
- Report Inappropriate Content
Re: Mobile workbench with storage and drawer
Wow @Adrianno really great work here! You have done an incredible job taking us step by step and letting the community know where you triumphs and learnings were. Also, I just love the look of black and timber.
Since I am a beginner to D.I.Y. still, can I ask what the difference is between a bugle-head screw and a standard one? Why did you select this type?
Thank you,
Katie
- Mark as New
- Bookmark
- Subscribe
- Mute
- Subscribe to RSS Feed
- Highlight
- Report Inappropriate Content
Re: Mobile workbench with storage and drawer
Hey @KatieC thanks for the feedback! I should have been clearer, they were Bugle Head Batten screws like these:
https://www.bunnings.com.au/macsim-75mm-galvanised-batten-screws-100-pack_p2420985
The hex-drive makes them easier to drive in without the drill slipping off, and these screws are good for two reasons, they are meant to be self-drilling, and the shape of the underside of the (bugle shaped) head helps them to sit flush with the surface of the wood without you needing to drill a counter-sink. I did however pre-drill a lot of the holes for these in this instance because I was drilling with the grain into the narrow 35mm wide timber so I thought it best to pre-drill to avoid potential splitting. I'm sure it wasn't strictly necessary but I thought I'd do it just in case!
- Mark as New
- Bookmark
- Subscribe
- Mute
- Subscribe to RSS Feed
- Highlight
- Report Inappropriate Content
Re: Mobile workbench with storage and drawer
Hello @Adrianno
What an awesome workbench. Thank you so much for sharing the photos and materials you used for your project. Nothing beats a mobile workbench as it makes it so convenient for you to position the table right next to the project instead of the other way around. My favourite part is the folding wheels. This is often an issue when you make a mobile workbench and that it becomes mobile. But with the option of lifting the wheels, it returns the stability of the table.
I'm sure our members will be keen to see the projects you build on this table.
Again, thank you so much for sharing such an amazing workbench.
Eric
- Mark as New
- Bookmark
- Subscribe
- Mute
- Subscribe to RSS Feed
- Highlight
- Report Inappropriate Content
Re: Mobile workbench with storage and drawer
Thank you @Adrianno,
That is really helpful information! I've started to pick up doing some upcycling and I think I'll give these a try next time. When I do I'll tag you in the post to let you know how I go.
Looking forward to more of your projects.
Katie
- Mark as New
- Bookmark
- Subscribe
- Mute
- Subscribe to RSS Feed
- Highlight
- Report Inappropriate Content
Re: Mobile workbench with storage and drawer
Top-notch work there @Adrianno! Our members thoroughly enjoy an excellent workbench project. You've gone above and beyond by providing all the necessary info for any members to replicate your project.
I see you are also a fan of my favourite 3d modelling software.
I look forward to seeing your next project, as you obviously have a ton to offer the community, and I trust you'll get plenty of advice and inspiration back in return.
Fantastic work!
Mitchell
- Mark as New
- Bookmark
- Subscribe
- Mute
- Subscribe to RSS Feed
- Highlight
- Report Inappropriate Content
Re: Mobile workbench with storage and drawer
Noice! The workbench was probably the most satisfying thing I've built, and I'm sure it's right up there for yours as well. Folding wheel design is something I haven't seen before, love it. Well done on the great build ![]()
- Mark as New
- Bookmark
- Subscribe
- Mute
- Subscribe to RSS Feed
- Highlight
- Report Inappropriate Content
Re: Mobile workbench with storage and drawer
Cheers @Remarka6le, yes totally agree, this is one of the most satisfying things I've built as well!
- Mark as New
- Bookmark
- Subscribe
- Mute
- Subscribe to RSS Feed
- Highlight
- Report Inappropriate Content
Re: Mobile workbench with storage and drawer
Hey @MitchellMc appreciate the feedback! Yeah it's a good modelling site isn't it! Good for DIY-ers who only need casual CAD capabilities and can't justify buying or learning anything more serious.
Why join the Bunnings Workshop community?
Workshop is a friendly place to learn, get ideas and find inspiration for your home improvement projects
You might also like
We would love to help with your project.
Join the Bunnings Workshop community today to ask questions and get advice.
