
The Bunnings Workshop community can help with your home improvement projects.
- Bunnings Workshop
- >
- Discussion
- >
- Garage and Shed
- >
- Re: How to transform garage into a study...
How to transform garage into a study?
- Subscribe to RSS Feed
- Mark Topic as New
- Mark Topic as Read
- Float this Topic for Current User
- Bookmark
- Subscribe
- Mute
- Printer Friendly Page
Share
- Mark as New
- Bookmark
- Subscribe
- Mute
- Subscribe to RSS Feed
- Highlight
- Report Inappropriate Content
How to transform garage into a study?
Hi there!
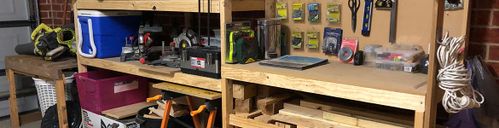
So I'm finally trying to turn this garage into a study of sorts.
Backstory - 1970s townhouse that has suffered water ingress between the common wall due to roof leaks. Common wall is rendered brick. Most recently the garage floor flooded due to blocked stormwater drain under the common wall, resulting in water entering from the gap between the wall and the floor. These have now been rectified (touch wood). The water damage has caused the pipe boxing to degrade, mold on the paint and the render to flake, which I have stripped back.
A few questions I would greatly appreciate some advice and suggestions on:
1. Fixing the gap between the wall and the floor? Shelleys no more gaps for brick and mortar? Gripset Betta Concrete Crack Filler? Something else?
2. Repairing/boxing the unsightly pipes. Expanding foam to try and fill it in then plaster? Just box it in? One option I was considering was incorporating the boxing into the shelving.
3. My plan is to install a desk and shelving on this wall. Plaster it myself, or just get someone in to put plasterboard up?


- Mark as New
- Bookmark
- Subscribe
- Mute
- Subscribe to RSS Feed
- Highlight
- Report Inappropriate Content
Re: How to transform garage into a study?
Welcome to the Bunnings Workshop community @hirkouma. It's sensational to have you join us, and many thanks for your question about creating a study space.
It’s great to hear you’ve sorted the underlying drainage and roof issues—those kinds of problems can really set a project like this back. For sealing the gap between the wall and floor, I’d recommend using something like Sikaflex 11FC. It’s a flexible polyurethane sealant that bonds well to both concrete and brick, and it’s much more durable than No More Gaps or a concrete crack filler, especially if there's any chance of future moisture or movement.
When it comes to the pipes, boxing them in is probably the cleanest option, especially if you're already planning to add shelving or a desk nearby. You could integrate the boxing into your shelving layout to make the most of the space while hiding the pipes at the same time. If you’re plastering that area, you’ll need to fix timber framing around the pipes first so the plasterboard has something to attach to—there’s no real benefit to filling behind with expanding foam unless you’re insulating. For the overhead pipes, it might be more effort than it’s worth trying to enclose them, especially since they run in multiple directions. Instead, you could lean into the look and paint them in a soft grey or black for a modern, industrial touch.
As for finishing the wall, plastering it from scratch is a big job if you haven’t done it before and can be tricky to get a smooth result. A more straightforward approach might be to fix timber battens to the wall and install plasterboard over the top. It’ll be faster and give you a clean finish ready for painting.
Please let me know if you have any questions.
Mitchell
- Mark as New
- Bookmark
- Subscribe
- Mute
- Subscribe to RSS Feed
- Highlight
- Report Inappropriate Content
Re: How to transform garage into a study?
I would do the timber batten thing for all the walls and cover with 2440 x 1220mm 3mm Plywood Pine Premium BC Grade (0340267).@ $40 per sheet which is about half the cost of wall lining. You need to measure up the plywood sheet that's going up over the power box and cut a rectangular hole..
Remove that plywood panel housing the ISP gear and install a timber cupboard.
Modify the top is such a way that when the cupboard is pushed in against the wall it hides most of those pipes.
Then as @MitchellMc suggested box in the rest and integrate wherever possible with shelving.
Cheers
- Mark as New
- Bookmark
- Subscribe
- Mute
- Subscribe to RSS Feed
- Highlight
- Report Inappropriate Content
- Mark as New
- Bookmark
- Subscribe
- Mute
- Subscribe to RSS Feed
- Highlight
- Report Inappropriate Content
Re: How to transform garage into a study?
- Mark as New
- Bookmark
- Subscribe
- Mute
- Subscribe to RSS Feed
- Highlight
- Report Inappropriate Content
Re: How to transform garage into a study?
Good Morning @hirkouma
Love making a garage into a more useful space!
I really like @MitchellMc 's suggestions, especially about sealing that join and also about using the pipes for a look then trying to cover them.
I Like the idea of framing out the wall and then plastering it more then doing something to the surface of the concrete. I would also add in air vents top and bottom plus have the studs off the wall by say 2cm, plus the baseboard to be lifted off the floor by say window spacers by 5mm or 10mm if possible. Whne you have a look at the projects I have linked it may show up why 
So issues I have had, water ingress through the bricks from outside. Removed the soil from outside and pronlem was solved.
Water from patio entering the wall and running down the inside and out from under the stud wall. Fixed by sealing the patio.
Water soak up the plaster from the water coming in. fixed beforehand by keeping the plaster off the floor by10-20mm. The skirting board covers the gap.
As you have had damo/water issues is why I am suggesting the studs wall be off teh actuall wall and teh ventilation to help keep the area dry.
The big drain pipe within the wall I would put a false wall over that can be removed if needed. Even making it look like a large steel plate with metal studs over it to give it an effect.
The pipes that @MitchellMc has mentioned I like the idea of colouring them something else, grey or black and making it a feature of some kind. Afterall it is a garage you are retrofitting and a blank canvas
I do like @AlanM52's idea of the plywood as well, it could look very industrial/retro/modern. It comes down to the style you aim for, maybe a mix of a few?
I have hidden away all my networking/NBN stuff in my linen cupboard, maybe factor in some cupboards to go on the new stud wall? (Stud walls are easy to do, just remember the garage floor will probarly have a slope on it ) Sketch yoruu ideas or ours up and then have a coffee and think. It will be an interesting and fun project I think Break it down into stages if it feels daunting.
- Sealing water leaks, tick
- Sealing Join
- Stud wall
- Plastering
-Cupboards
- Fake pipe covering.
- Pipes in roof
- Lighting
-Completion of fit out.
Garage lining for stud walls stage 1
Garage lining for stud walls stage 2 (Cornice and skirting boards)
and
Hidden internal door for the library
There are also some other projects in and around the garage you may want to troll through
Dave
- Mark as New
- Bookmark
- Subscribe
- Mute
- Subscribe to RSS Feed
- Highlight
- Report Inappropriate Content
Re: How to transform garage into a study?
Hi @hirkouma
Looks like it's my turn. I would follow @MitchellMc advice on how to best seal the cracks and gaps in the wall.
Then an easy solution to hide all those cables and devises would be to position a 2nd hand or basic wardrobe kit.
Attaching either plasterboard or timber panelling to battens instead of directly to the concrete wall, sounds easy enough. But you will need quite a few battens, suitable fasteners and a decent hammer drill and bits. Standard hammer drills can be slow going and even good masonry bits can cook themselves if you're doing a lot of holes. So hiring a small pneumatic hammer might be worth the spend, plus they are about 3X faster with less effort.
Personally, I would be cleaning down the wall of all loose debris and use a construction adhesive and stick timber panelling directly to the wall. I've done this a few times, now for man-caves, and more recently my garage using OSB. It's inexpensive, looks good, comes sealed on one side and very forgiving if they don't quite line up with easy solutions there too.
Nailbag

- Mark as New
- Bookmark
- Subscribe
- Mute
- Subscribe to RSS Feed
- Highlight
- Report Inappropriate Content
Re: How to transform garage into a study?
Hi @MitchellMc thank you very much for your guidance and suggestions! A few follow up questions if I may..
That brown pipe is the common sewer line, and with the water damage the original chipboard that was used to box the pipes has degraded and been removed. This has resulted is a fairly large gap in the common wall. Is boxing going to be sufficient to seal it given I'm hoping to use the space to store a variety of things that are sensitive to damp and humidity. I'm planning to monitor the humidity and if need be a plumbed dehumidifier.
Re plasterboard - I was contemplating a fairly long desk to accommodate effectively two workstations - mine, and a sewing/crafting area for my daughter, along with integrated bookshelves/storage/display cabinets. Is there a potential issue with weight on the plasterboard?
- Mark as New
- Bookmark
- Subscribe
- Mute
- Subscribe to RSS Feed
- Highlight
- Report Inappropriate Content
Re: How to transform garage into a study?
Thanks @AlanM52! Appreciate the suggestion of incorporating a data cupboard into the solution.
- Mark as New
- Bookmark
- Subscribe
- Mute
- Subscribe to RSS Feed
- Highlight
- Report Inappropriate Content
Re: How to transform garage into a study?
Thanks @Dave-1! There's quite a few pipes not pictured, thanks to extensive renovations done to the upstairs bathrooms in the past. I've no issues with pipes in the ceiling, and to @MitchellMc's point I think it's better to incorporate rather than put in a false ceiling. I appreciate any and all suggestions!
Why join the Bunnings Workshop community?
Workshop is a friendly place to learn, get ideas and find inspiration for your home improvement projects
You might also like


We would love to help with your project.
Join the Bunnings Workshop community today to ask questions and get advice.