
The Bunnings Workshop community can help with your home improvement projects.
- Bunnings Workshop
- >
- Discussion
- >
- Garage and Shed
- >
- Re: How to attach folding table to brick...
How to attach folding table to brick wall?
- Subscribe to RSS Feed
- Mark Topic as New
- Mark Topic as Read
- Float this Topic for Current User
- Bookmark
- Subscribe
- Mute
- Printer Friendly Page
Share
- Mark as New
- Bookmark
- Subscribe
- Mute
- Subscribe to RSS Feed
- Highlight
- Report Inappropriate Content
How to attach folding table to brick wall?
Hi there,
I'm going to install a folding desk on the inside brick wall of my garage. I will be using a drill with hammer mode. I also have a level. The desk will be used for light craft applications and won't be exceeding 20kgs of items on it at a time. When upright, I want the surface to be roughly 80cm up from the ground so that it can be used from a seated position.
I'm looking to purchase the following –
Carinya Folding Spring Loaded Bracket x2
https://www.bunnings.com.au/carinya-315-x-145mm-white-folding-spring-loaded-bracket_p3970376
Specrite 1200 x 600 x 18mm Golden Teak Acacia Panel
https://www.bunnings.com.au/specrite-1200-x-600-x-18mm-golden-teak-acacia-multi-use-panel_p0456528
I have a few questions and would be grateful for any help before I get started –
- Will the Carinya brackets be sufficient for holding up the desk? The panel used for the desk weighs 7.6kg. The bracket length is 315mm and will be running along the 600mm side of the panel.
- What type/size of screws/bolts will I need to attach the Carinya brackets to the brick wall? I'm unsure if anchors or dynabolts are suitable.
- What size screws will I need to attach the desk to the brackets?
- Any advice for how best to go about this task?
– Do I attach the desk first to the brackets, then mount to the wall?
– OR do I attach the brackets to the wall first before mounting the desk? - Anything else I've missed! 😀
Thank you!


- Mark as New
- Bookmark
- Subscribe
- Mute
- Subscribe to RSS Feed
- Highlight
- Report Inappropriate Content
Re: How to attach folding table to brick wall?
Hi @JacobZ
Thanks for your reply. This sounds like a good solution! Would it be possible to provide a rough sketch of the design please?
- Mark as New
- Bookmark
- Subscribe
- Mute
- Subscribe to RSS Feed
- Highlight
- Report Inappropriate Content
Re: How to attach folding table to brick wall?
Hi @CROBBO,
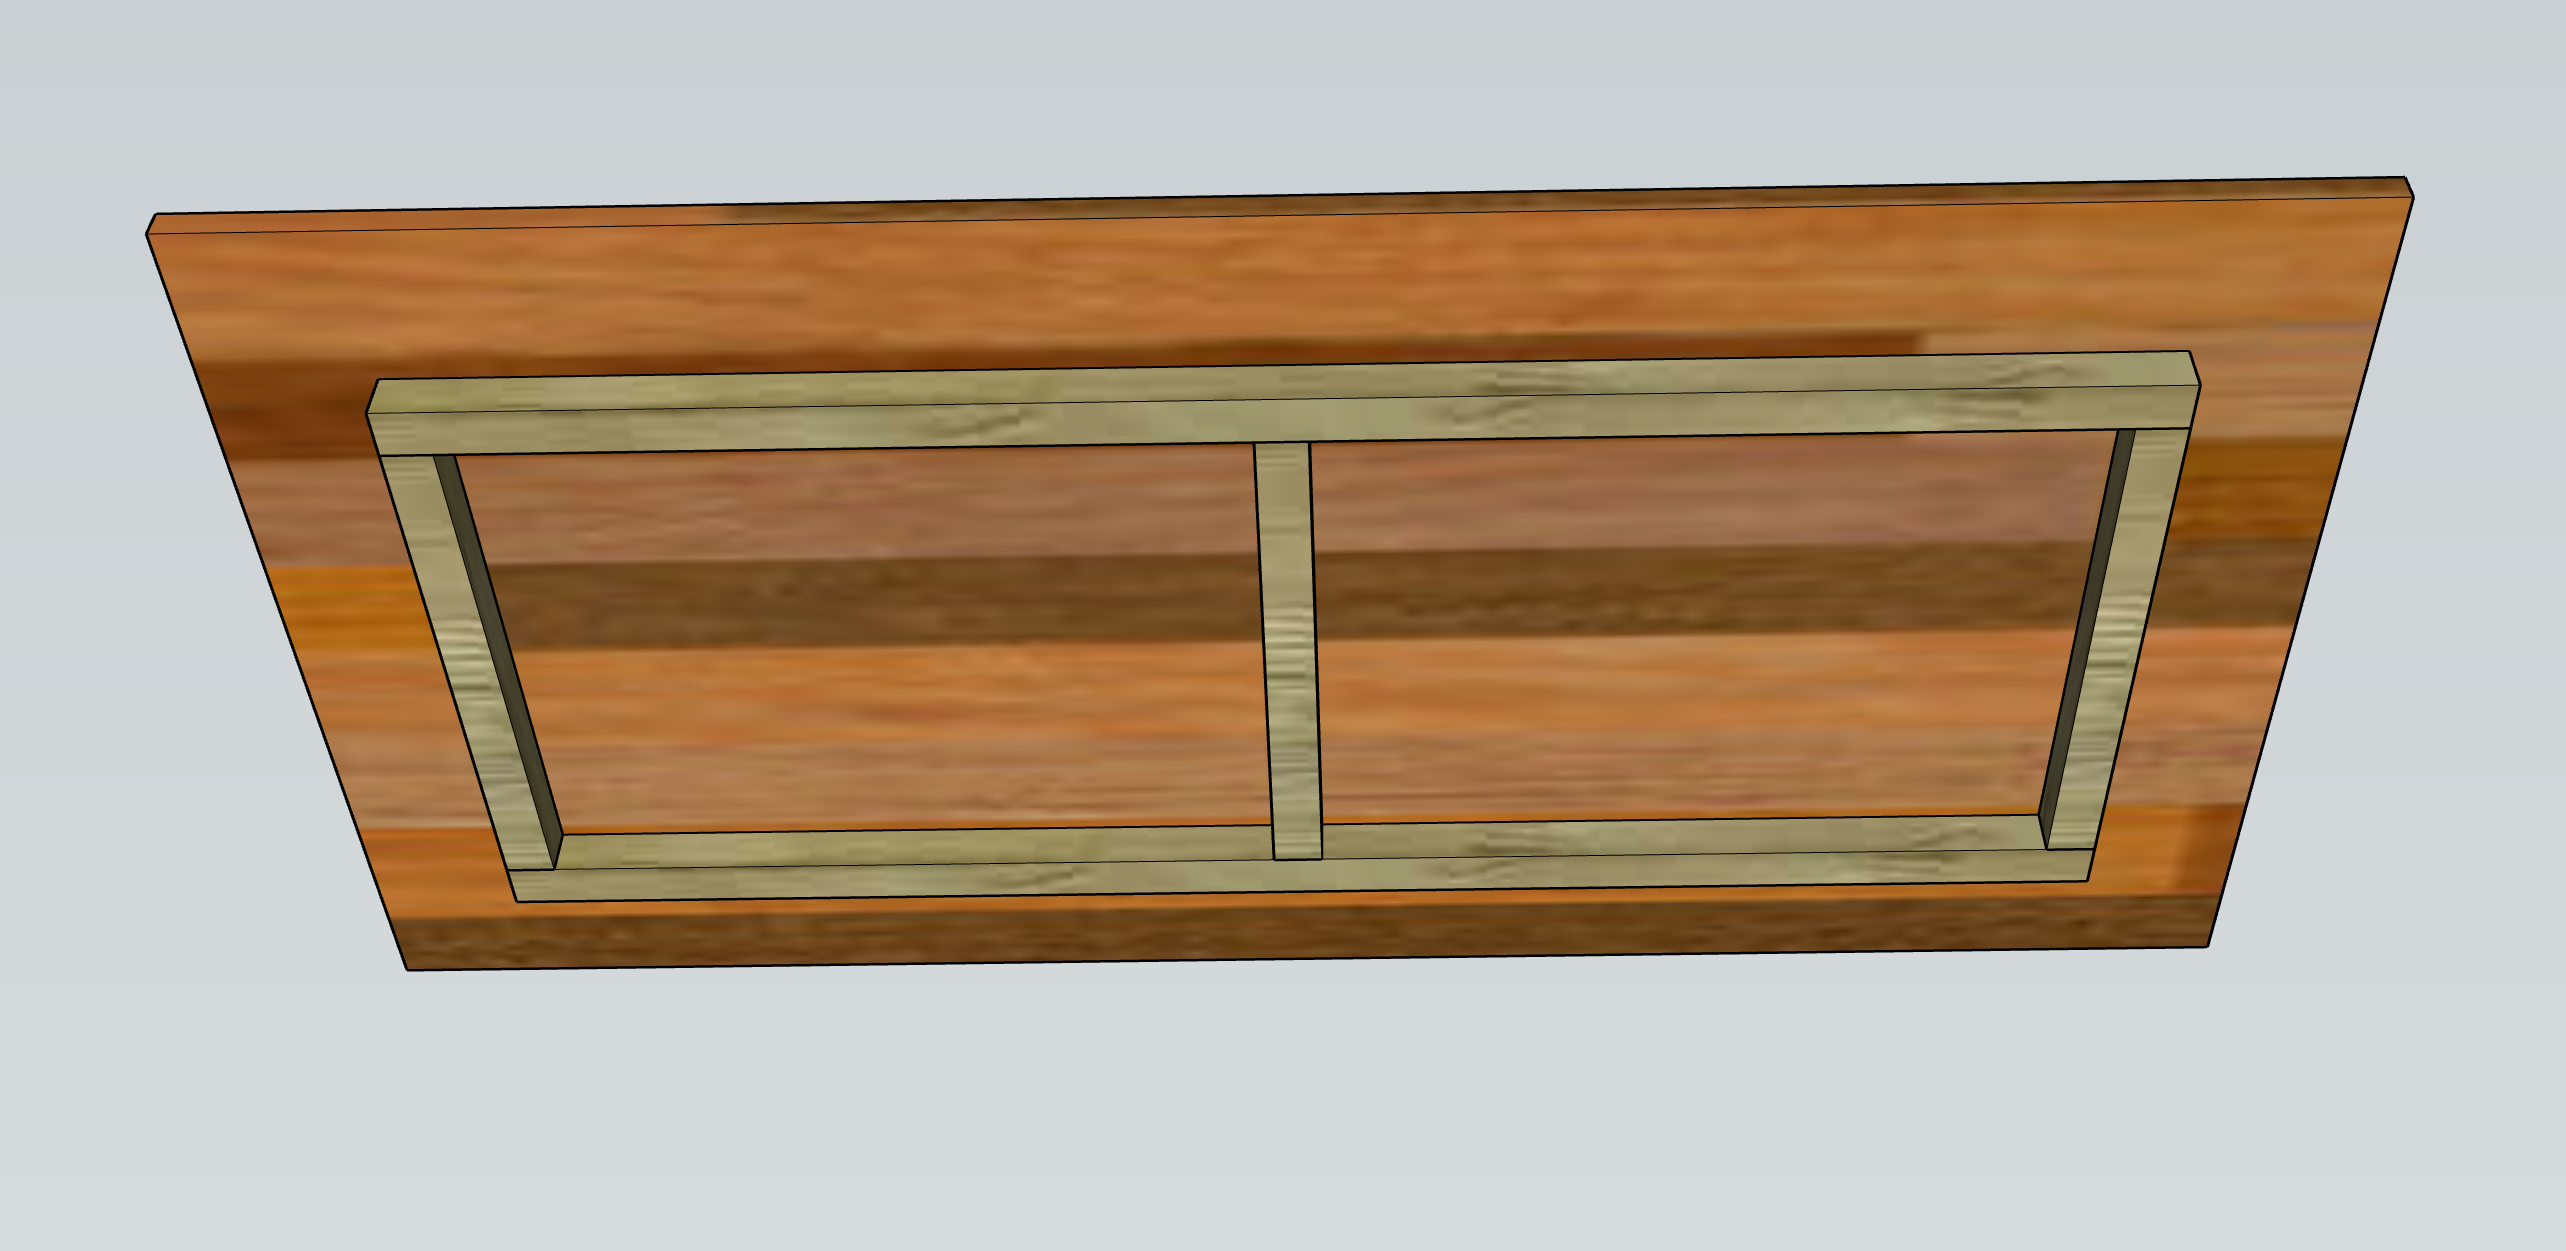
There's not much to it; you'd just measure the distance between the brackets and build the frame so that it comfortably fits between them and extends to around 100mm from the front and back edge. Screw it all together, then screw it to the underside of the panel.
By screwing it together before attaching it, pressure applied to the long piece at the front would be transferred through the screws into the three shorter pieces, which would distribute the load over a wider area and more material.
Let me know what you think and if you have questions, please don't hesitate to ask.
Jacob
- Mark as New
- Bookmark
- Subscribe
- Mute
- Subscribe to RSS Feed
- Highlight
- Report Inappropriate Content
Re: How to attach folding table to brick wall?
Hi @JacobZ
Nice, thank you! That makes a lot of sense.
Once I've done the measurements, would I be able to get the timber cut to spec at Bunnings?
Thanks,
Rob
- Mark as New
- Bookmark
- Subscribe
- Mute
- Subscribe to RSS Feed
- Highlight
- Report Inappropriate Content
Re: How to attach folding table to brick wall?
Hi @CROBBO,
The minimum length we can cut to instore is 600mm, so unfortunately, it would not be possible.
I'd suggest grabbing a Craftright Mitre Box And Saw Set, which will make it easy to cut the timber to size yourself.
Let me know if you have any further questions.
Jacob
- Mark as New
- Bookmark
- Subscribe
- Mute
- Subscribe to RSS Feed
- Highlight
- Report Inappropriate Content
Re: How to attach folding table to brick wall?
Hi @JacobZ
Great, I'll look into it thanks.
Do you think long-term I'll be OK with a bit of flex on the panel? I don't really want to warp it or apply too much pressure on the brackets if that's avoidable.
Thanks,
- Mark as New
- Bookmark
- Subscribe
- Mute
- Subscribe to RSS Feed
- Highlight
- Report Inappropriate Content
Re: How to attach folding table to brick wall?
Hi @CROBBO,
I don't think it is a huge issue as long as it gets folded down when not in use, and you don't put a heap of weight on it. If you left it unfolded for long periods of time, there's a good chance it would sag, so folding it down when not in use would be the best thing you can do in its current state.
Adding that little bit of reinforcement should stop it from sagging, so it's probably the best thing you can do.
Jacob
- Mark as New
- Bookmark
- Subscribe
- Mute
- Subscribe to RSS Feed
- Highlight
- Report Inappropriate Content
Re: How to attach folding table to brick wall?
Thanks so much for the update and very glad our advice helped along the way @CROBBO That bench looks awesome.
I guess you could consider a 3rd bracket if you're finding the sag a little too much. Alternatively you could simply have a removal centre leg to take that weight on projects needing more stability.
One thing I learnt decades ago, is that the accessories that come with DIY powertools are often of a low grade, especially masonry bits. I was given a small box of 6mm masonry bits and would you believe I cooked all of them before drilling one 40mm hole in to solid brick. So, I went down to Bunnings, bought one for about $7 and that same bit lasted me for dozens of future holes. That one you bought will do the same. But it is important to not just lean on them for extended periods causing even the best to over heat. Drill a little bit, pull the bit out to clear the debris and repeat. This will allow the bit to drill faster holes, with less heat build up from the dust its already drilled through.
Nailbag
- Mark as New
- Bookmark
- Subscribe
- Mute
- Subscribe to RSS Feed
- Highlight
- Report Inappropriate Content
Re: How to attach folding table to brick wall?
Hi @JacobZ,
Thanks for the advice and mock-up on reinforcing the bench I put together! It's definitely added the extra stability I was after –


A big lesson for me was drilling pilot holes first. This made connecting the support piece a breeze.
I drilled a screw into the 30x30mm hardwood without pilot holes on a test piece and it split straightaway.
New questions!
So I've added some shelves above the desk that I'm pretty happy with how they turned out.
I got some 1200mm wide timber pieces and stained them with Cabot's water-based interior stain and varnish.

One of the major issues I had attaching the brackets to the brick wall was the time it took per hole and the amount of bits I smouldered to do it!
I was spending up to an hour just drilling a single hole. Throughout I'd cool off the bits in water after a few minutes of continuous drilling and also spray the hole down. I'd read not to apply too much pressure, but I was making so little ground making the 6cm deep holes that I was forced to apply some.
Unfortunately, this would dull the bits quicker making it harder to keep straight lines while drilling. A couple of the brackets ended up wonky because of this.
I figured perhaps the cordless Ryobi drill with hammer function wasn't up the the task, so I went and got this corded Ryobi hammer drill and fresh Full Boar masonry bits after dulling a couple of the Sutton bits. This sped up drilling time a little bit, but seemed most effective when coupled with a fresh drill bit. By the end of a hole, the drill bit had dulled enough to be ineffective for the next hole.
Could someone please let me know if there is advice for drilling holes into brick more efficiently?
Is there a functional difference between the bit I've been using and this one?
I'm planning on adding another shelf opposite the desk on a veneer brick wall attached to the house side of the garage.
The depth of the brick is about 8.5cm to the window frame. Like the previous wall, I'll be drilling holes about 6cm deep to accomodate these anchors & screws.

I found on the previous wall, I'd run into a hollow within the brick about 4-5cm deep. Is this standard for my type of brick?
Before drilling these new 6cm holes on the house side, would it be safe to assume that I wont be at risk of drilling through the brick and into any electrical wires etc?
Thanks!
- Mark as New
- Bookmark
- Subscribe
- Mute
- Subscribe to RSS Feed
- Highlight
- Report Inappropriate Content
Re: How to attach folding table to brick wall?
Hi @CROBBO,
Yes, the value of pilot holes becomes pretty evident the first time you attempt to drive a screw into something and split your workpiece in half. I'm glad that the reinforcement helped out.
Standard hammer drills will get there eventually, but they are noticeably slower and harder on bits compared to a proper rotary hammer drill like the corded unit you picked up. What you experienced with drilling time and bit wear lines up with that.
Fresh masonry bits always perform best, so it is normal to notice a big drop off by the end of a hole if they have been put under considerable strain. Brick also tends to be harsher on drill bits when compared with concrete or besser blocks, as kiln firing them creates an extremely strong outer surface that will heat up and wear down the bit considerably. The steps you are taking to cool the drill bit are good. The only other thing I could recommend is starting with a smaller masonry bit, for example, 4mm, to drill an initial hole, then follow up with the larger 8mm bit. Having less material to punch through makes the strain on the bit considerably less, so doing it in two stages will reduce wear and you'll likely find that it is faster.
Functionally, the Full Boar 8mm TCT Masonry Drill Bit and the Full Boar 8mm x 160mm 4 Cut Tip for SDS-Plus Hammers do the same thing, but there are two main differences.
A 4-cut masonry bit spreads impact across four cutting edges, which keeps the bit more stable, drills straighter, and reduces chipping compared to a 2-cut tip. It also wears more evenly, so it stays effective for longer in hard materials like brick.
The other difference is that the 4-cut bit is an SDS-plus bit, which is designed to lock into an SDS (slotted drive system) chuck, which is a quick-change bit holder on many rotary hammer drills. The SDS system is specifically designed to efficiently transfer the percussive force into the drill bit and then into the wall. Unfortunately, your new Ryobi drill uses a standard 3-pronged chuck, not an SDS chuck, so this benefit is lost if it were used in your drill.
Yes, house bricks will usually have hollows in them, so this is to be expected. Electrical cables are not run through the hollows in your brick, so as long as you are not drilling more than 110mm, which is the standard width of a house brick, then there is no risk of running into electrical cables.
I hope this helps to clarify things. Please let me know if you have any further questions.
Jacob
- Mark as New
- Bookmark
- Subscribe
- Mute
- Subscribe to RSS Feed
- Highlight
- Report Inappropriate Content
Re: How to attach folding table to brick wall?
Hi @JacobZ,
Thanks so much for answering my questions – big help!
Would it still be possible to fit an SDS drill bit in the 3-pronged chuck of the Ryobi drill I picked up? May be worth a try vs the 2-cut bit I've been using.
Cheers,
Why join the Bunnings Workshop community?
Workshop is a friendly place to learn, get ideas and find inspiration for your home improvement projects
You might also like


We would love to help with your project.
Join the Bunnings Workshop community today to ask questions and get advice.